3D Render Engines for iClone: Choosing The Best

José Tijerín is a digital illustrator and 3D sculptor, as well as creator of the upcoming game Dear Althea for Steam.
In the following tutorial, José shares how he uses Character Creator and iClone to get fantastic results in Omniverse, Unreal Engine 5, and Maya V-Ray render engines. He compares the results and gives his personal opinions on each one of them. This tutorial will help users discover new possibilities for showcasing their 3D sculpt and animation work.
Watch the video below, or continue reading for excerpt highlights of José’s Reallusion tutorial.
Comparison of Omniverse, UE 5, and V-Ray for 3D Real-time Animation
The Three Different Render Modes in Omniverse
The Omniverse render modes are very impressive. Go to the top of the viewport to find the lightbulb symbol. Clicking on it will show the three types of rendering that Omniverse has to offer.
- RTX Real-Time corresponds more or less to traditional lighting in video games.
- RTX Path-Traced is in my opinion the strong point of the program.
- Iray Photoreal has great accuracy, but can be slow and computationally heavy.
One of the main differences between the rendering modes is the rendering time. For my project, the scene is complex in terms of lighting and textures, so to avoid noise in the video the render times are quite long compared to the incredible speed that Omniverse usually offers.

The RTX Path Traced result is excellent with rendering speed so fast and of such high quality that you can work on the project while rendering without a problem. This gives you the possibility to tweak the scene without having to wait for the render to update; something that can speed up the production by a lot.

Iray Photoreal is NVIDIA’s bid to become one of the major rendering engines for the big screen. Compared to other industry-standard render engines, it does have some small shader problems in certain situations. However, judging by the color transmission present in some scene details, it tends to give better results than other modes and can be quite impressive for some scenes.

As you may have noticed, unlike the other modes, the rendering of translucent material does not work by default. To make it work, go to the Iray menu to locate Render Settings and find the Caustic Sampler option. When activated the result is quite impressive, even for a very simple scene.

Render with RTX Path-Traced
However, given the complexity of the operations to be performed to achieve this result, the time required for this mode to completely remove noise and achieve high definition is very time-consuming compared to the other modes. I recommend choosing the intermediate mode for good, responsive results.
Now that we have chosen a render mode, let’s see how to go about rendering a scene. Go to the Render Settings menu to find the Path Tracing rendering menu. Inside, there are two important sections: Path-Tracing and Denoising. To explain these parameters we are going to render a complicated material like the pre-defined material for honey.


In the first section, we find the Total Samples per Pixel parameter. The higher the number, the greater the number of samples and the higher the quality, but at the cost of longer render times.
The second section is the Denoiser, a system that many 3D programs have been using for some years now. This system detects the noisy areas in the render and softens them. However, you have to bear in mind that the more samples you have to work with, the better the results will be.
Now that we have the basics set up, let’s render the animation by going to the Rendering menu and in the drop-down menu open the Movie Capture menu. In this window, we can configure parameters such as frame rate and resolution. Select the option to Use Current (RTX Path Traced) and set the number of samples per pixel. When done, assign a destination folder for the output images and hit the Capture Sequence button.
The final result is quite good and we have obtained it in a very short amount of time compared to traditional renders.
Detailed Comparison of Three Render Engines
Omniverse delivers decent results, but does not distribute the light as well as in the previous case. However, if we use Omniverse’s photo-realistic render, the result is quite good. As for Unreal, some tricks and effects are needed to improve the result.

Continuing with the comparisons, it is clear that an issue is the time taken to render each frame with pixel noise removed. Thanks to V-Ray’s default Denoiser, this only takes 18 minutes. It has to be said that this not only affects the final result but also the workflow. When working on 3D scenes, it is really useful to see the results in real-time. This can help us to spot errors, save time checking how the render is coming along, or even allow us to be more creative.

As for fluid simulations, apart from Unreal which only uses particle effects, both Maya and Omniverse give great results. However, in my opinion, the winning edge goes to Omniverse because it allows you to edit the simulations in an accurate, intuitive, and hassle-free manner.

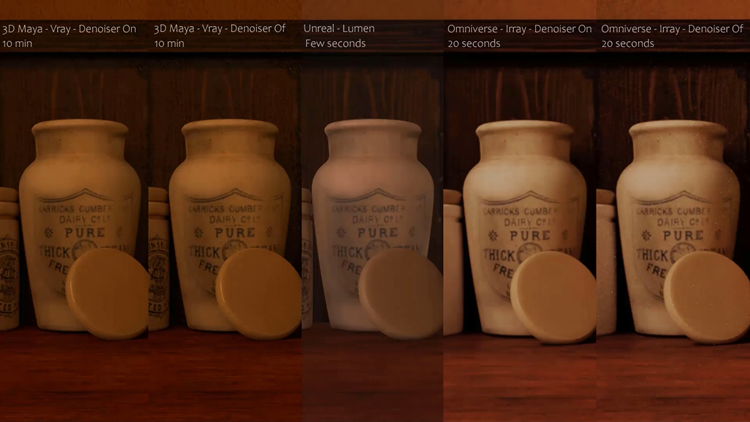
We can also compare the performance of the denoiser in the different renders. In this case we also have to leave Unreal aside, because Lumen uses a completely different system. In this detail of a larger 4K render we can clearly see how both V-Ray and Omniverse denoiser does an excellent job.
Without de-noise, V-Ray renders still hold up with a more polished result and less noticeable noise, yet in Omniverse, the noise becomes less uniform and is noticeable in the overall image. Omniverse gives the best result when Denoiser is enabled across all renderers. It has to be said that the 10 minutes it takes for V-Ray to render the scene is a big hit to its advantage in this department compared to Omniverse’s near instantaneous solution.
Want to find out more? Read the full tutorial on Reallusion Magazine. It includes detailed steps on how to use iClone with Omniverse, Unreal 5 and V-Ray, in-depth comparisons of results, and José’s insights on these different engines.
Visit Reallusion and learn more about 3D animation software iClone. Find José Tijerín’s We’re Besties content pack on Reallusion’s content store, and add to your Steam wishlist José’s upcoming game Dear Althea.