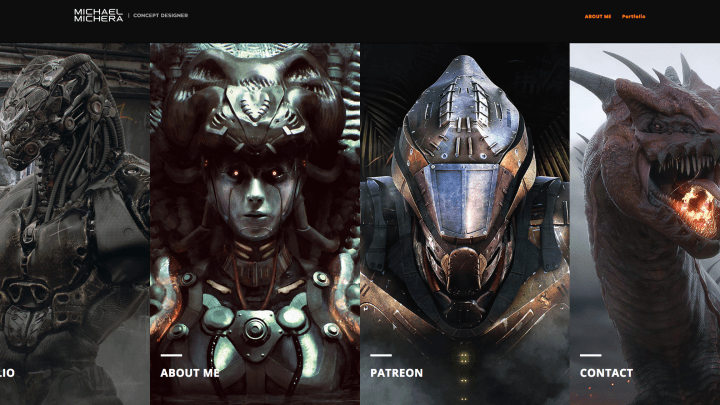
Keos Masons: Interview & Tutorials

Keos Masons is a character modeling and concept design company in the video-game, movie and collectible industry founded by artists Marco Plouffe and Cédric Séaut.
How did you first begin to be interested to work in 3D?
Ced: There was an incredible highway of new ideas, media and international artistic content during my childhood. I grew up with many comic books from the US, Europe and Japan, at the same times it was the beginning of video games and I spent all my free time watching movies at the cinema. Art has always been engraved in my heart and soul, but Jurassic Park and other similar movies released during that period really blew my mind and helped to push me forward into 3D.
Marco: I’ve been a fan of video games my whole life… and I still am. I remember drawing my own Megaman bosses non-stop. From a young age, I knew I wanted to marry my love for video games and art. Drawing for the video game industry felt like the right match, it felt just right! Although, when I was faced with choosing a career at school, I could not find a school for video games in or nearby my hometown so I felt like I needed to adjust my career plans and head into the computer sciences instead.
After 3 years of technical studies and 3 years working for the government as an IT, I lacked a sense of accomplishment and this brought me close to a depression. After a lot of reflection, I came to the conclusion that in order to be happy I needed to reorient my career towards what I really wanted to do when I was a kid. I sold my house, my car and moved to Montreal to begin my studies in 3D art. Within the first few days at school, I already knew I was in the right place. I remember the first time I touched ZBrush, I flipped out! It felt so right and I knew that it was what I wanted to do for the rest of my life!
Were there any particular tutorials that you found useful as you began to learn? Or are you formally educated?
Ced: I wish!! But actually no… I started 3D at the real beginning of the internet, way before we could see VFX in movies and real 3D graphics in games. It was nearly impossible to find tutorials except in books as thick as bricks, and they generally explained functions that came from older version of the software because it took so much time to gather the data and print them out.
It was the same situation in terms of education, there weren’t many schools and the few that existed were mainly 2D programs. It was even harder because at school they encouraged us to follow a different path due to the fact that 3D jobs were just emerging, they were misunderstood and difficult to learn. But that being said, it was my Passion (with a capital “P”) and my dedication to working hard (alone in my small, student apartment) that continued to drive me for many years.
Marco: The school I went to was called Campus Ubisoft – Collège de Matane. It was a 1-year program, meant to quickly form artists who would be hired by Ubisoft and other studios in Montreal. They only did it for 5 years and I was chosen on the final year, so you could say I lucked out by sliding under that closing door! My studies focused on modeling in general (characters, props, levels) and despite it being a hard and competitive domain, I decided to put most of my energy into character design.
Even if the classes were excellent, I knew I needed to continue studying after school if I wanted to excel in character design specifically, so I followed a few tutorials available at that time: anatomy, things like from Zack Petroc and Scott Eaton, but also general character modeling from Gnomon Workshop or various others… it’s hard to tell because I watched so many! Sometimes I would just play them in the background as I worked. Let’s just say that during my time at school, I learned equally as much simply by watching video tutorials related to character design. Also, I drank a lot of coffee and didn’t get much sleep (although I don’t recommend this).
Today however, I can honestly say that I appreciate the challenges throughout my education because they brought me to a place where I am comfortable with my skills as a Character Artist and they also prepared me to become Art Director and Project Manager for Keos Masons.

How did you two meet each other? Do you feel this kind of collaboration can spur on projects that otherwise might not happen with just a single person working in isolation?
Ced: I met Marco right after my second job in Montreal, at THQ. He was the perfect nerdy representation of Broly from Dragon Ball Z, you can’t just ignore that, when you see someone like that.
I do think that working in collaboration makes a huge difference when it’s time to work on personal projects. Collaboration, sharing, comparison, criticism is really important to push forward and generate ideas. It gives life and maturity for both the project and the artists. Looking back, I’m proud to say that this experience has made me better for many reasons and on many aspects.
Marco: Cedric arrived at THQ a few weeks after I got the job, my first job as a Character Artist. I already knew him from his online portfolio and a few good things I heard about him from others. I think we just connected from the start. I thought he was a pretty cool dude and he was very active in wanting to help and also challenge me.
Honestly, he still mentors me to this day so our collaborations within our company is something I’m very happy about! I’m not saying I would’ve been a bad artist if I was in isolation but without a doubt every artist that I’ve ever met in my career have all inspired and taught me something to make me the artist I am today. Therefore, my identity as an artist is formed primarily by a core, layered by everything I’ve learn from Cedric and my fellow art buddies!
Do you both tend to gravitate towards the same subject matter or feel that you are different in the type of genre that usually appeals to each of you?
Ced: My personal opinion is that we are both the same and also different. It’s hard to keep working and collaborate for many years with someone if you don’t at least share the same values. And on the other hand, for sure we have our own personality and style, and the most important thing is that we have a deep respect for each other’s work and artistic affinity. On my side I love trying to copy Marco’s style and convince people that he did it! But I fail all the time…
Marco: I think Cedric pretty much nailed it. The worst is that I also try to copy him sometimes and feel that I’m failing! But I think failing at it simply creates something new, a new style or twist. I think there’s something to learn here: co-existing with an artist happens because of shared skills and values, but also complementary ones as well. I am constantly absorbing the things I love about his style, but also there are parts of me that don’t change anymore which I believe define my artistic core. I think it’s a perfect mix of staying true to yourself and always learning and evolving.
 Project Breakdown
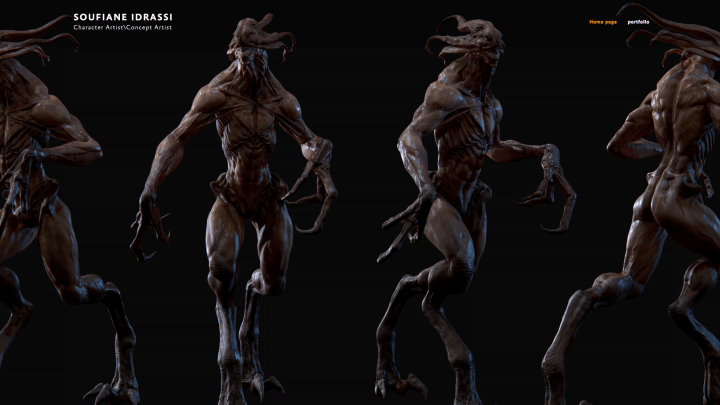
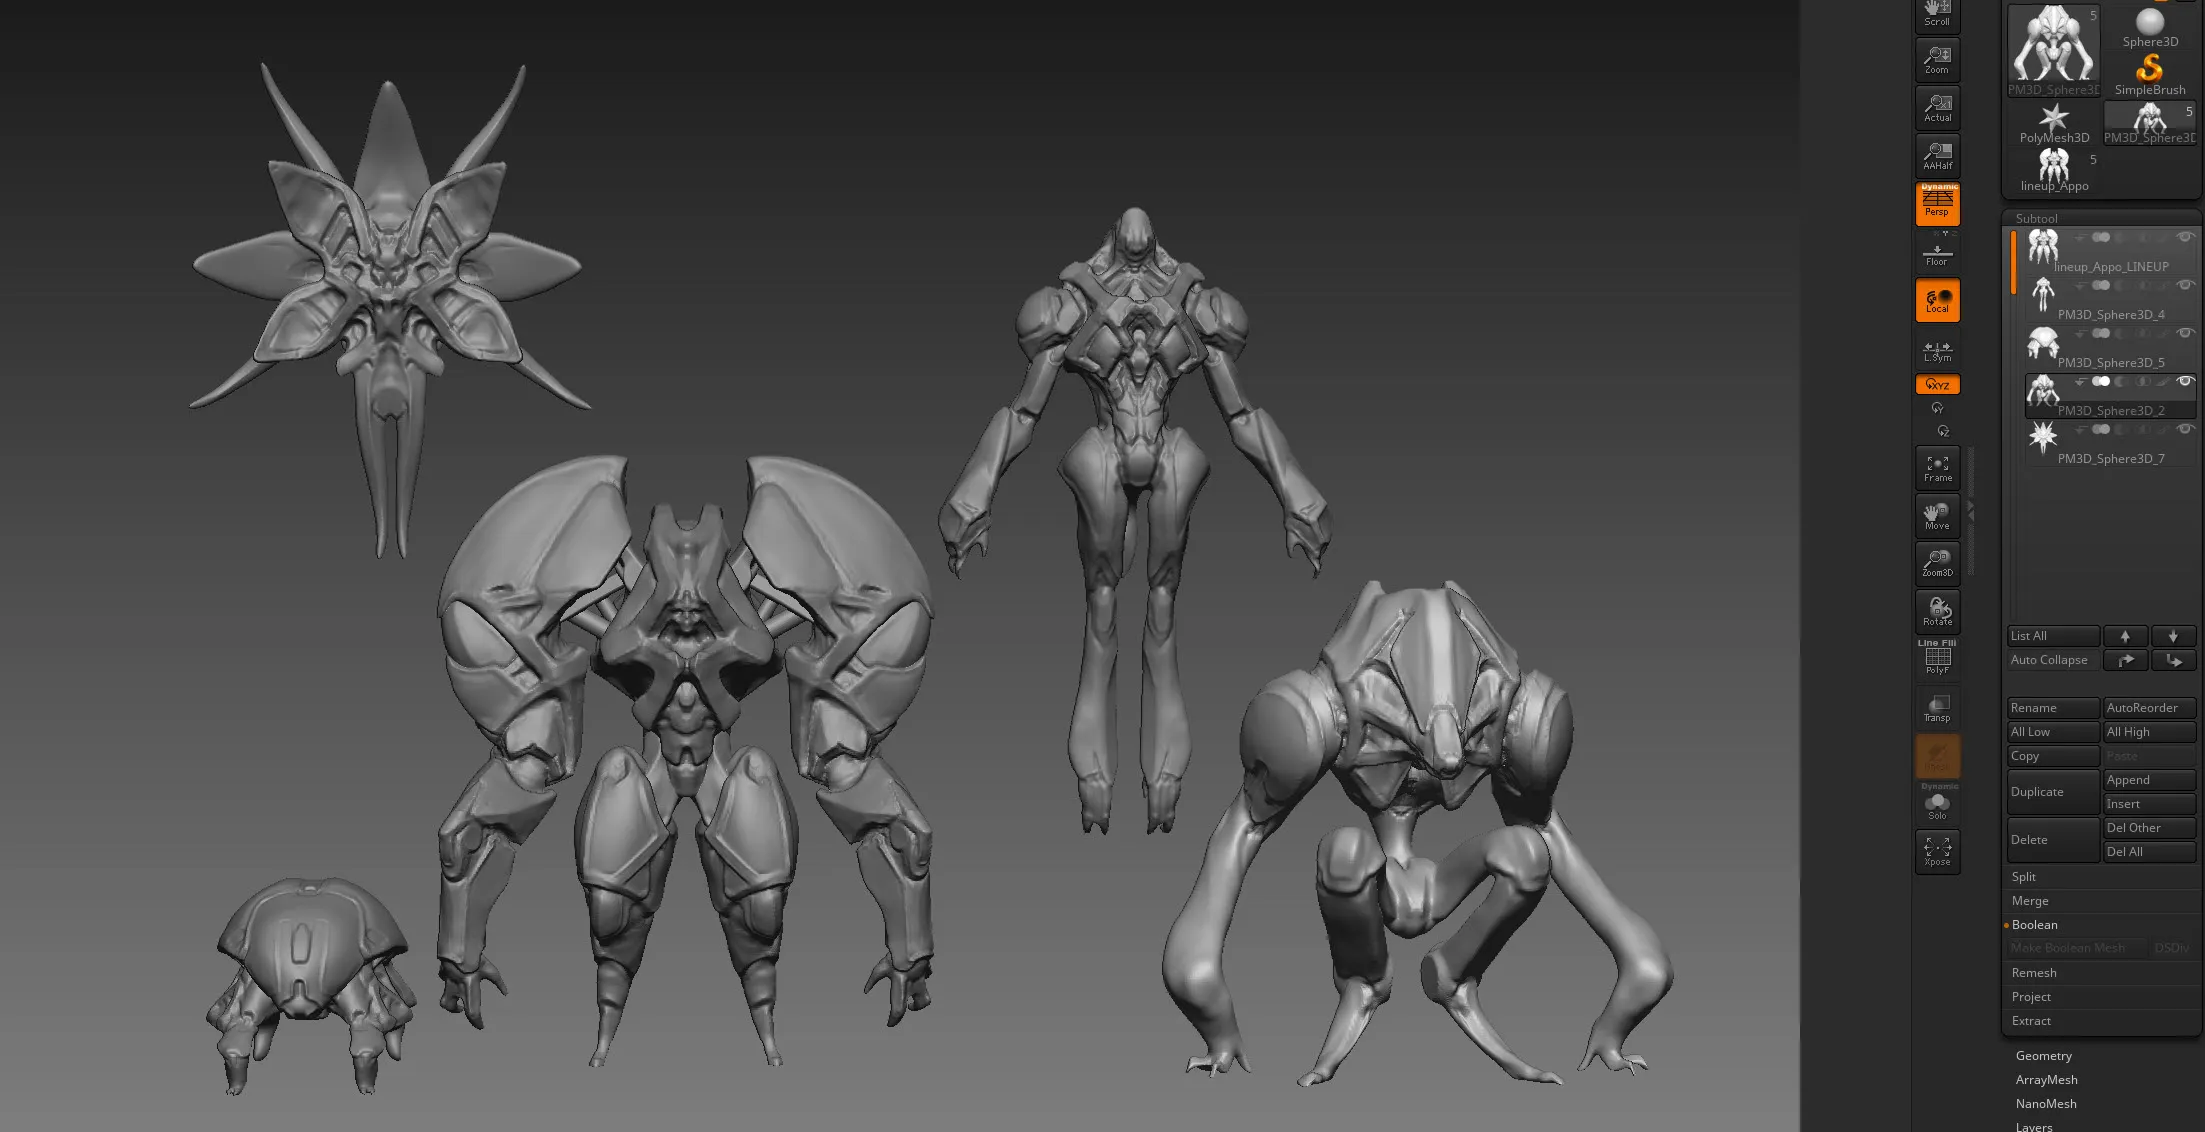
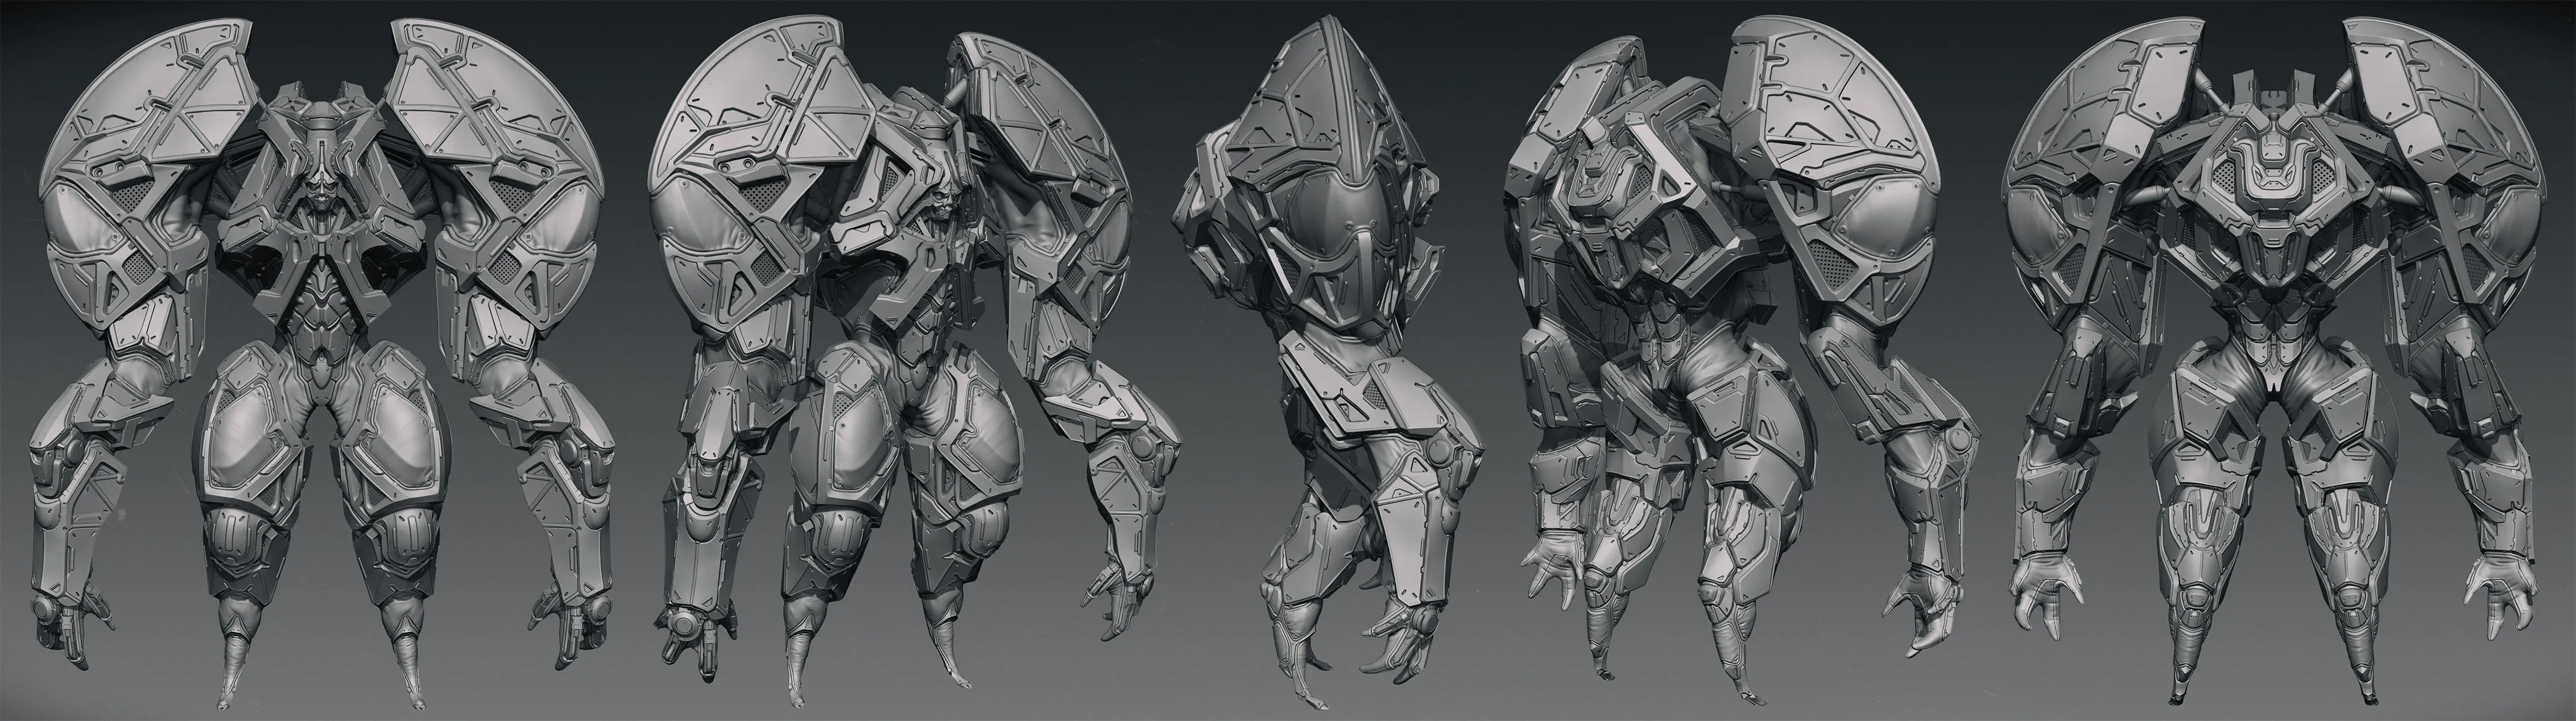
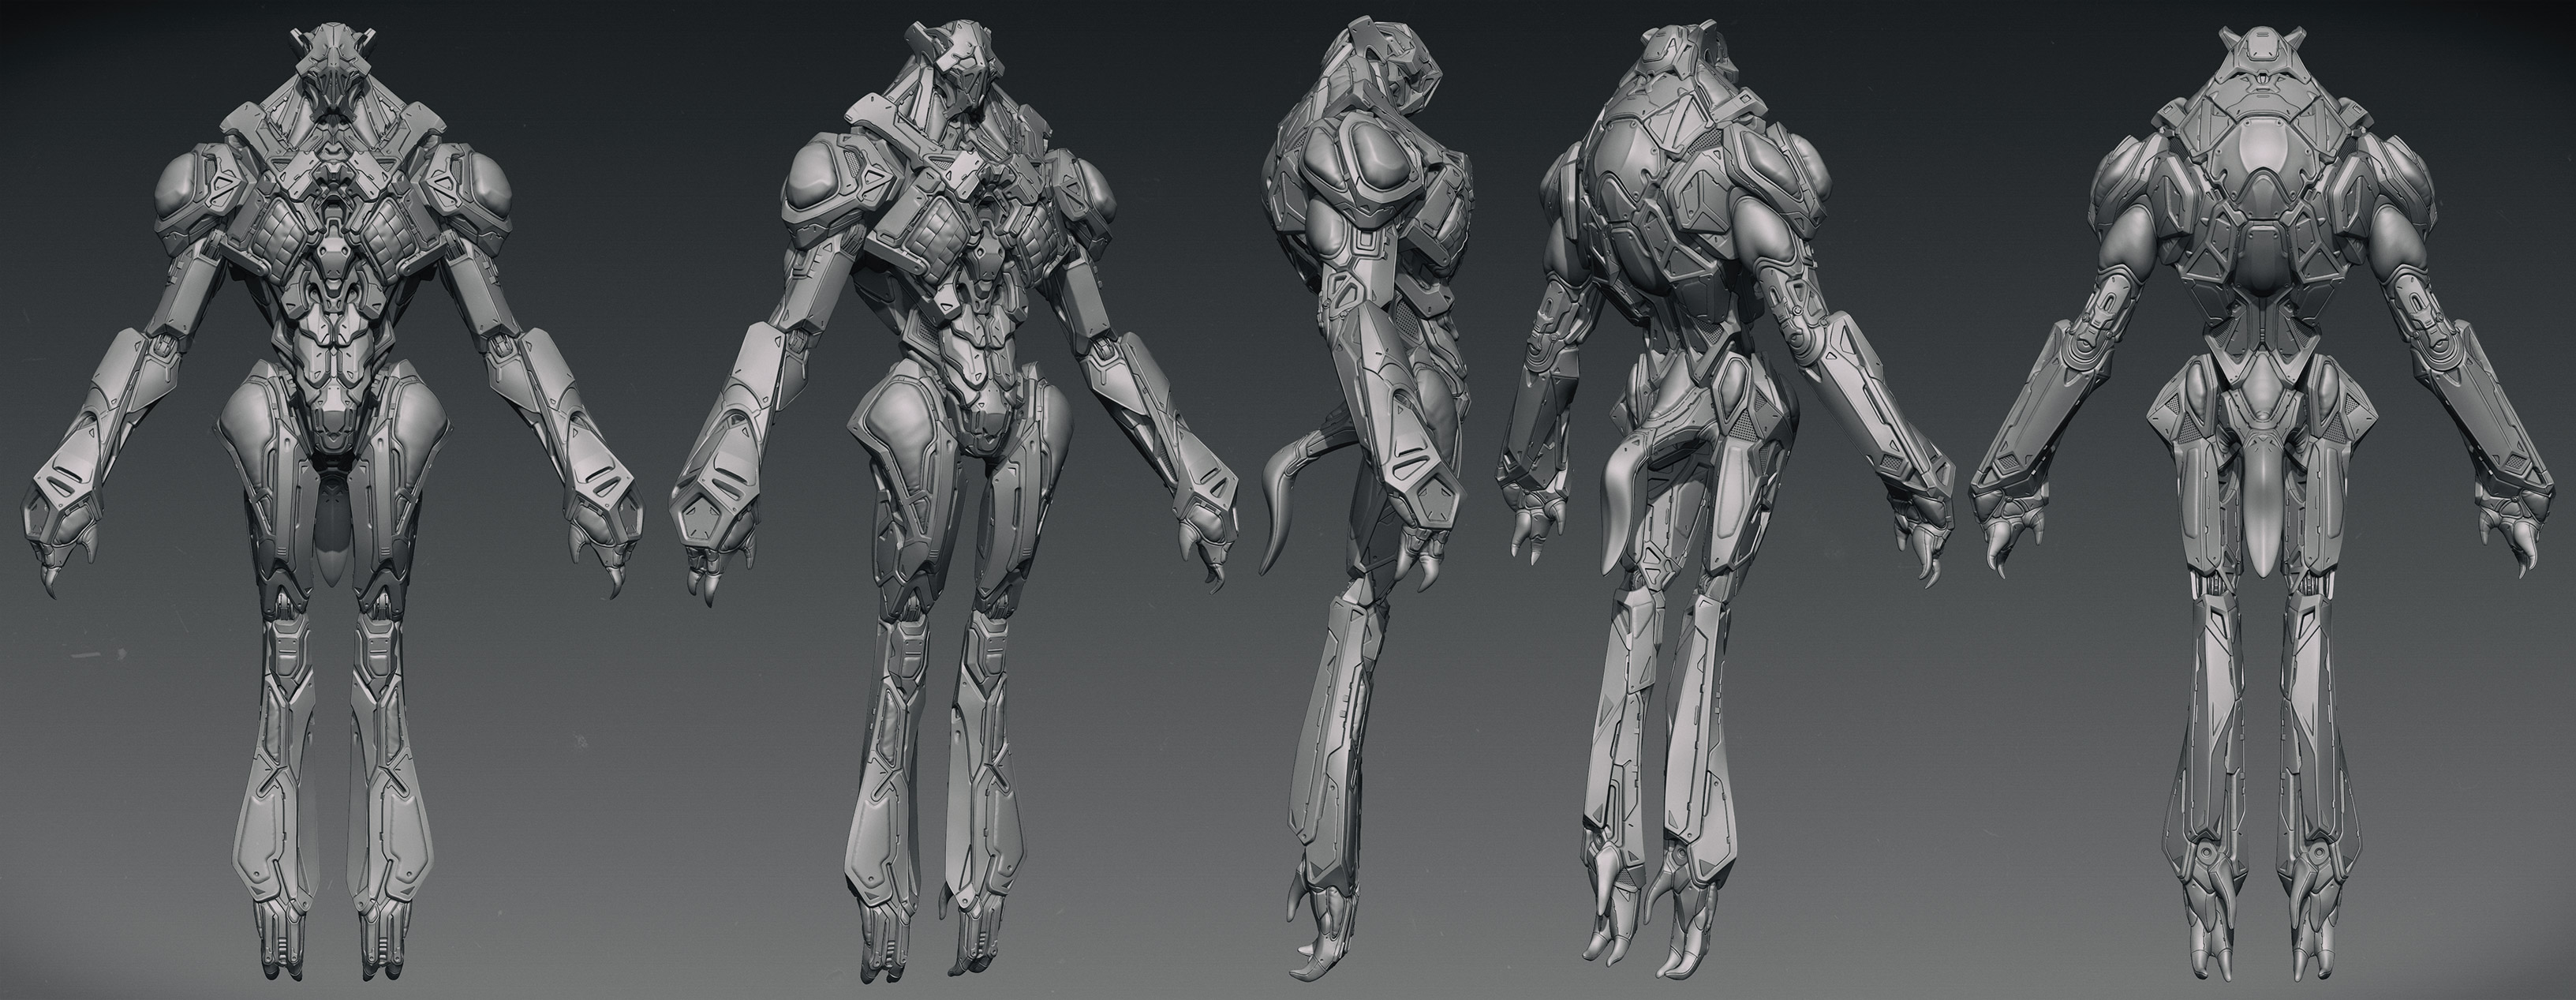
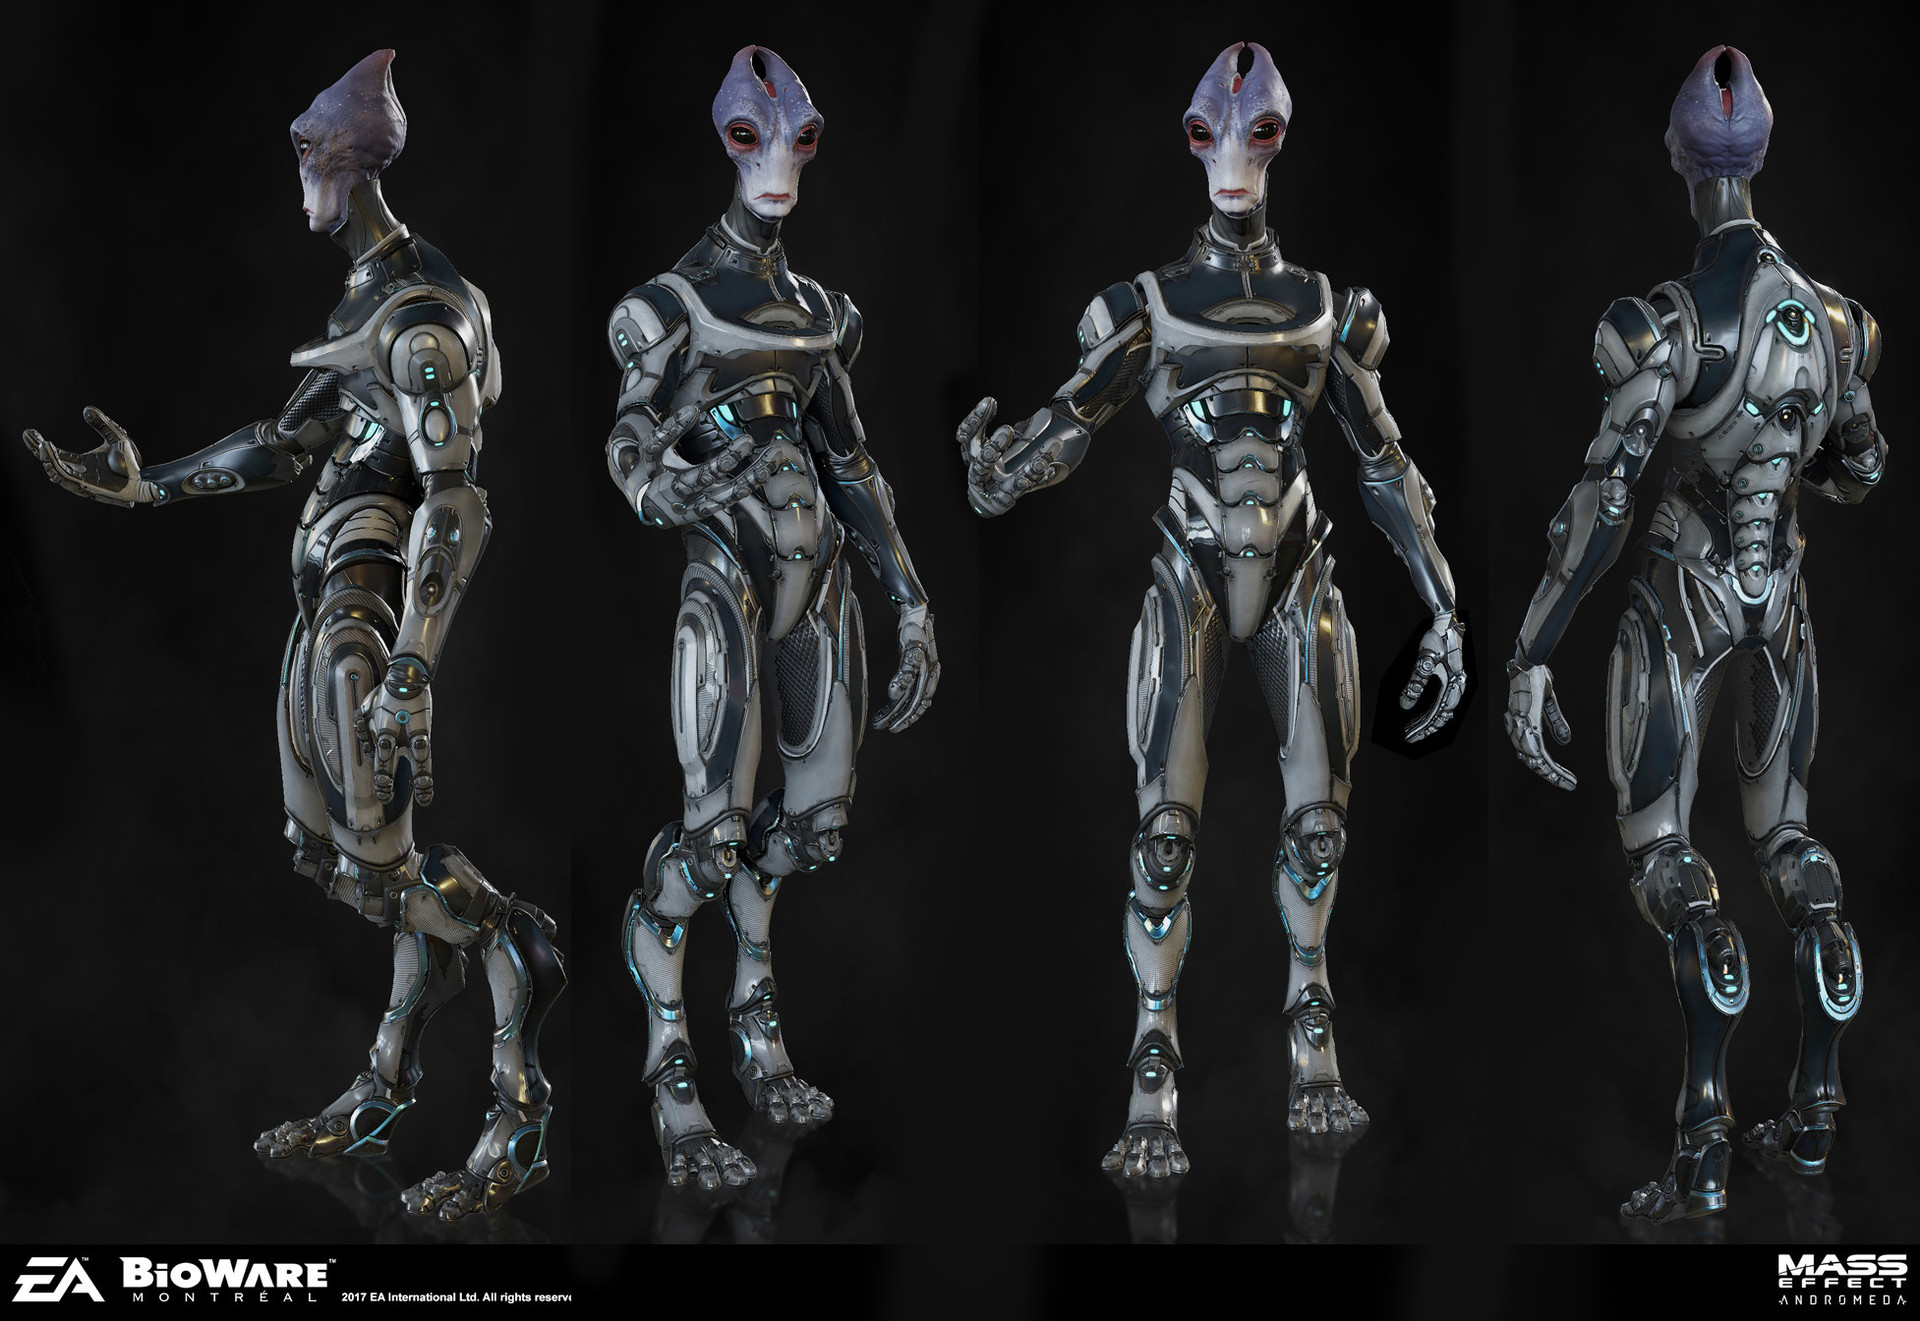
Ced: On my side, it’s all about doing several characters at the same time, it’s the only one way that came naturally to me to have fun, cultivate ideas and not get bored too fast. The good thing is that it usually serves the production well in terms of diversity and content.
1- I work on many characters without any details, all in the same ZTool, switching continuously between each other by using the arrow keys on the keyboard. My rules are, switch when you get bored and do them really different from each other in terms of silhouette and shapes. Preferably, keep the same art direction.
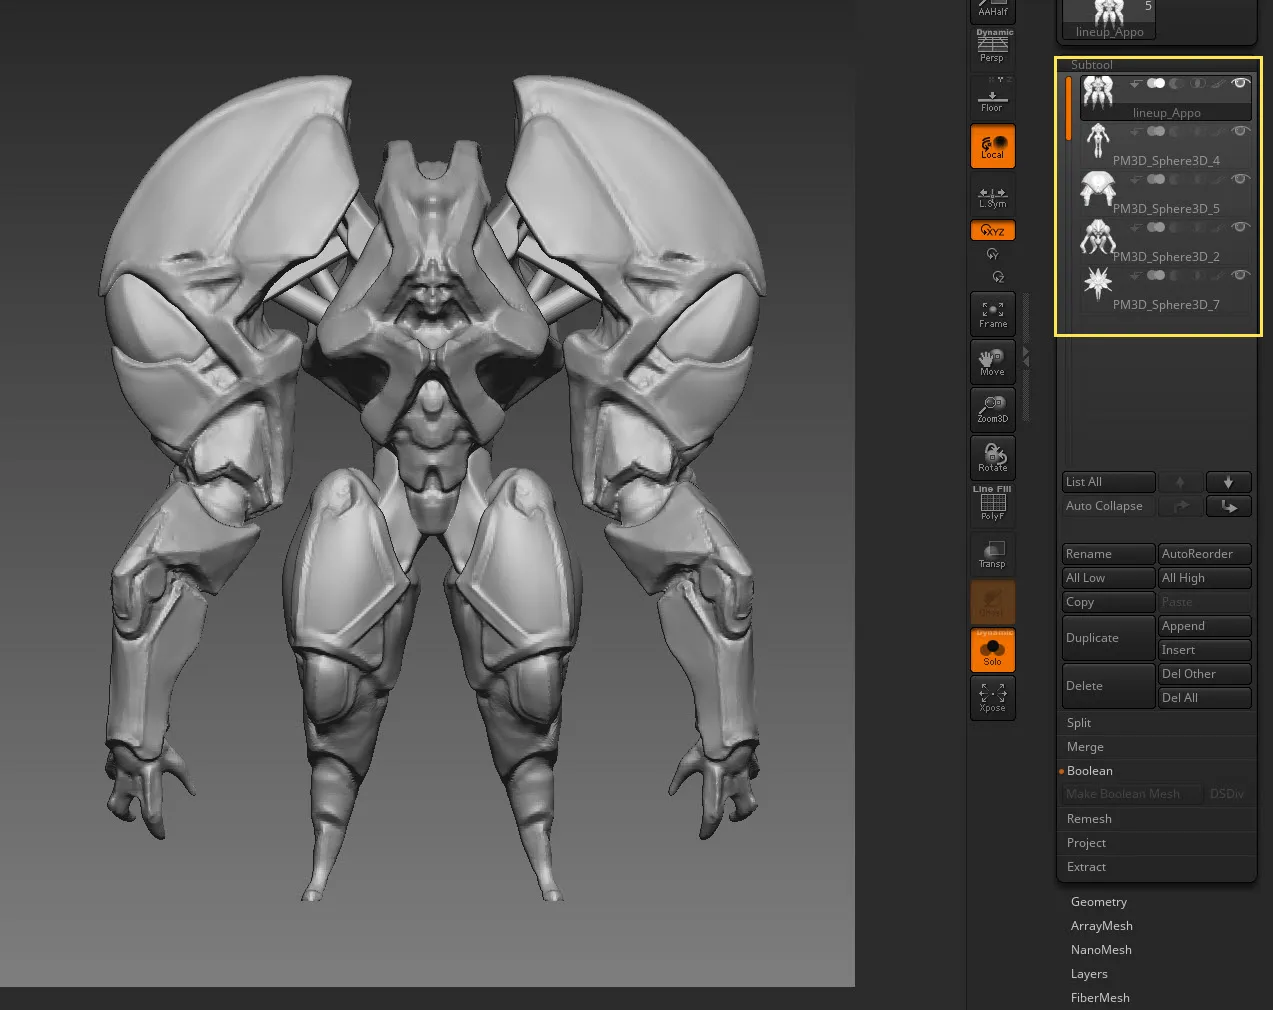
2- Then, I line them up to compare, adapt the scale and shape individually, if needed (in local symmetry). It’s important at this step to bring an individual personality to each one.
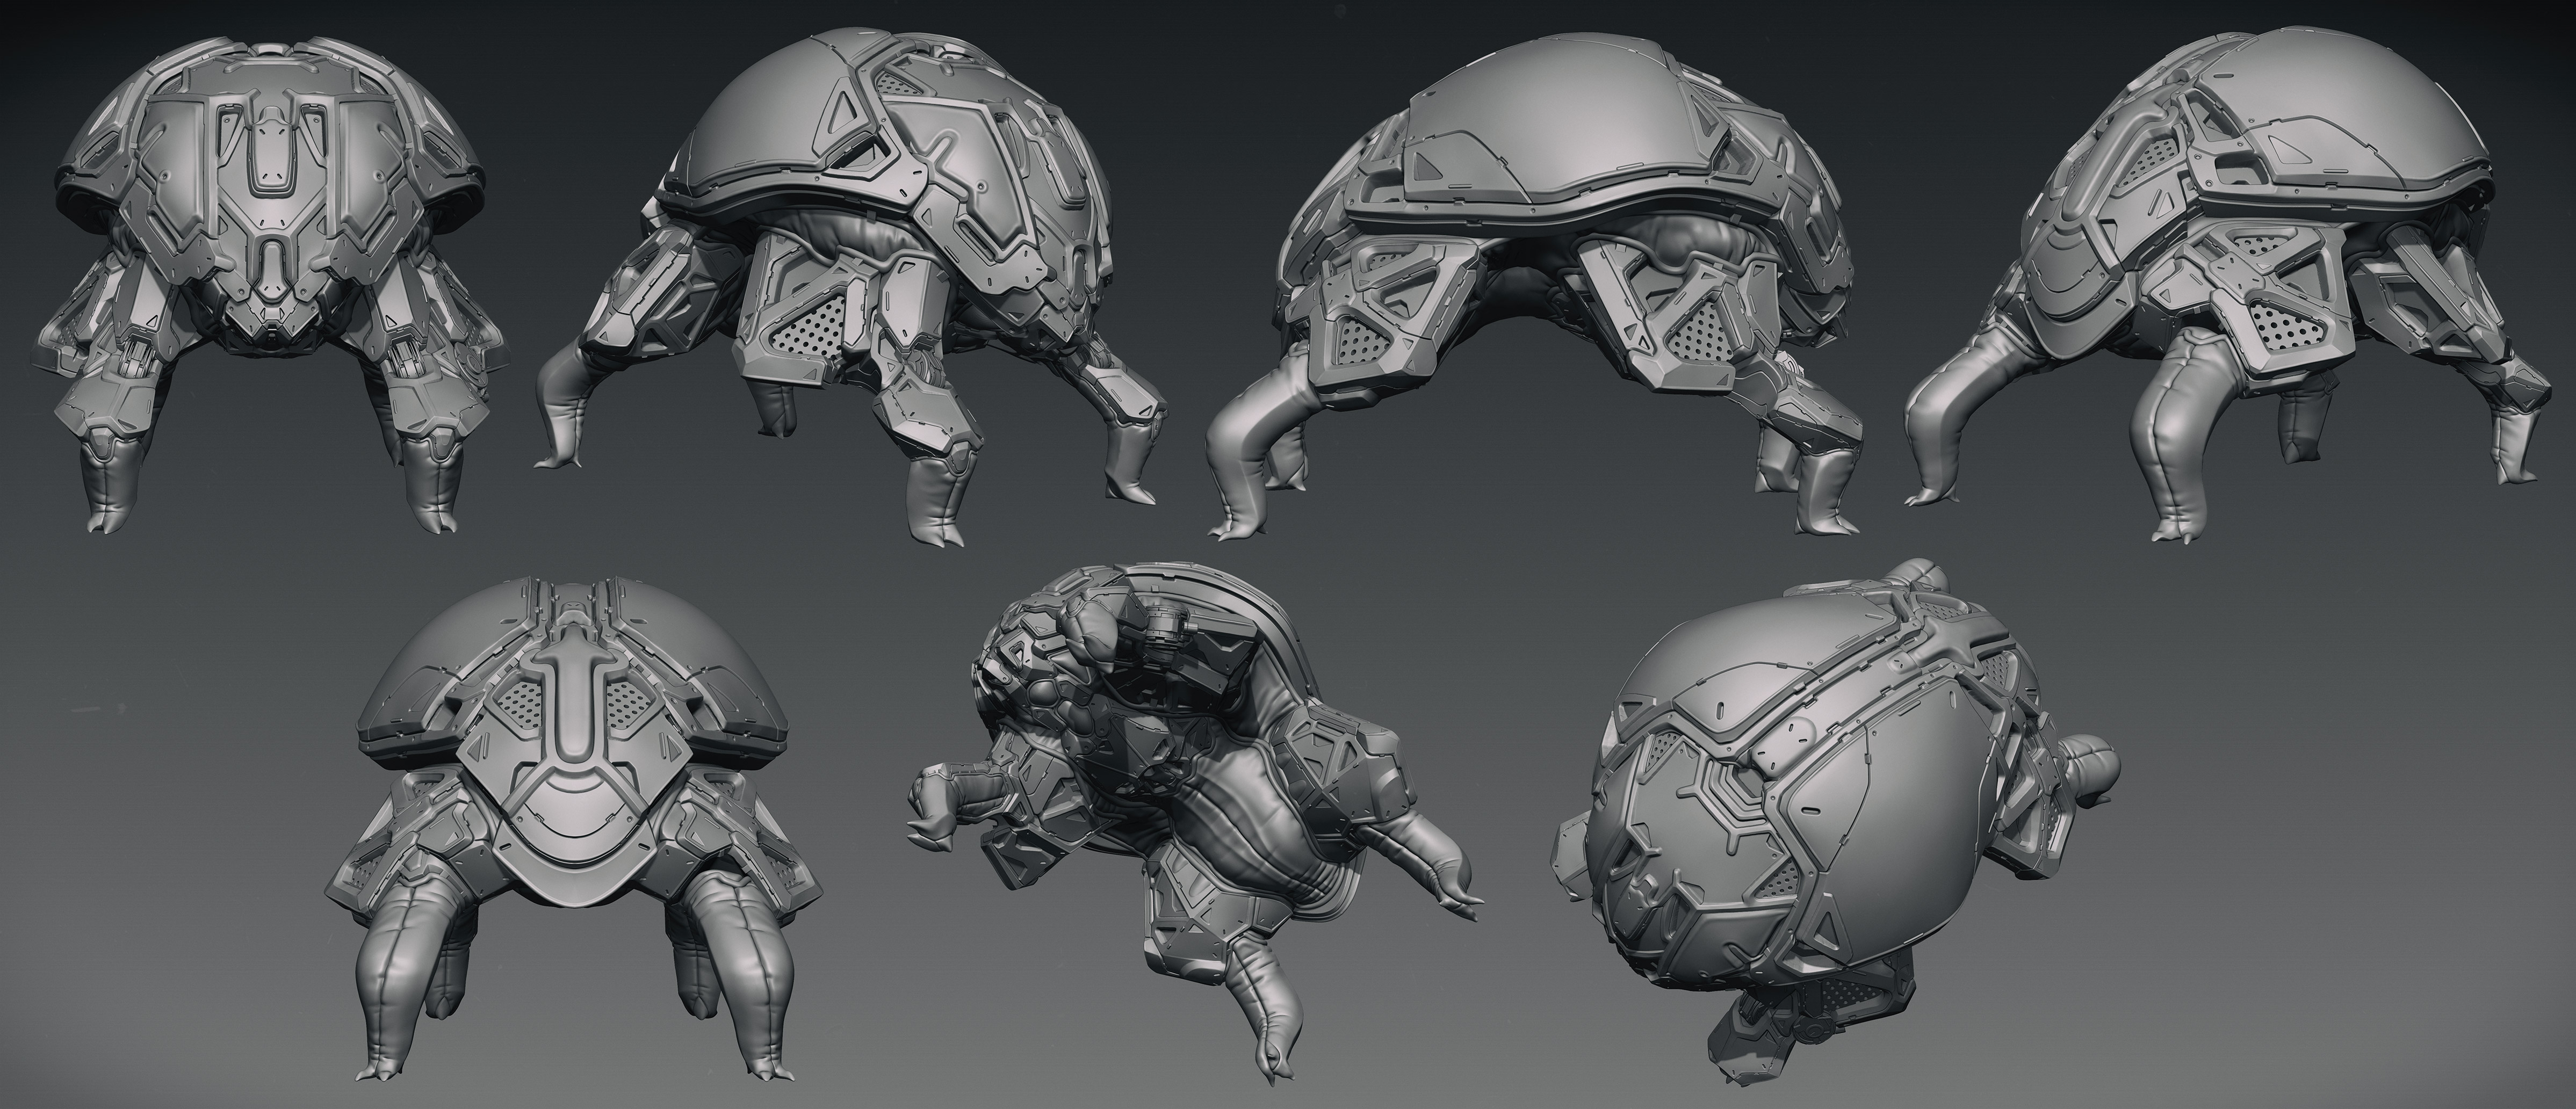
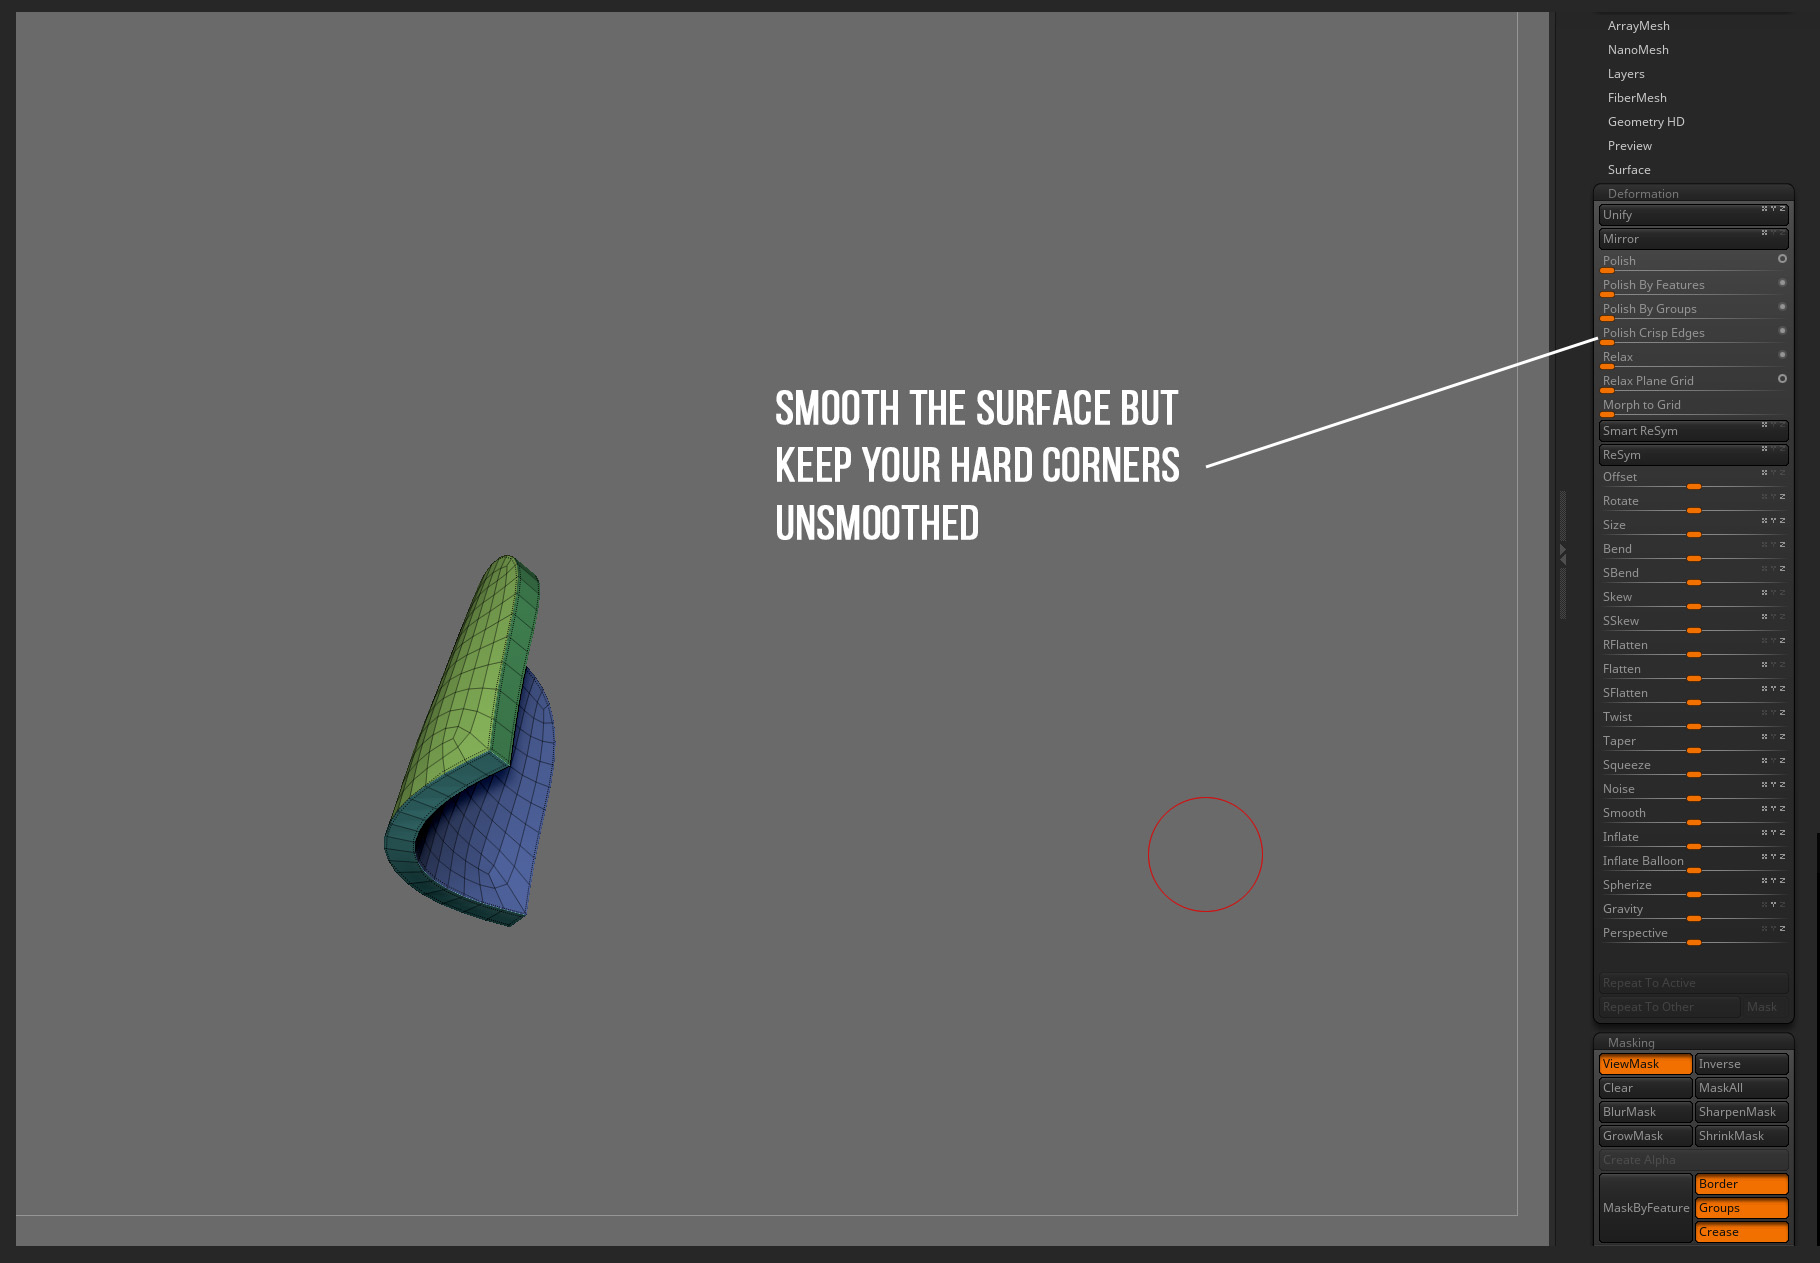
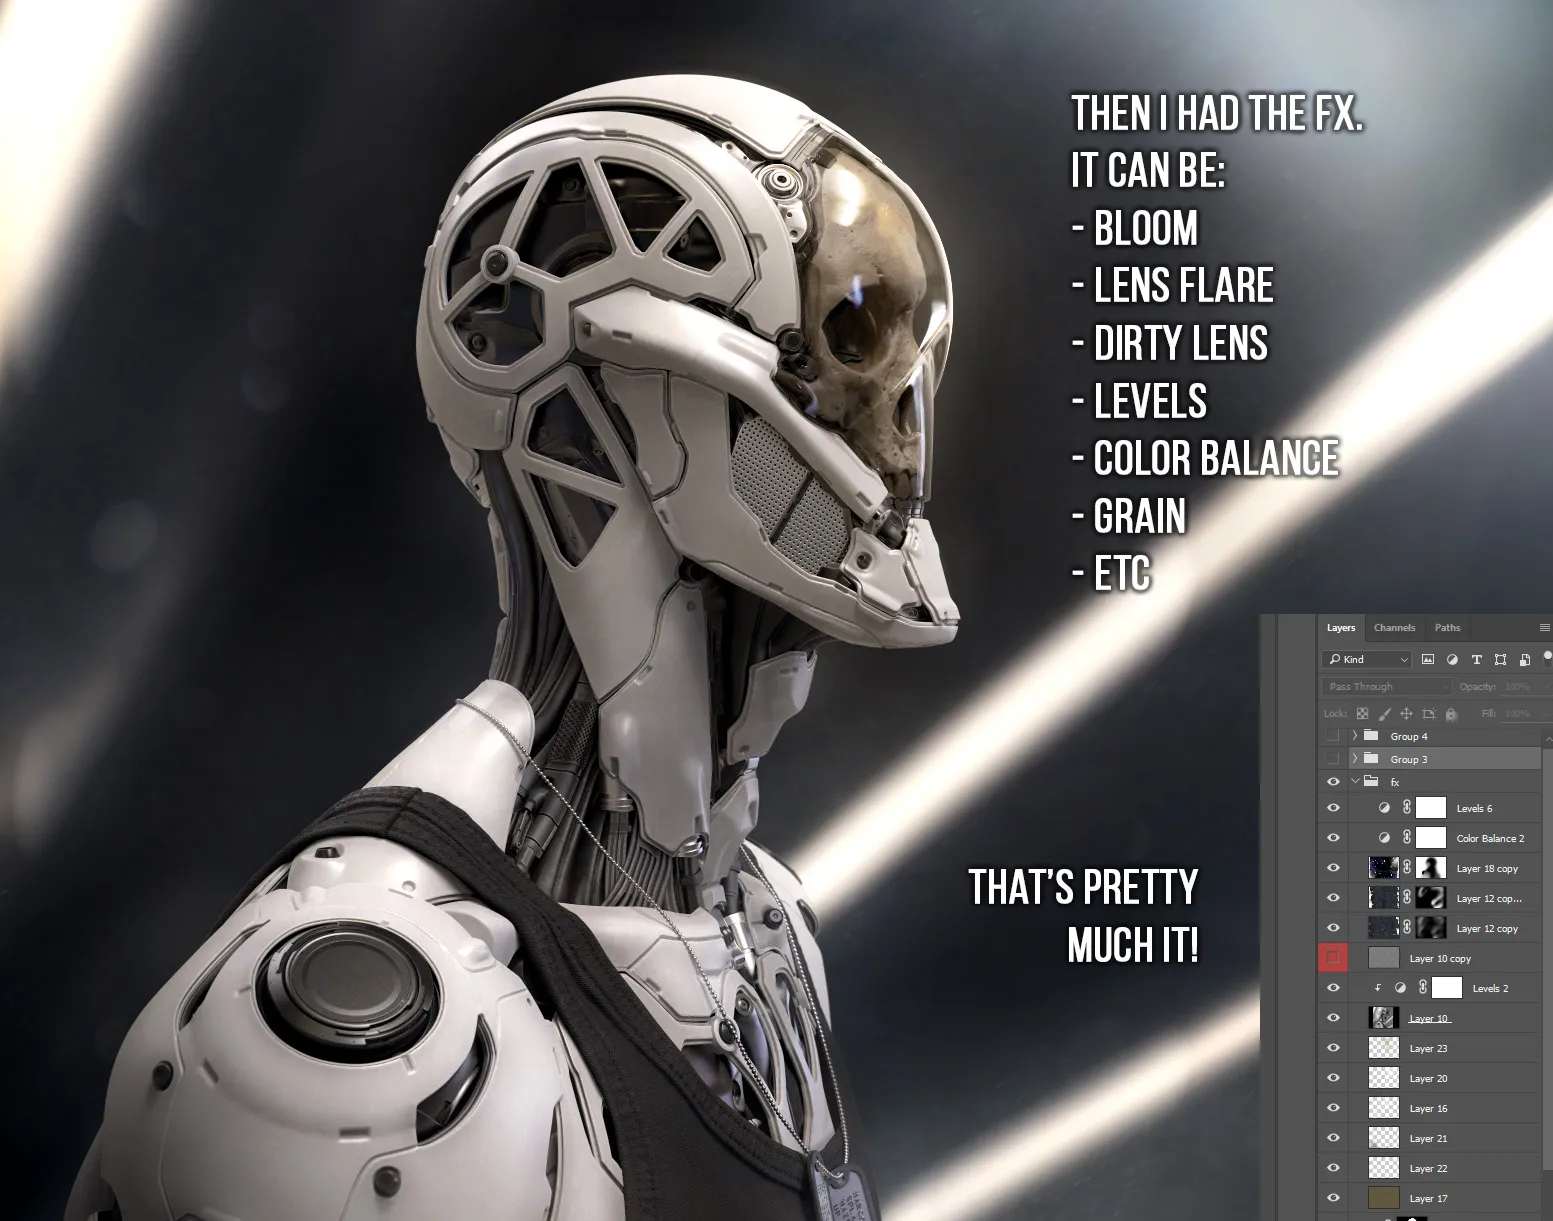
3- Polish: It’s time to turn off your brain and go in machine mode! Years of doing highly polished characters for the video game industry (either on organic or mechanical characters) came in handy for getting the treatment of the elements just right.


4- Texturing: There are many ways to present your concept, it depends on your affinity and knowledge. I personally love to experiment new and interesting solutions to get something fast and good. For this set of characters, I decided to try something totally different and used Substance Painter.
A- Breakdown of the character in several pieces.
 B- Decimation for each of them (between 70k and 100k (vertex)).
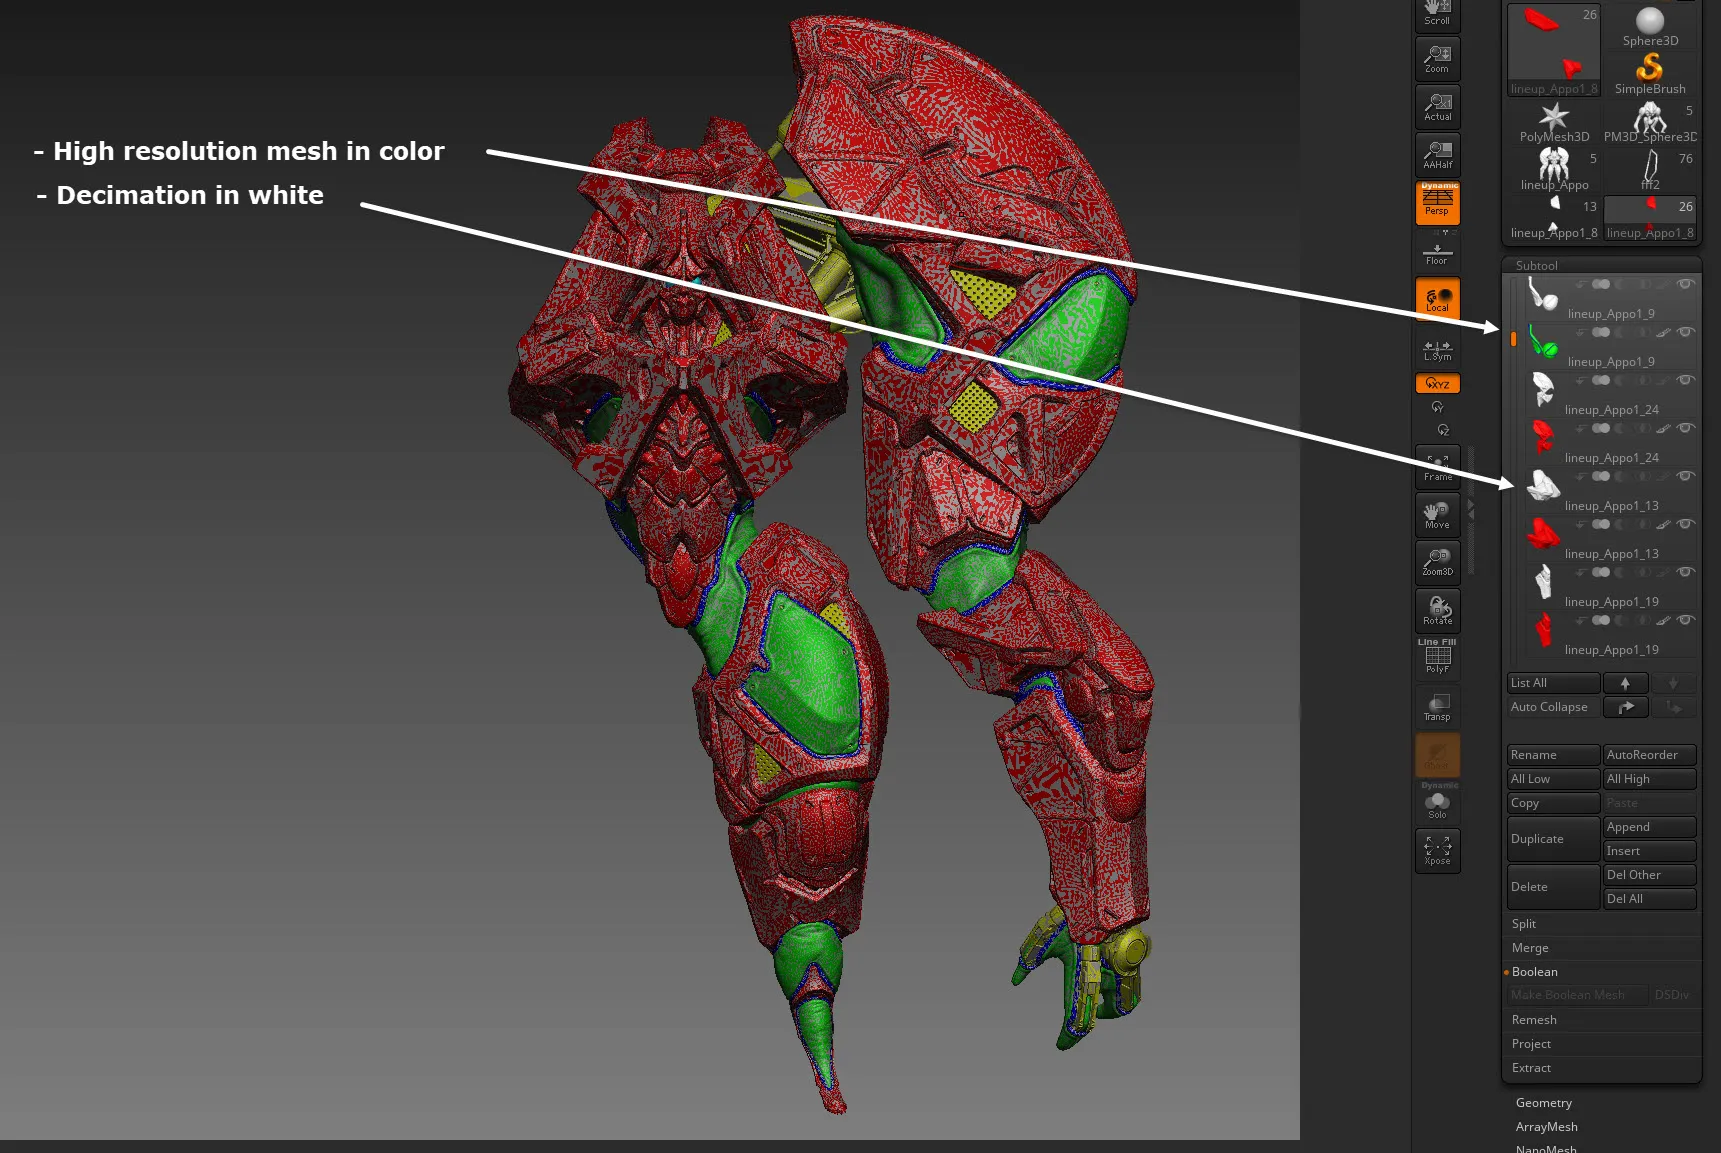 C- Automatic UVs done with Unwrella (you can try UVMaster too, but it can be buggy sometimes and you don’t want to break your flow too much).
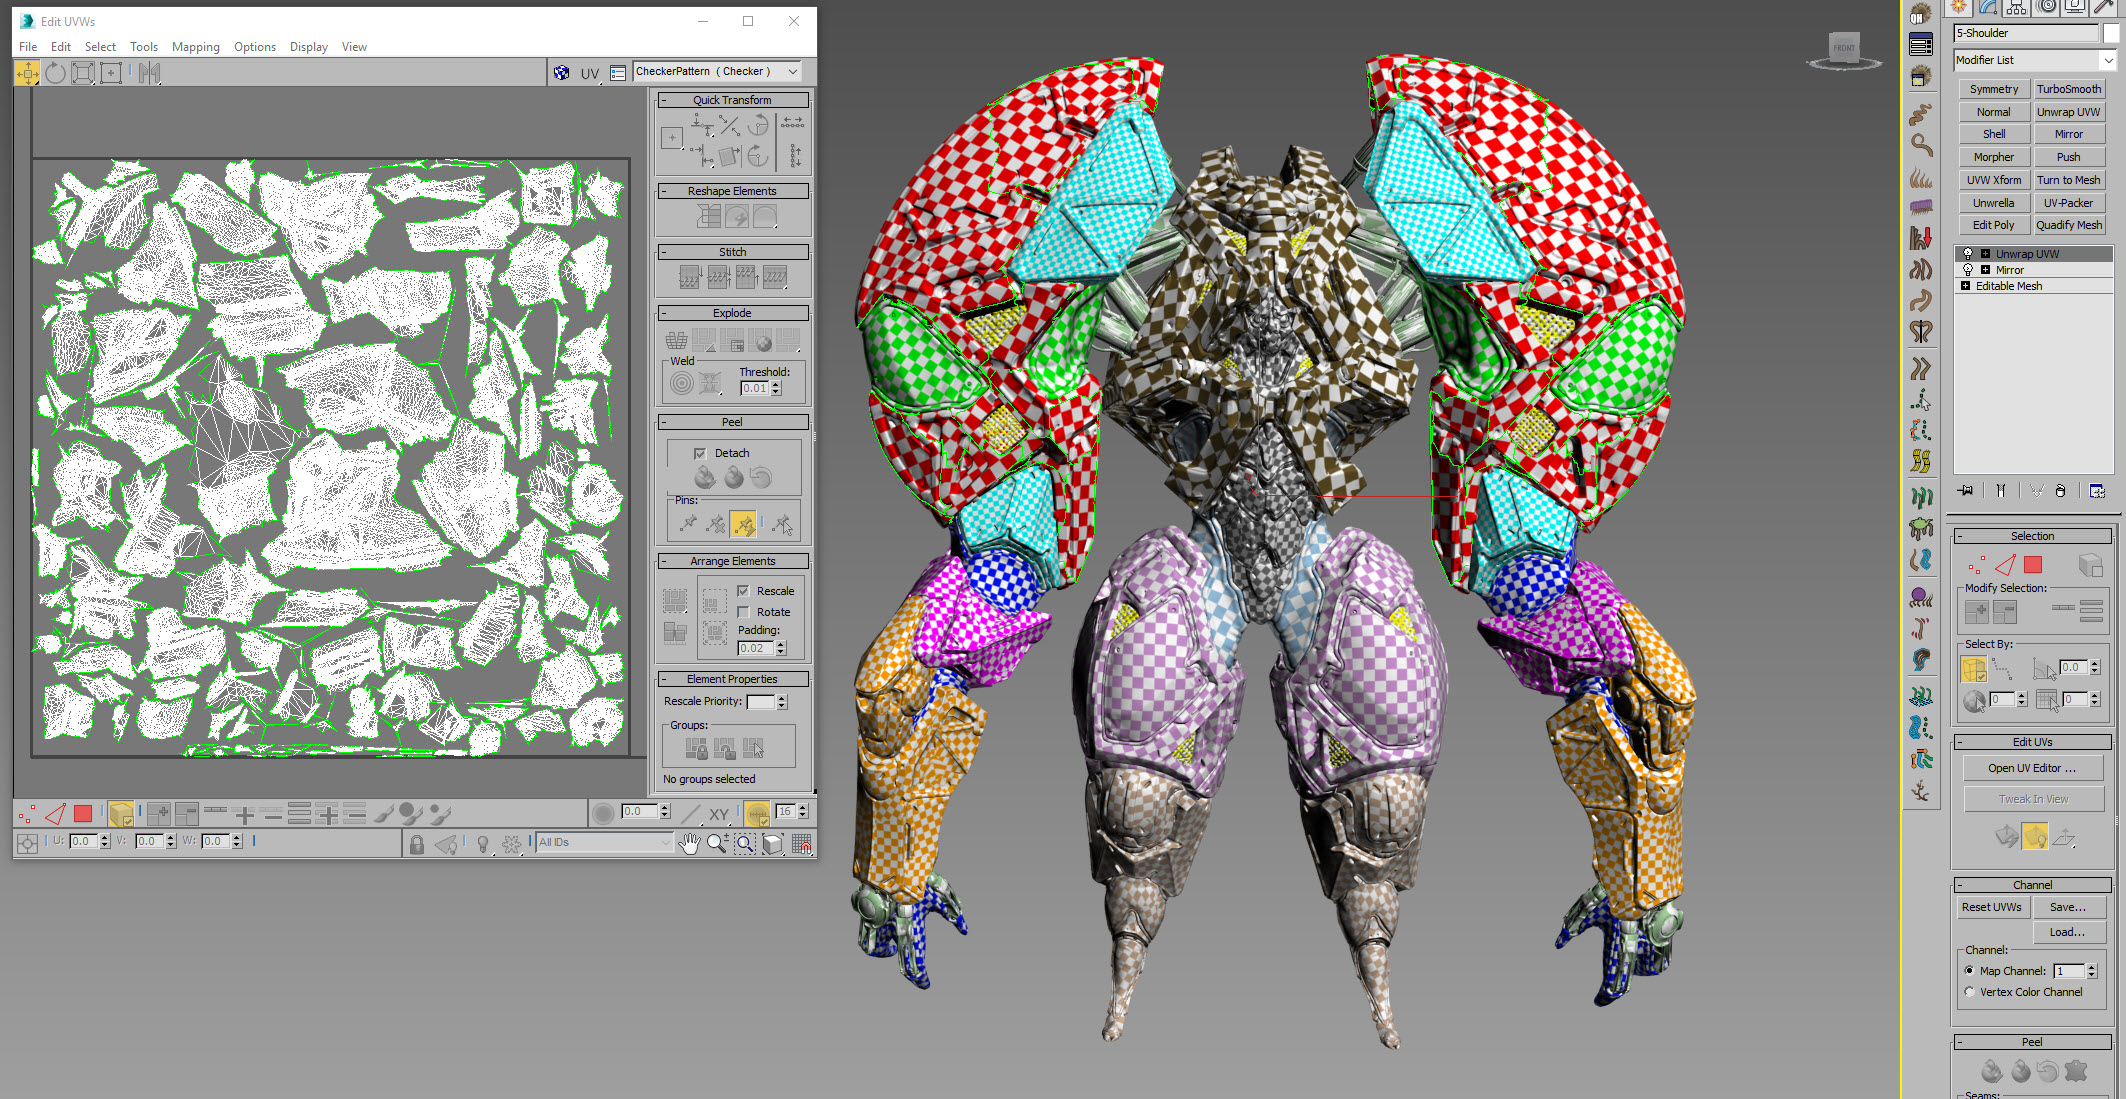
D- Fast baking in Substance Painter (Tangent/World Space Normal and ID map only, the rest will be generated from them).
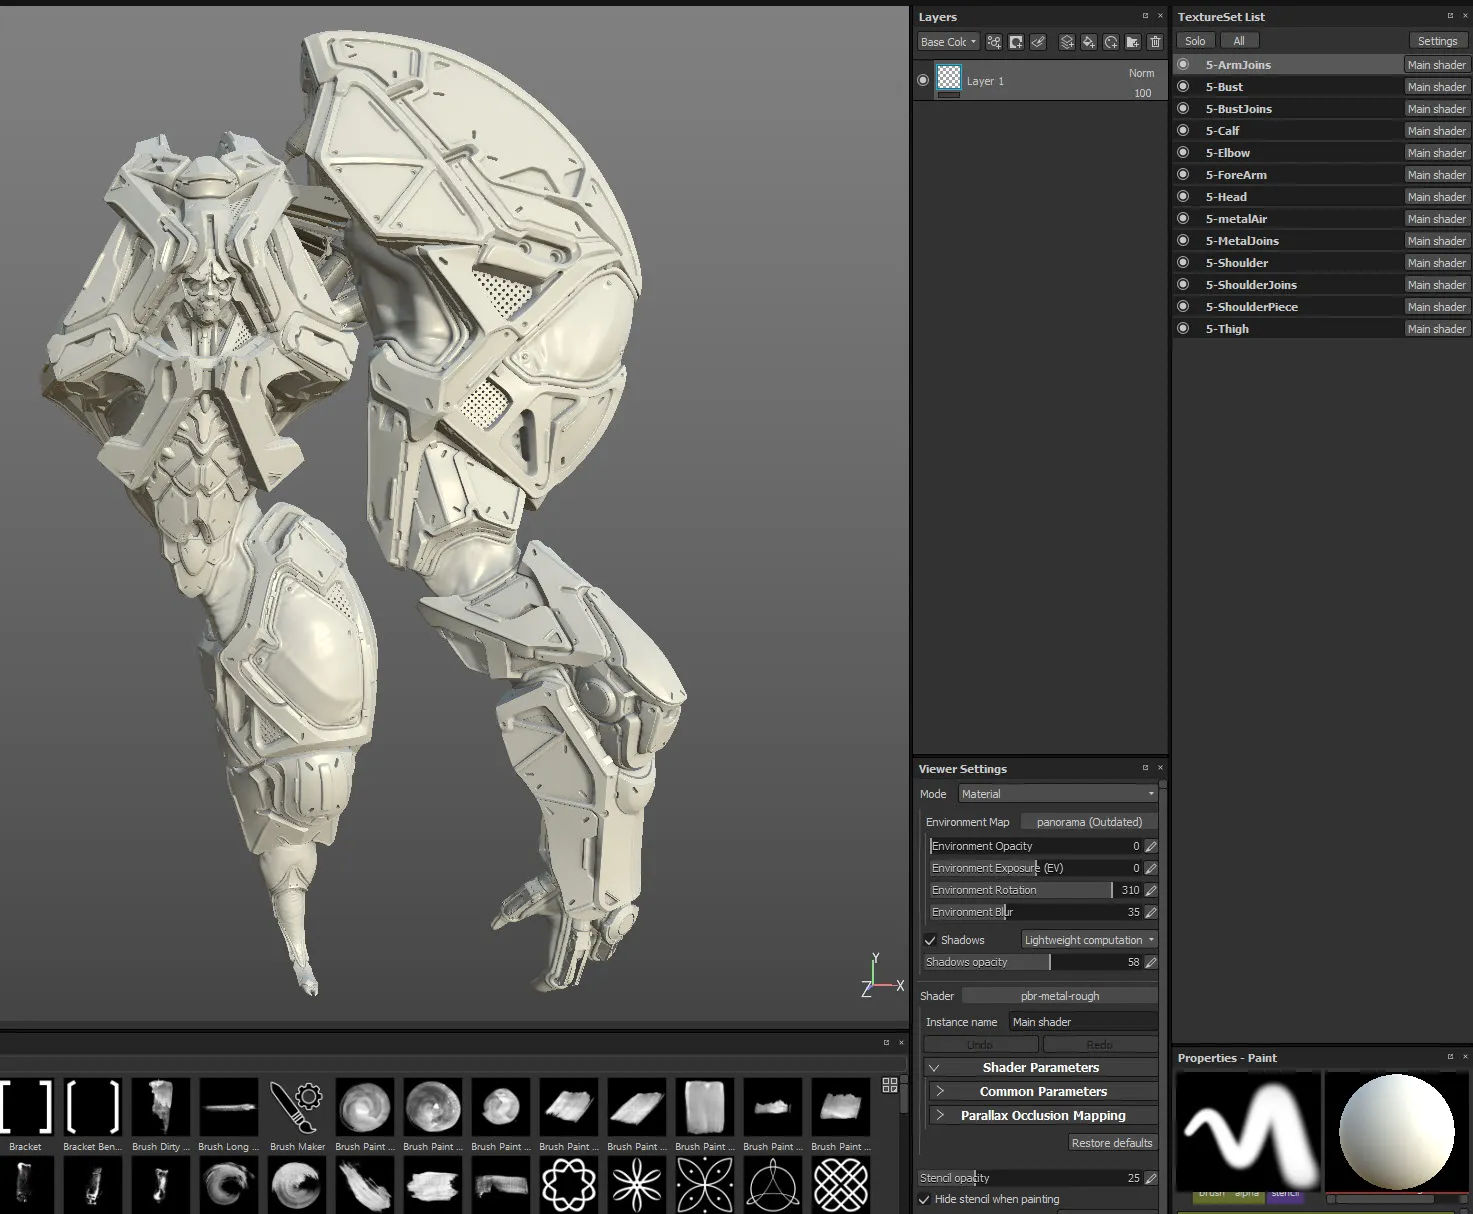
E- Texturing in Painter. For conceptual work, it’s not recommended to spend too much time tweaking the textures. The goals is to slap a Smart Material on there and do minor tweaks until it gives the good vibe.
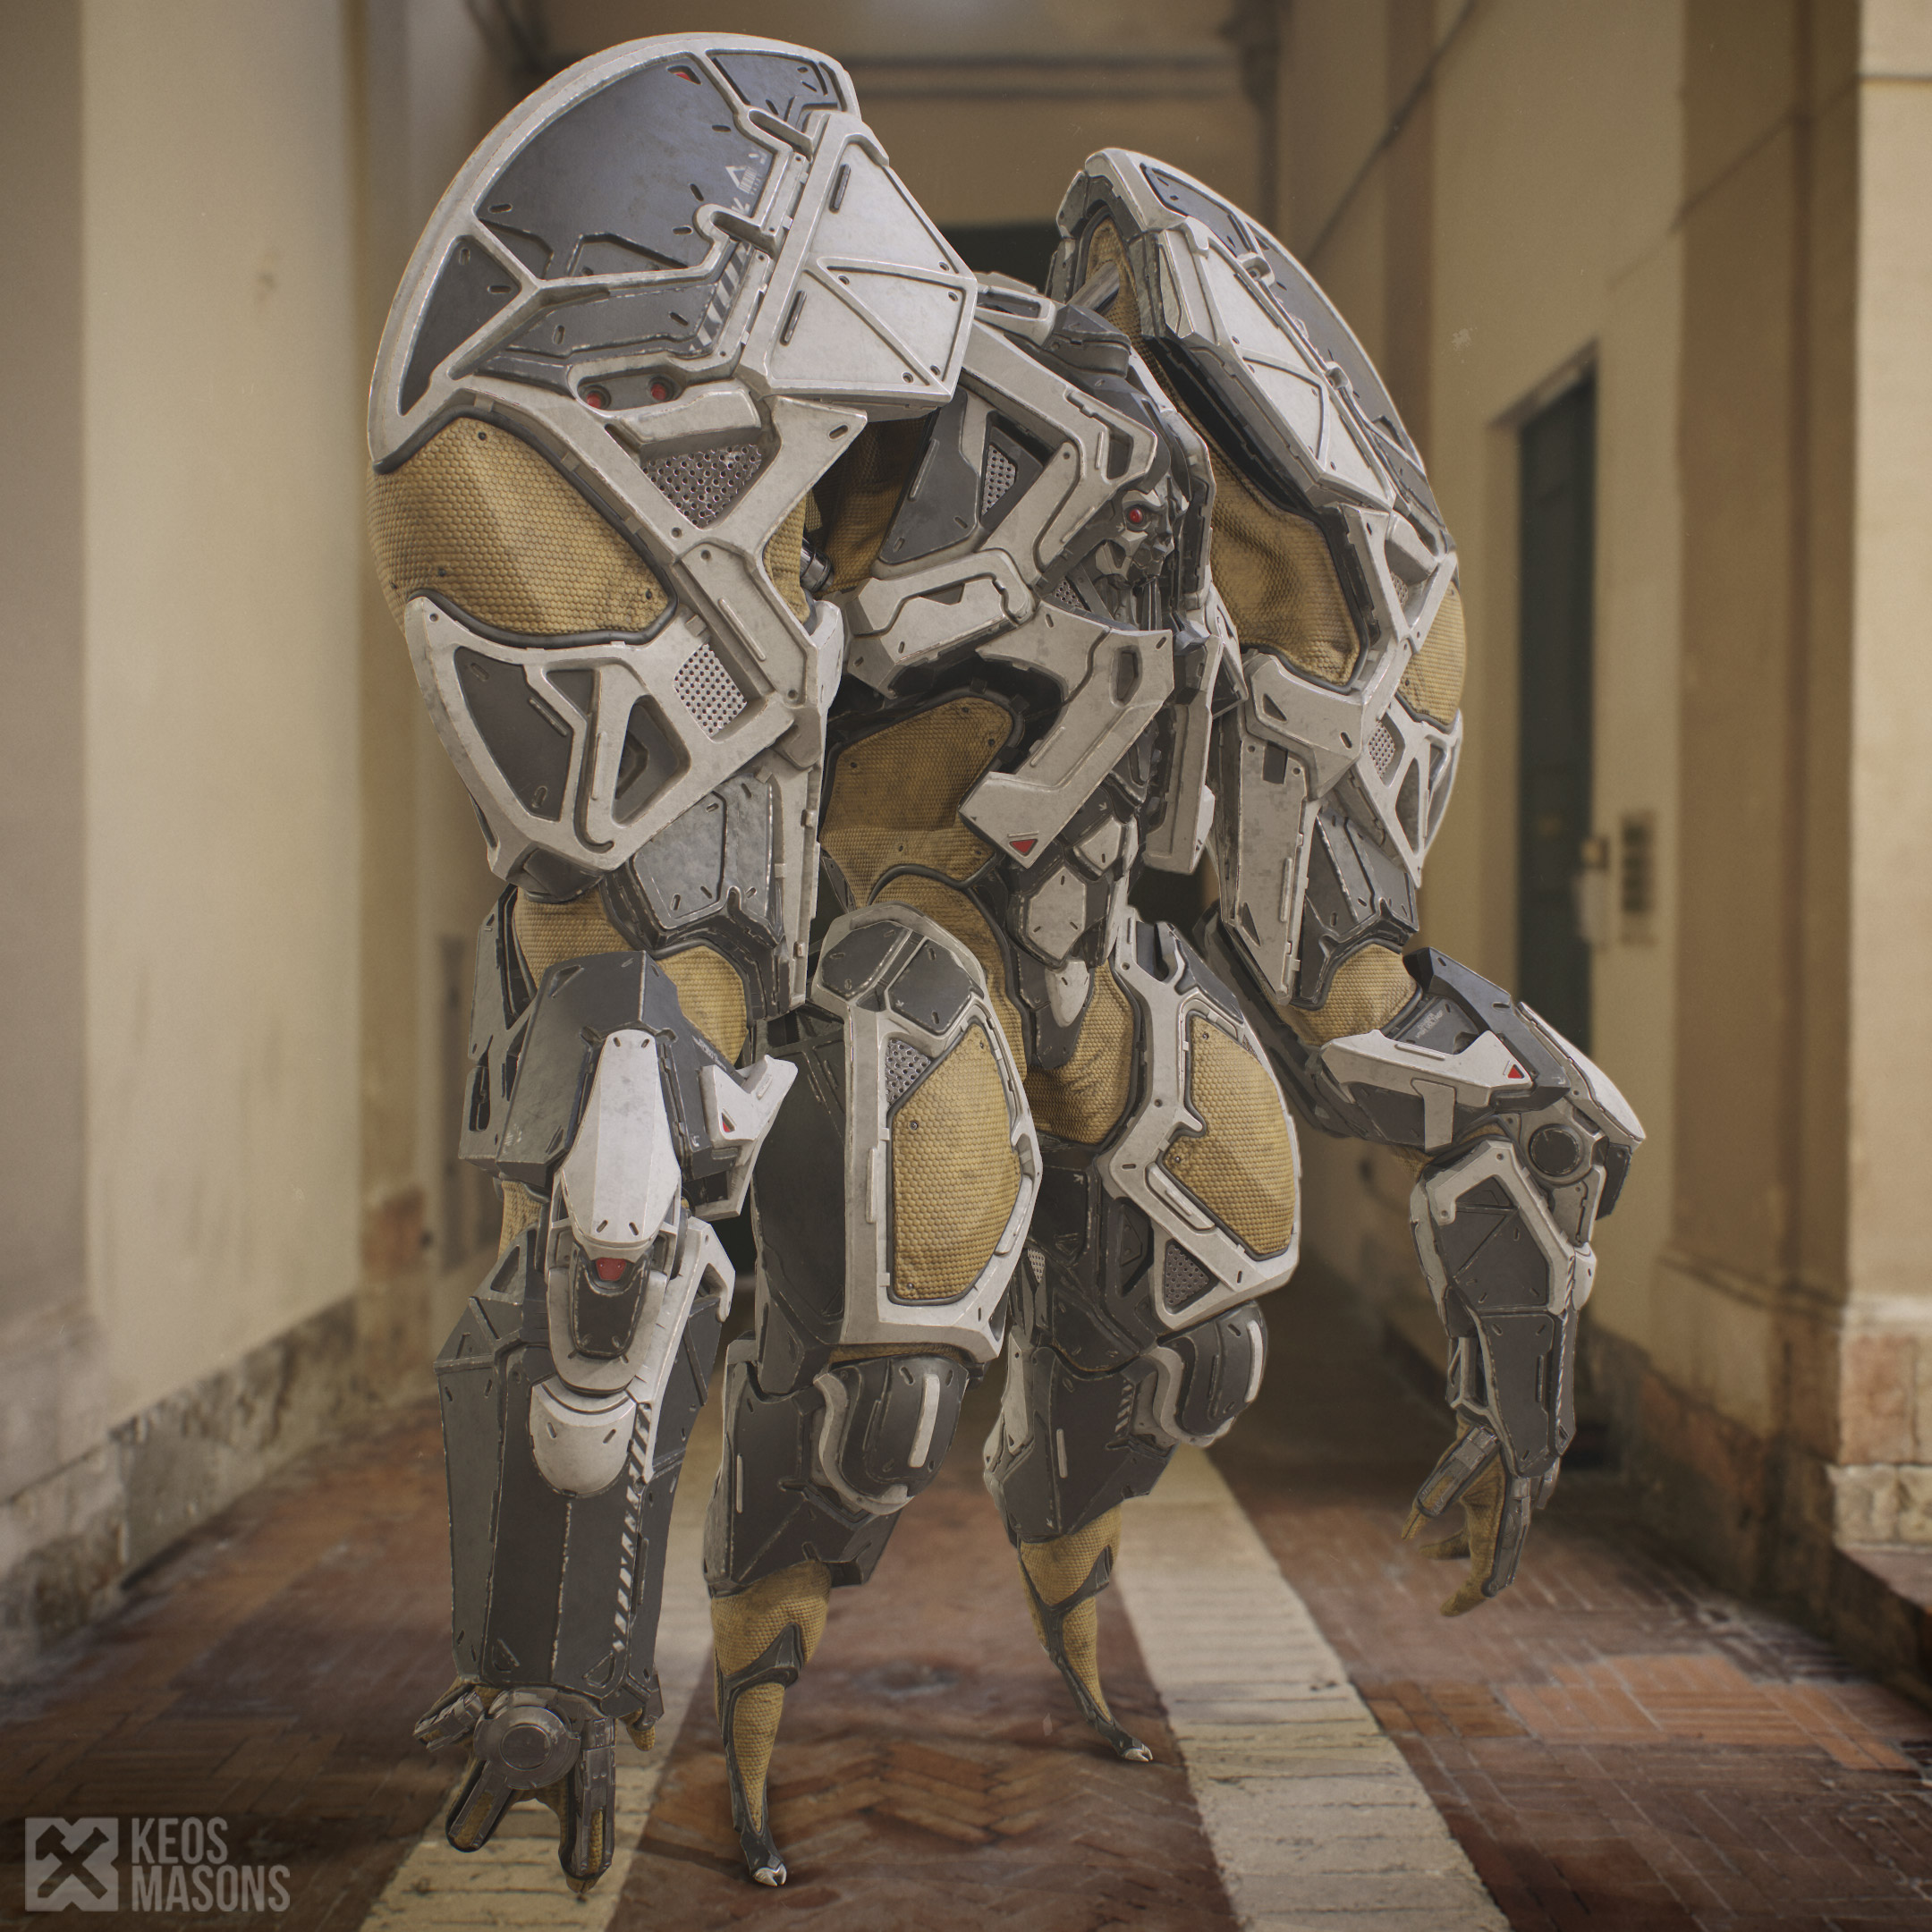
5- Presentation: The same as a “video game” workflow is used for the texturing, Marmoset Toolbag is used for the final rendering.
What is fun about this workflow is that you can actually rig it and animate it roughly while still being in the conceptual phase of the project or character. On a few video game projects, it came in very handy to work this way for concepts.
Another point worth mentioning is its resemblance with a real video game pipeline. It’s basically the SAME pipeline if, in step B and C, you replace the decimation and automatic UVs by a typical Lowmesh and clean UVs following your client’s requirements. The difference is that for a full production, it simply requires a bit more polishing to allow close-ups on the character.

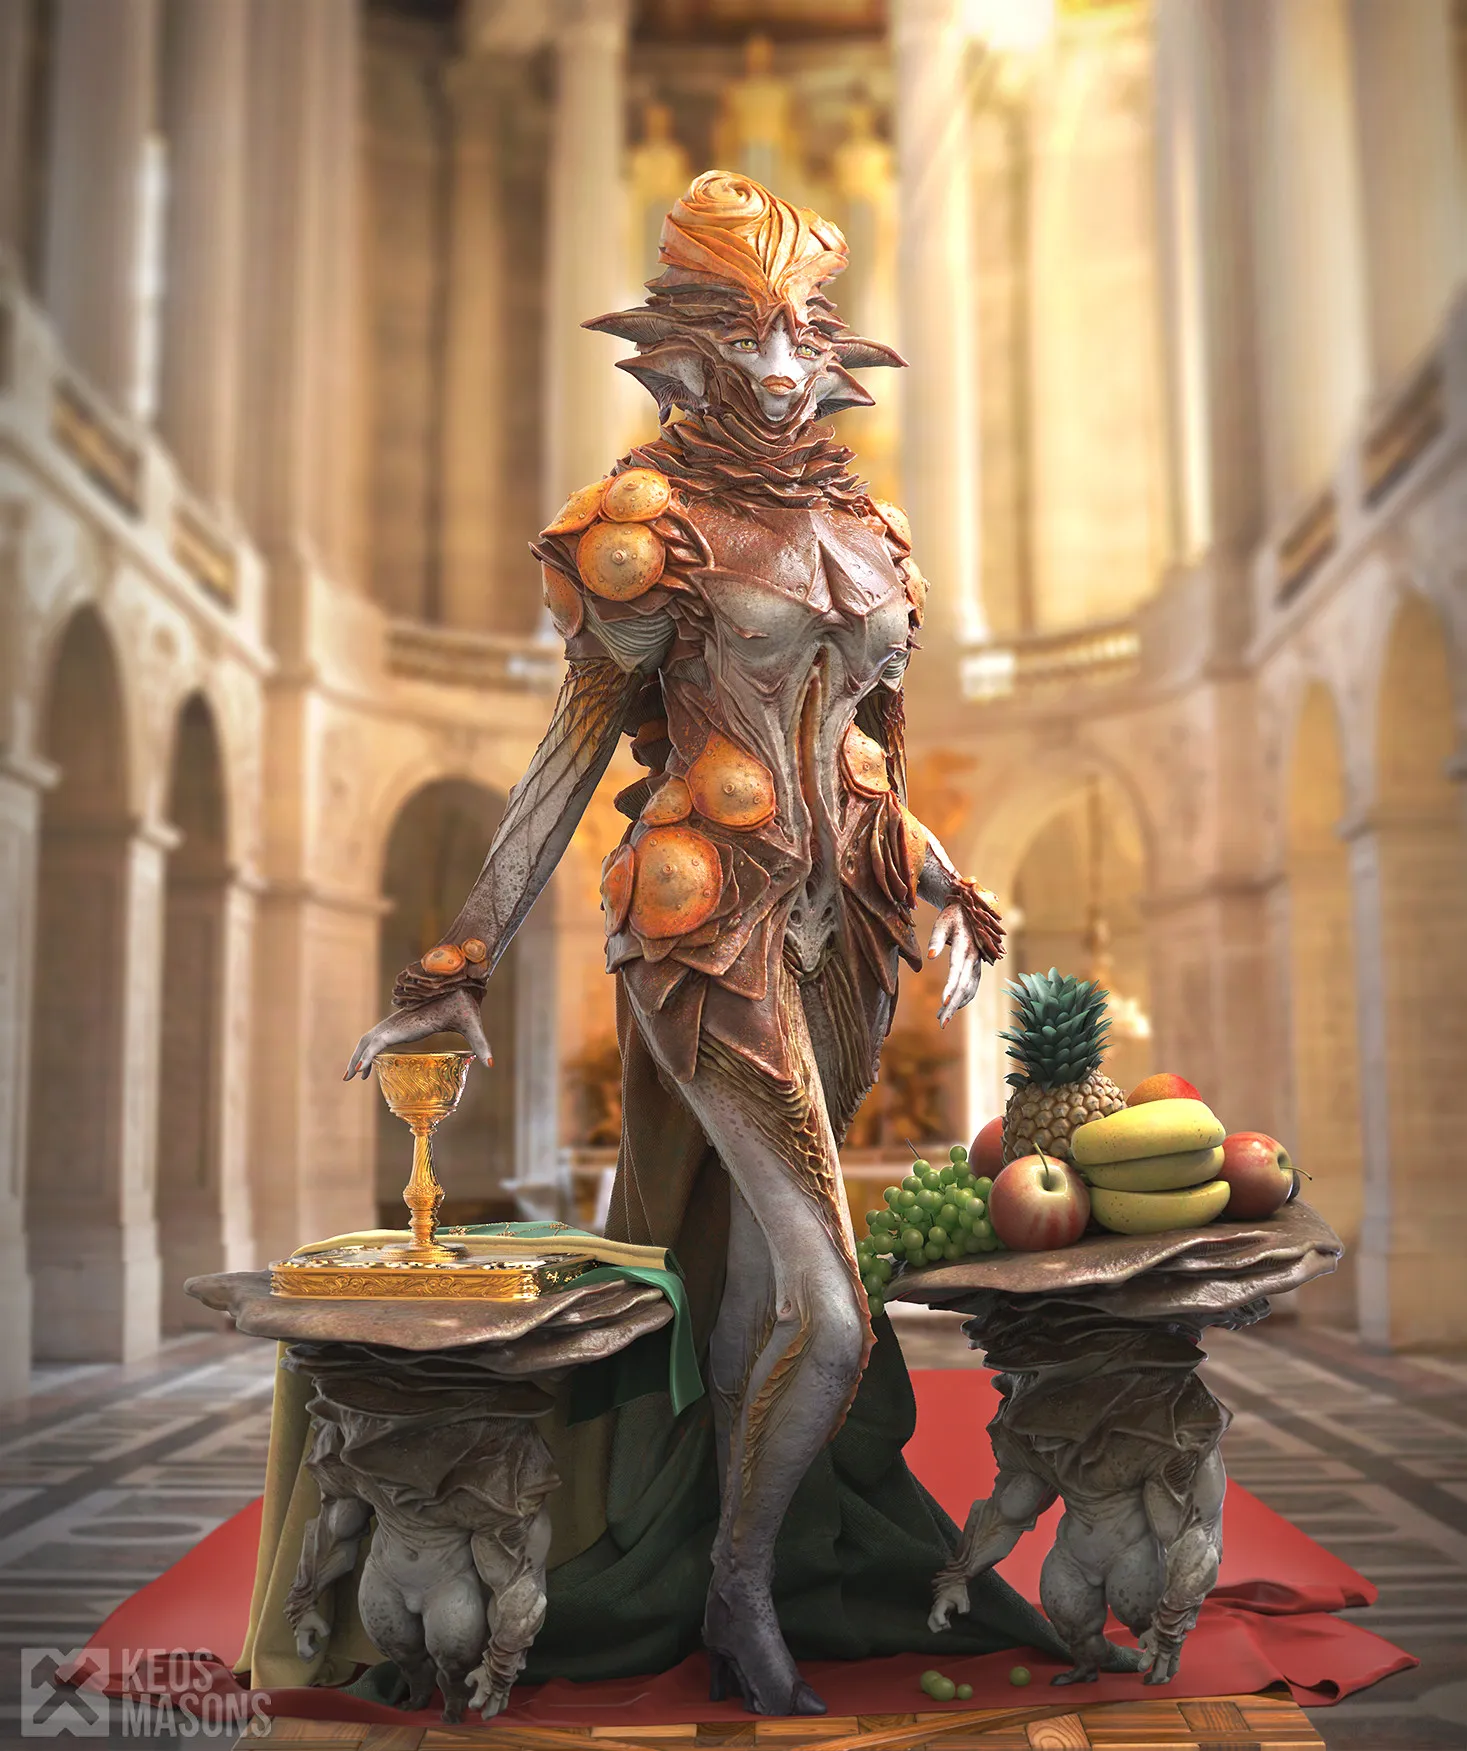
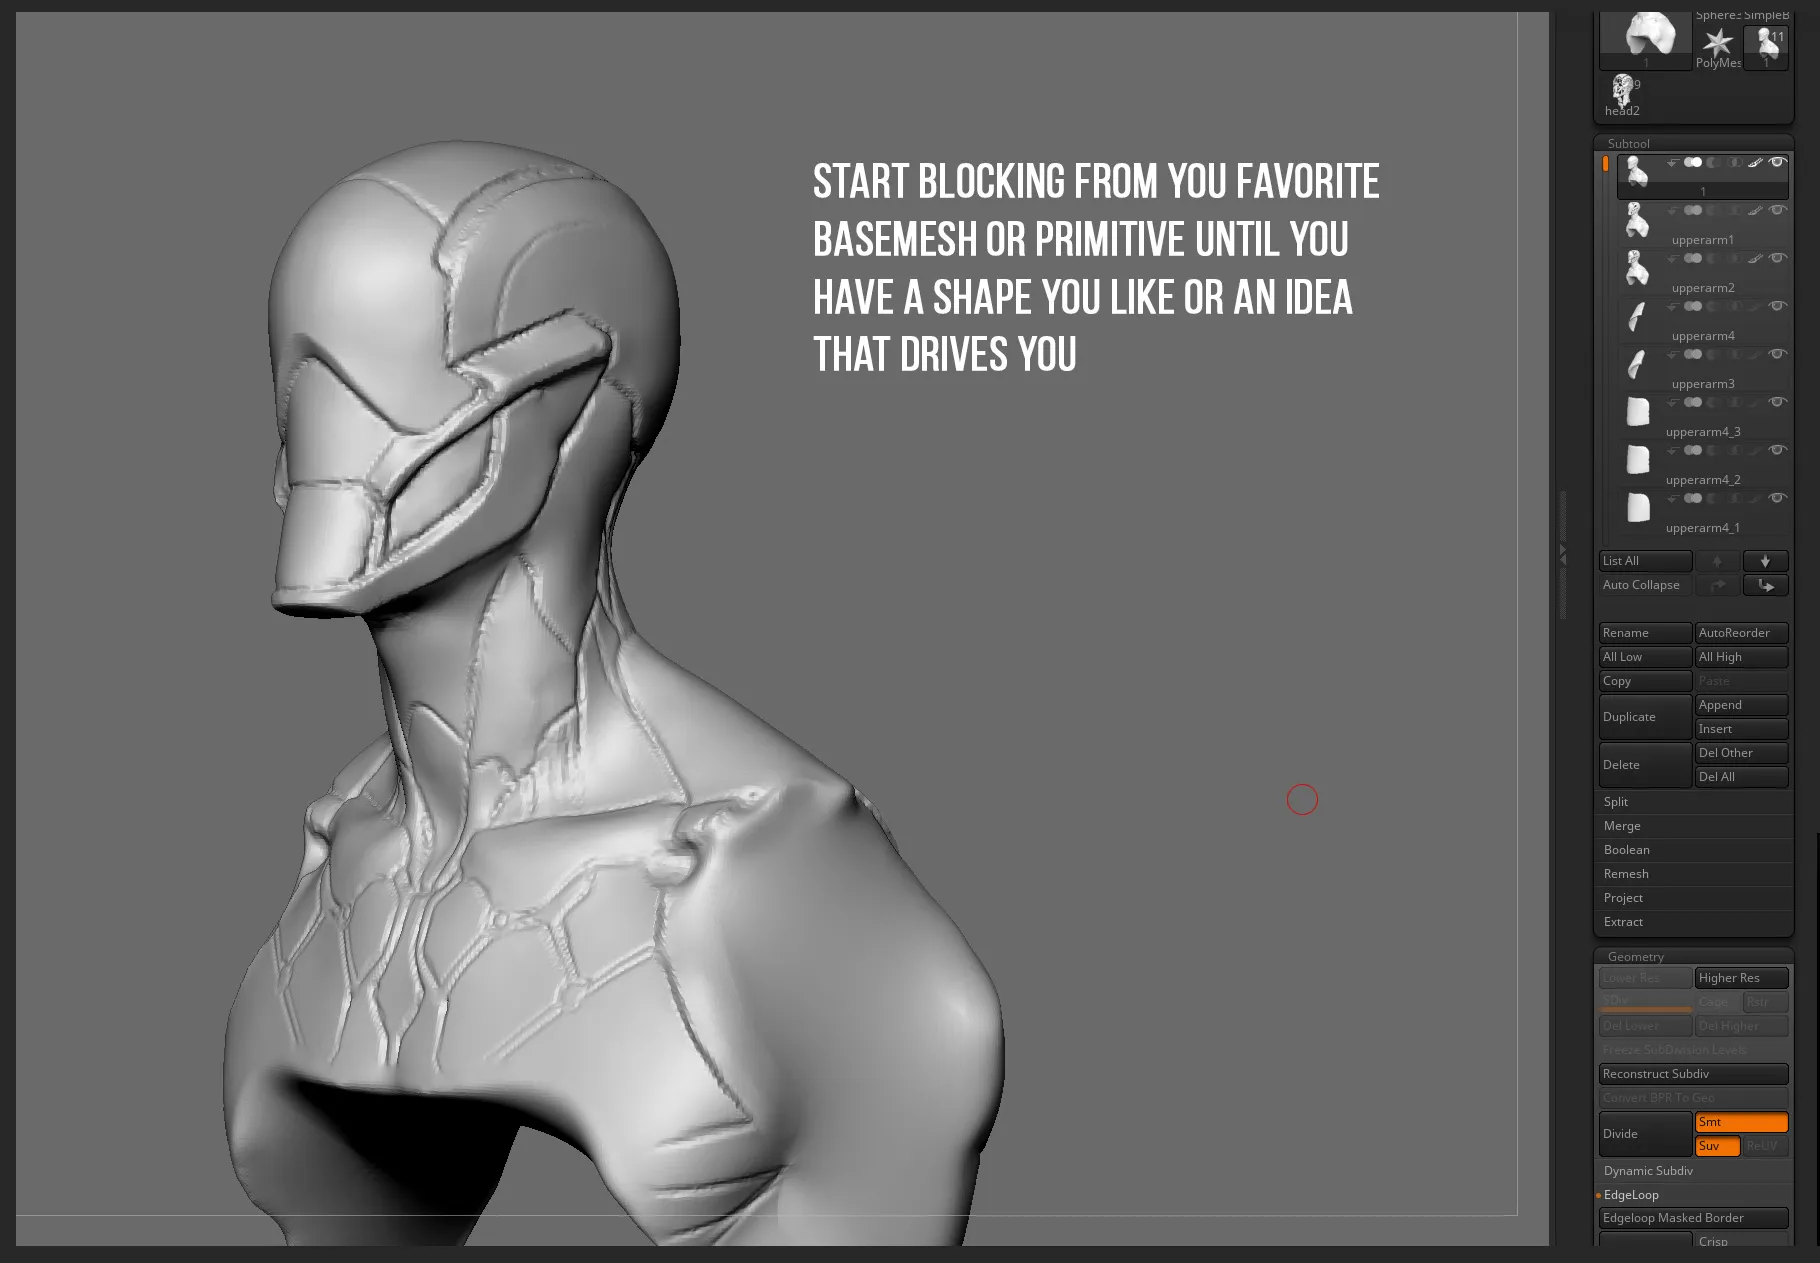
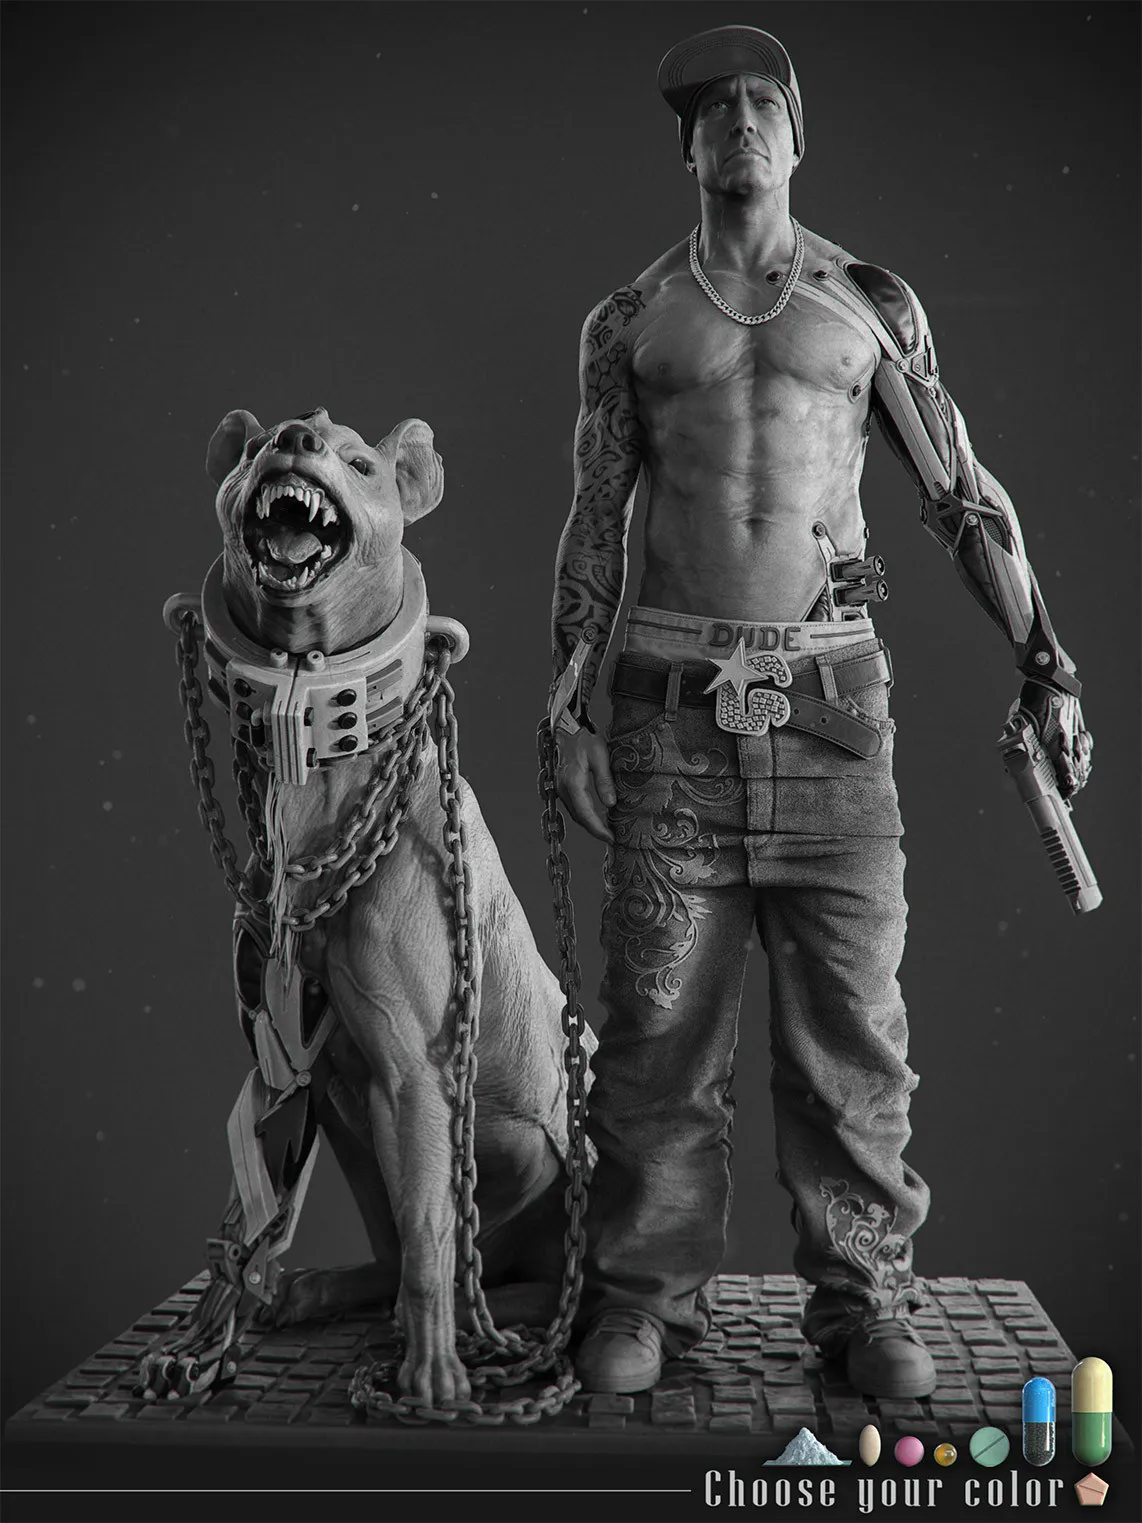
Marco: During my process, I start with a loose idea and sometimes, like Cedric, I let the inspiration come to me while starting from a blank sheet. Usually, in the first 30 minutes I get a pretty good idea of what I want and the rest is simply to keep track of your idea, stay confident and focused. Don’t be afraid to deviate if a better idea comes and search for references to get fresh ideas.
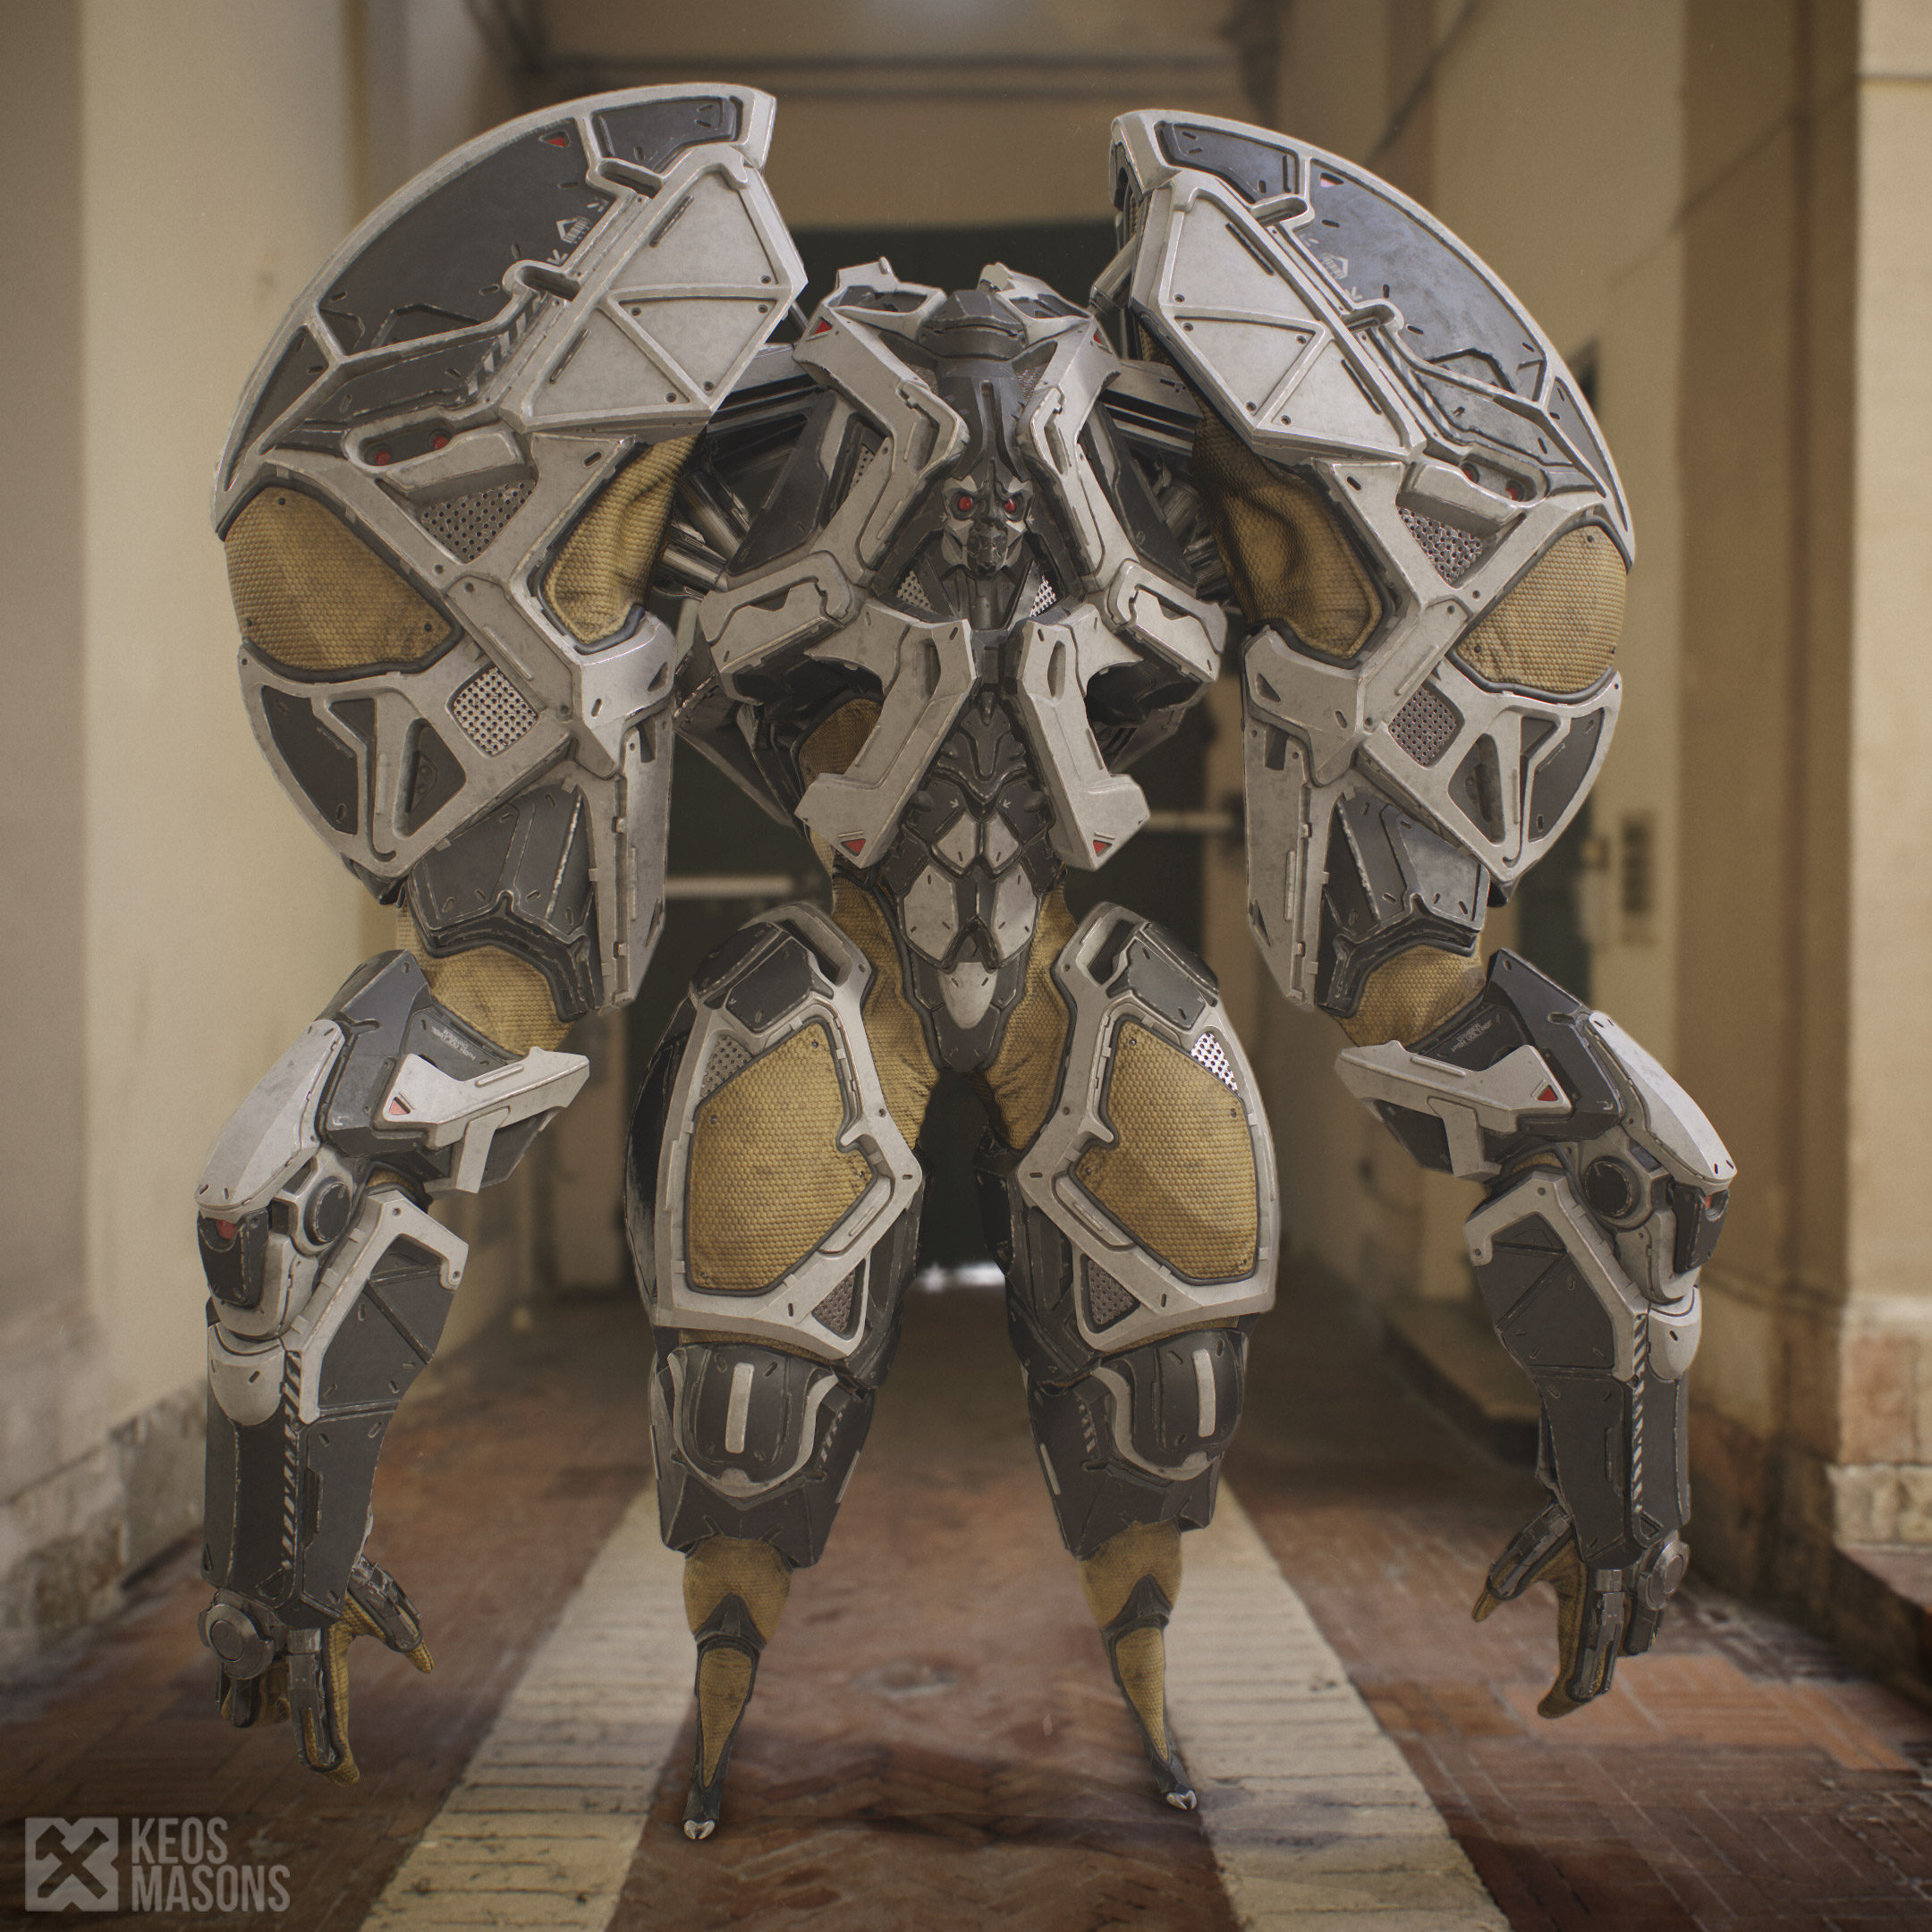
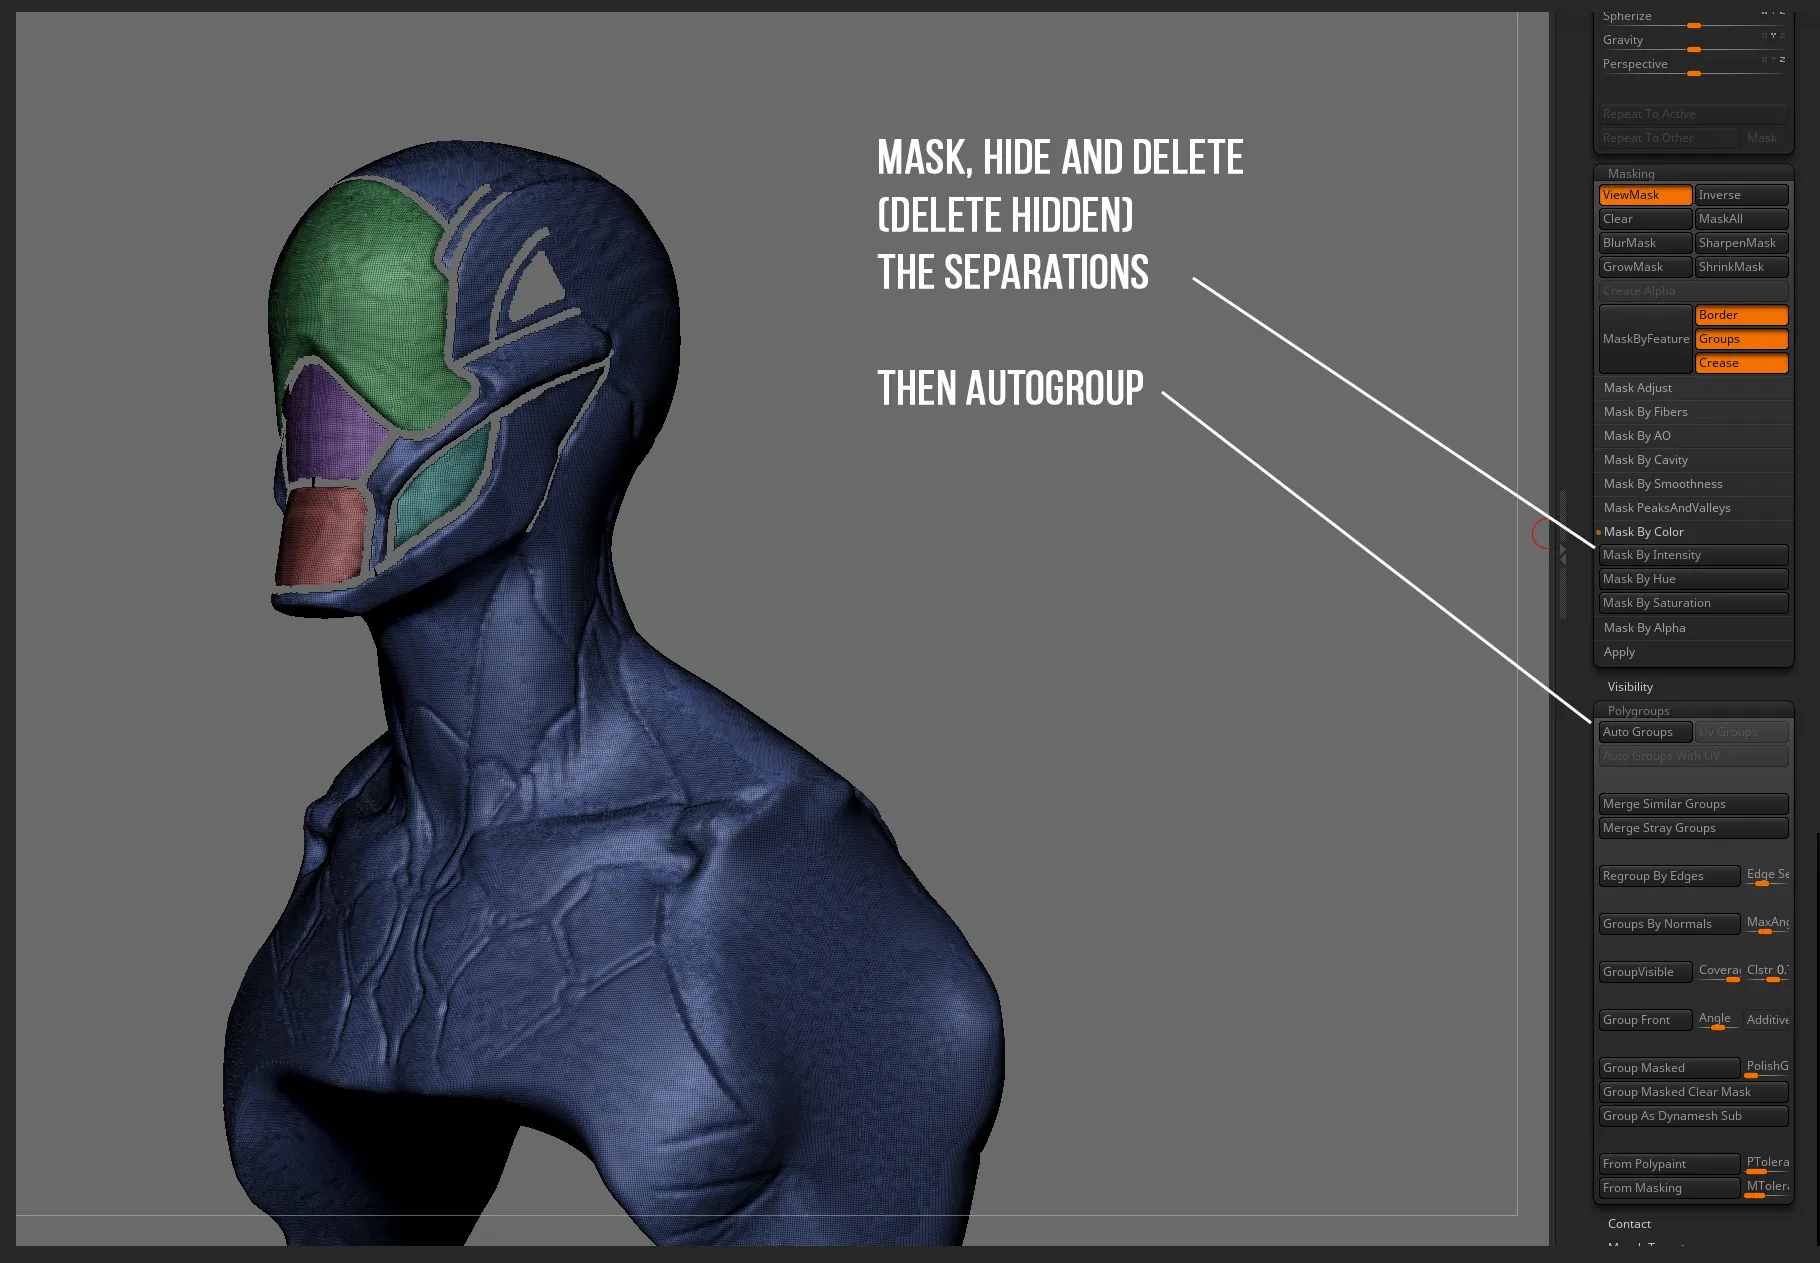
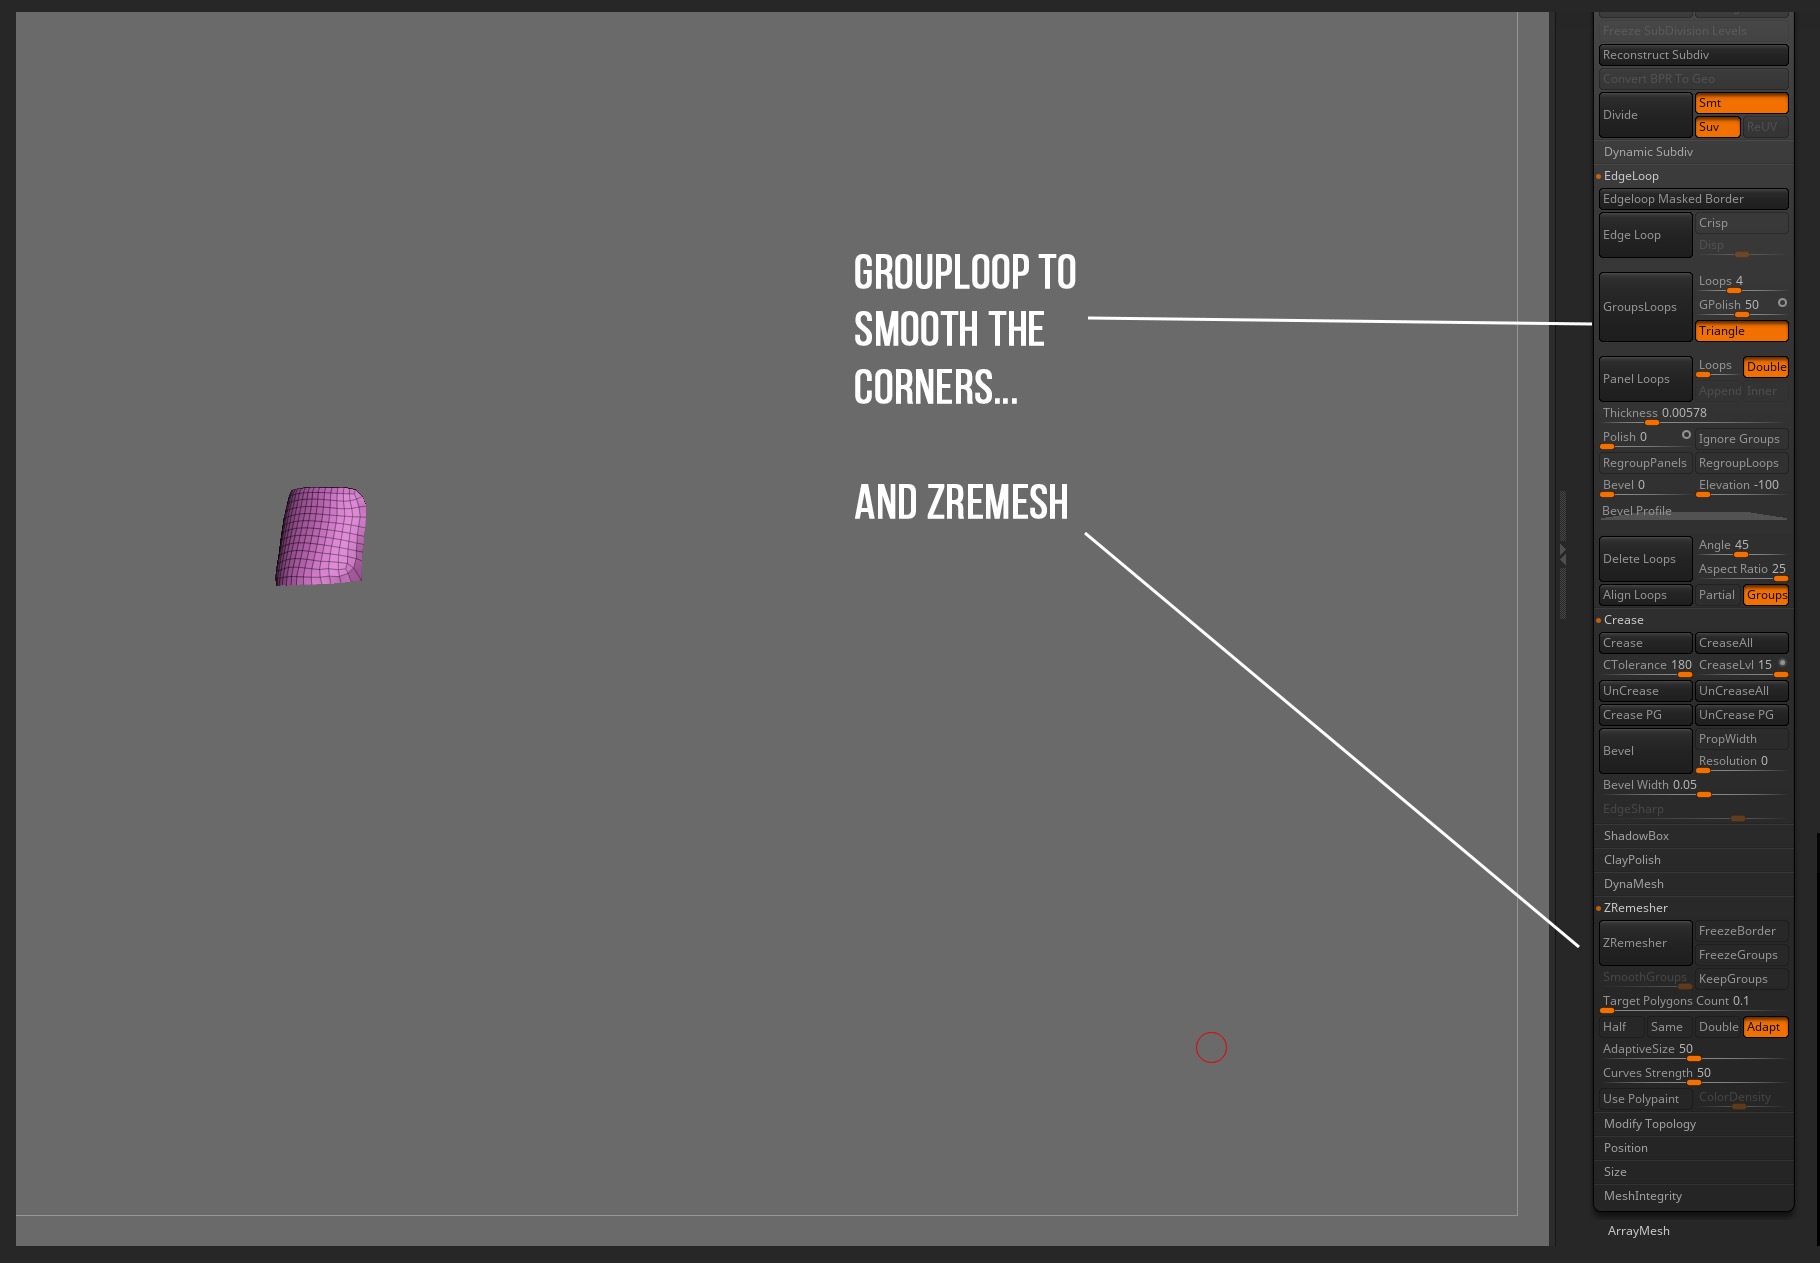
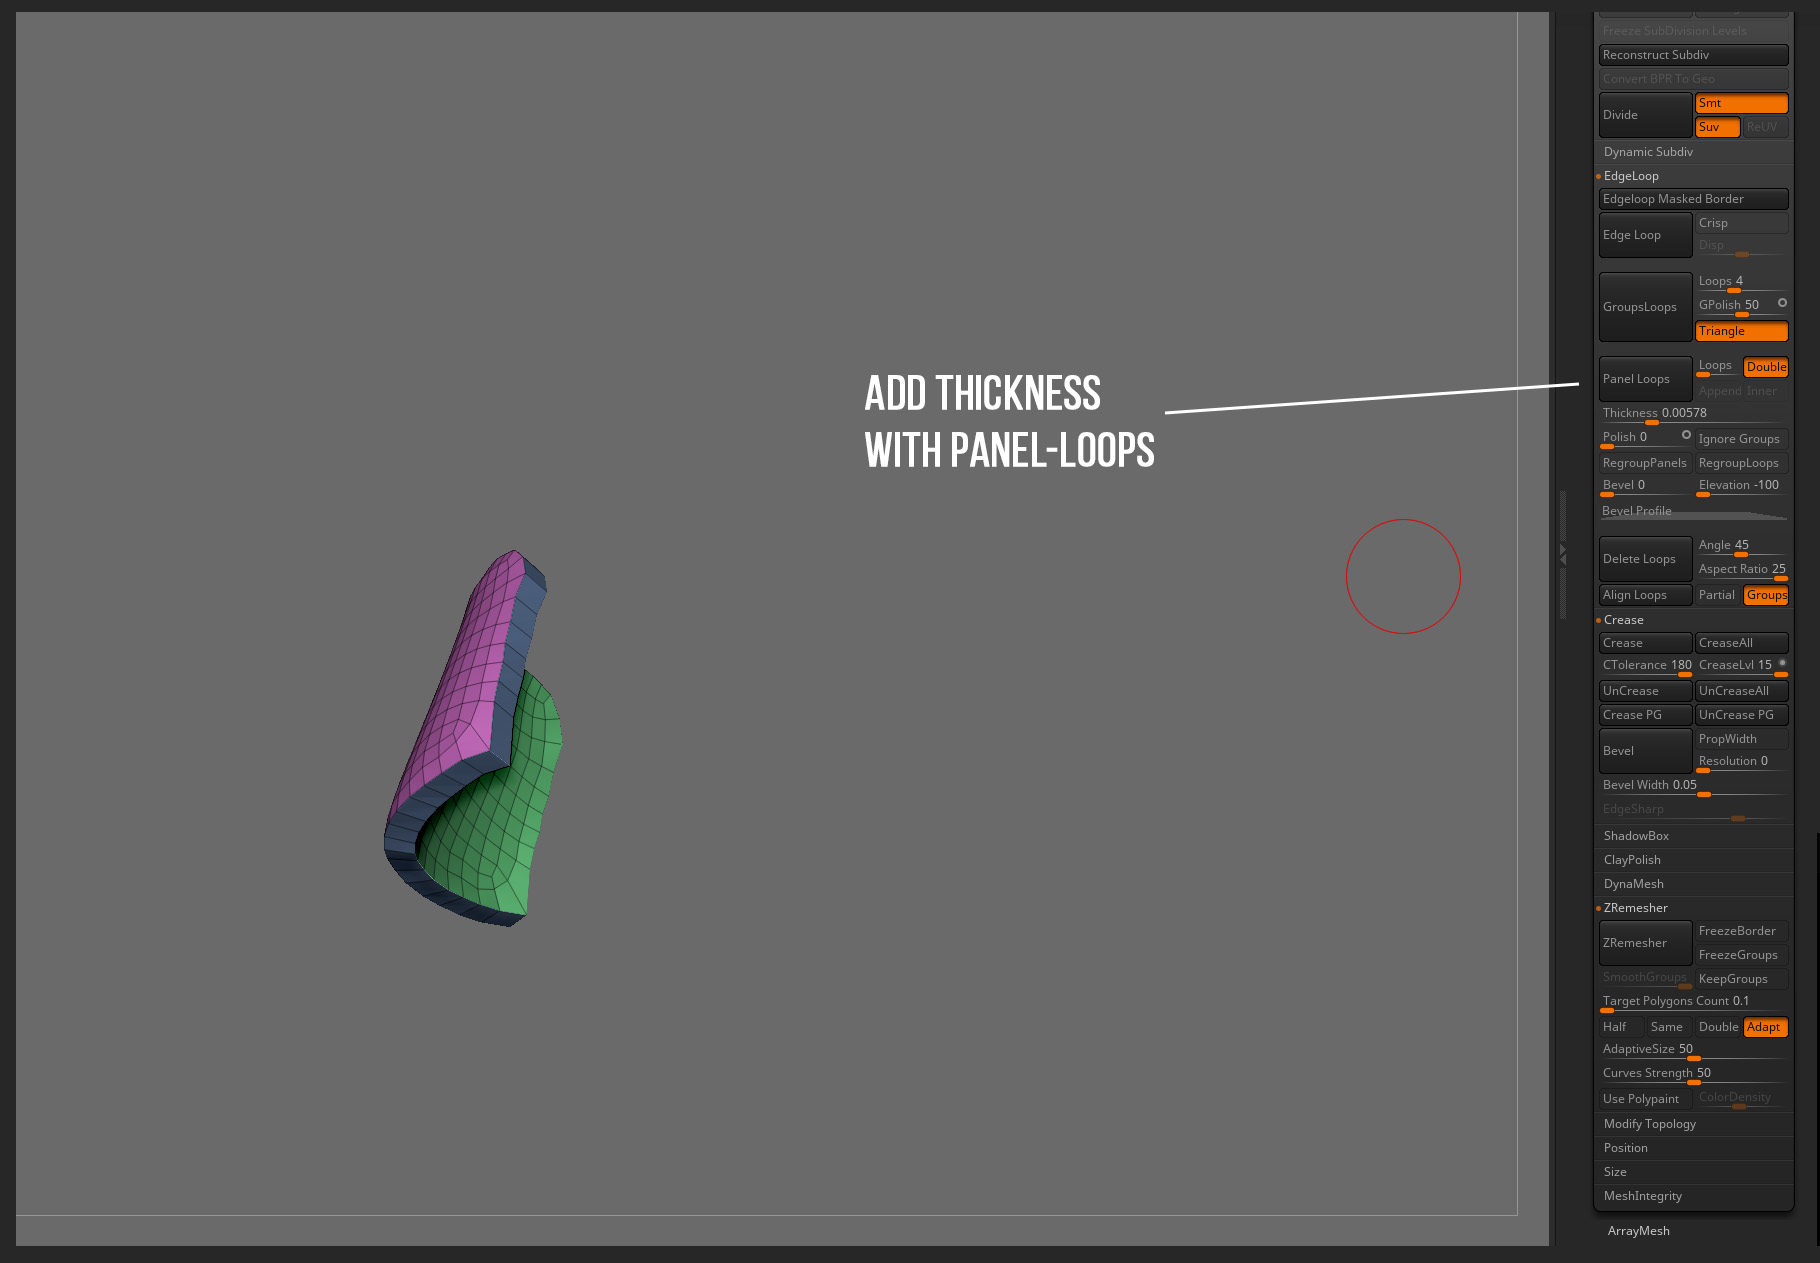
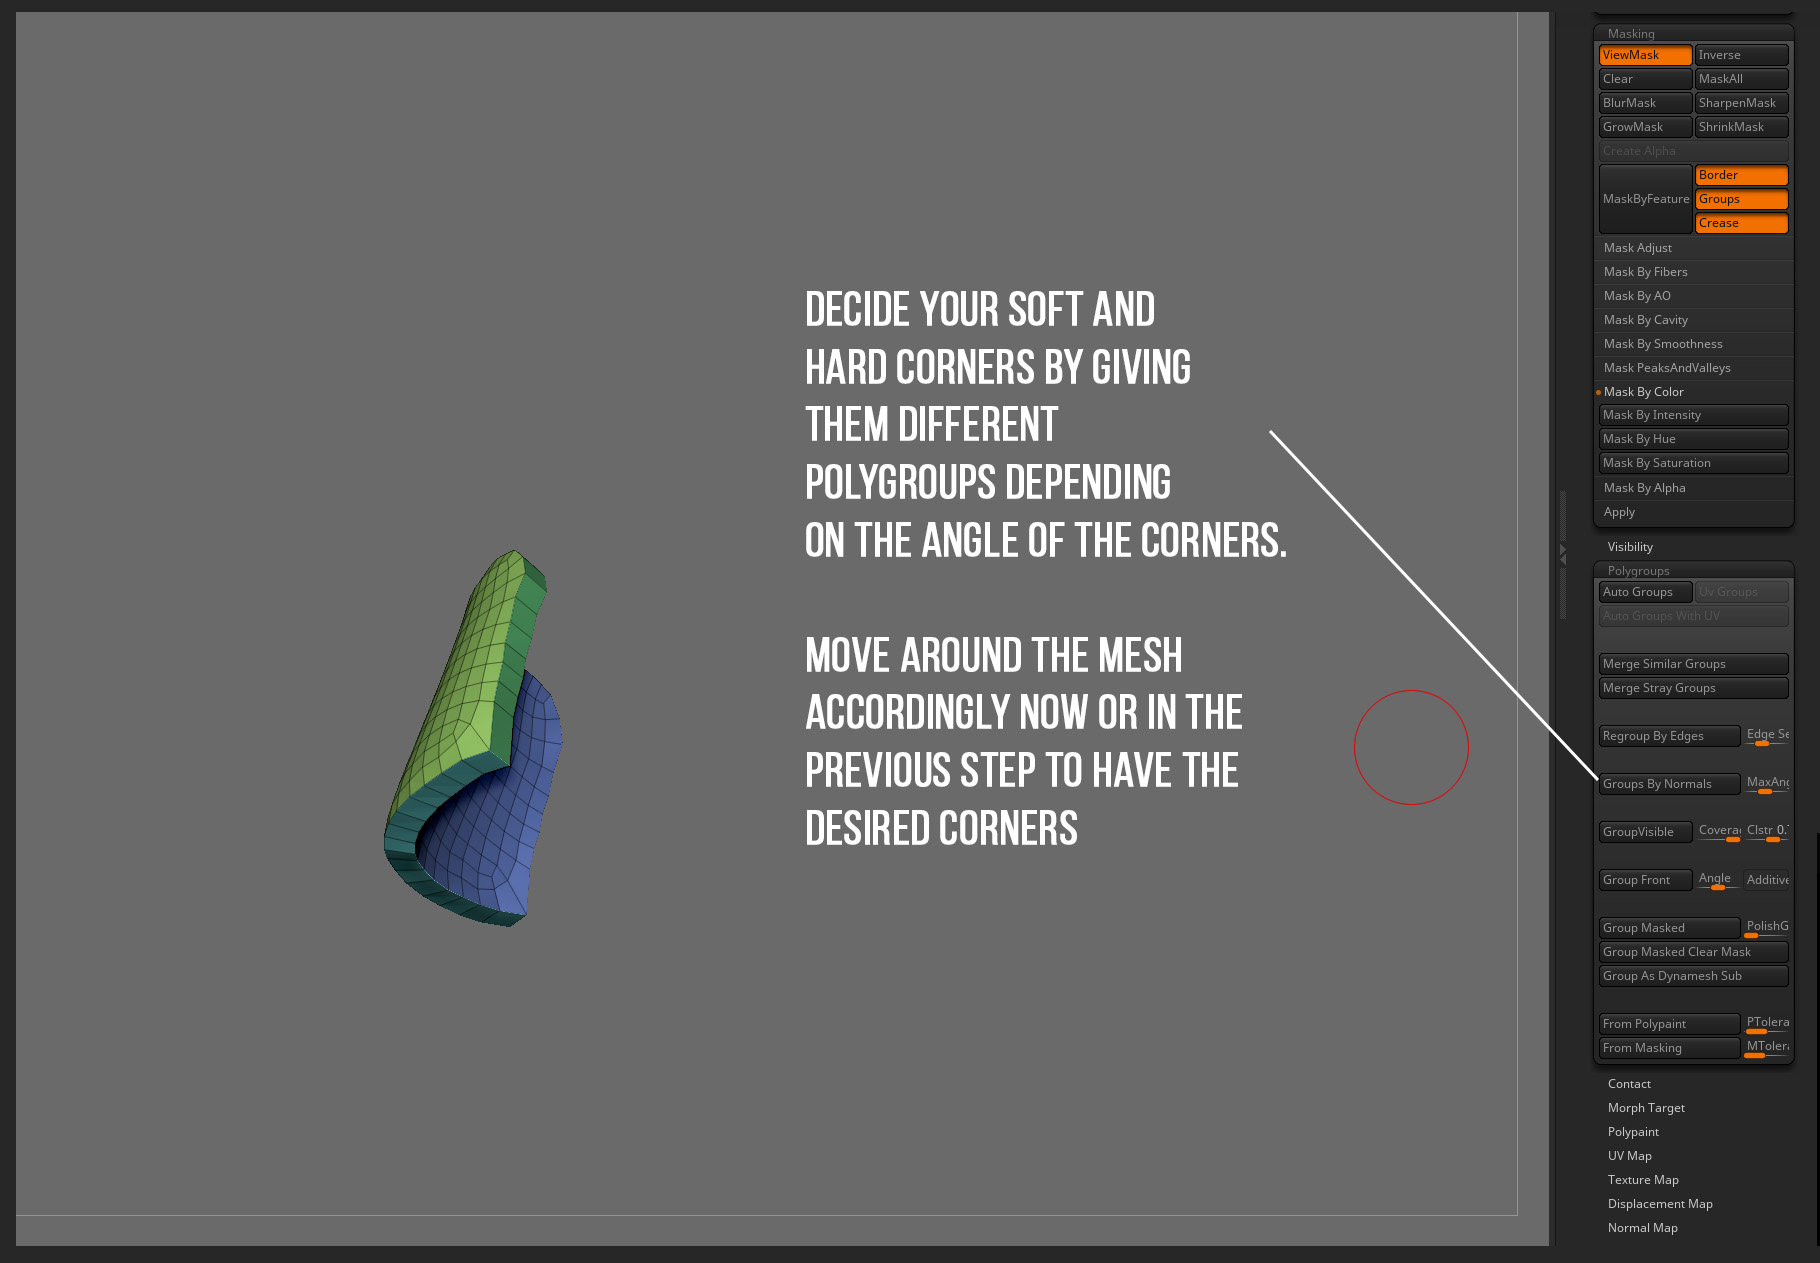
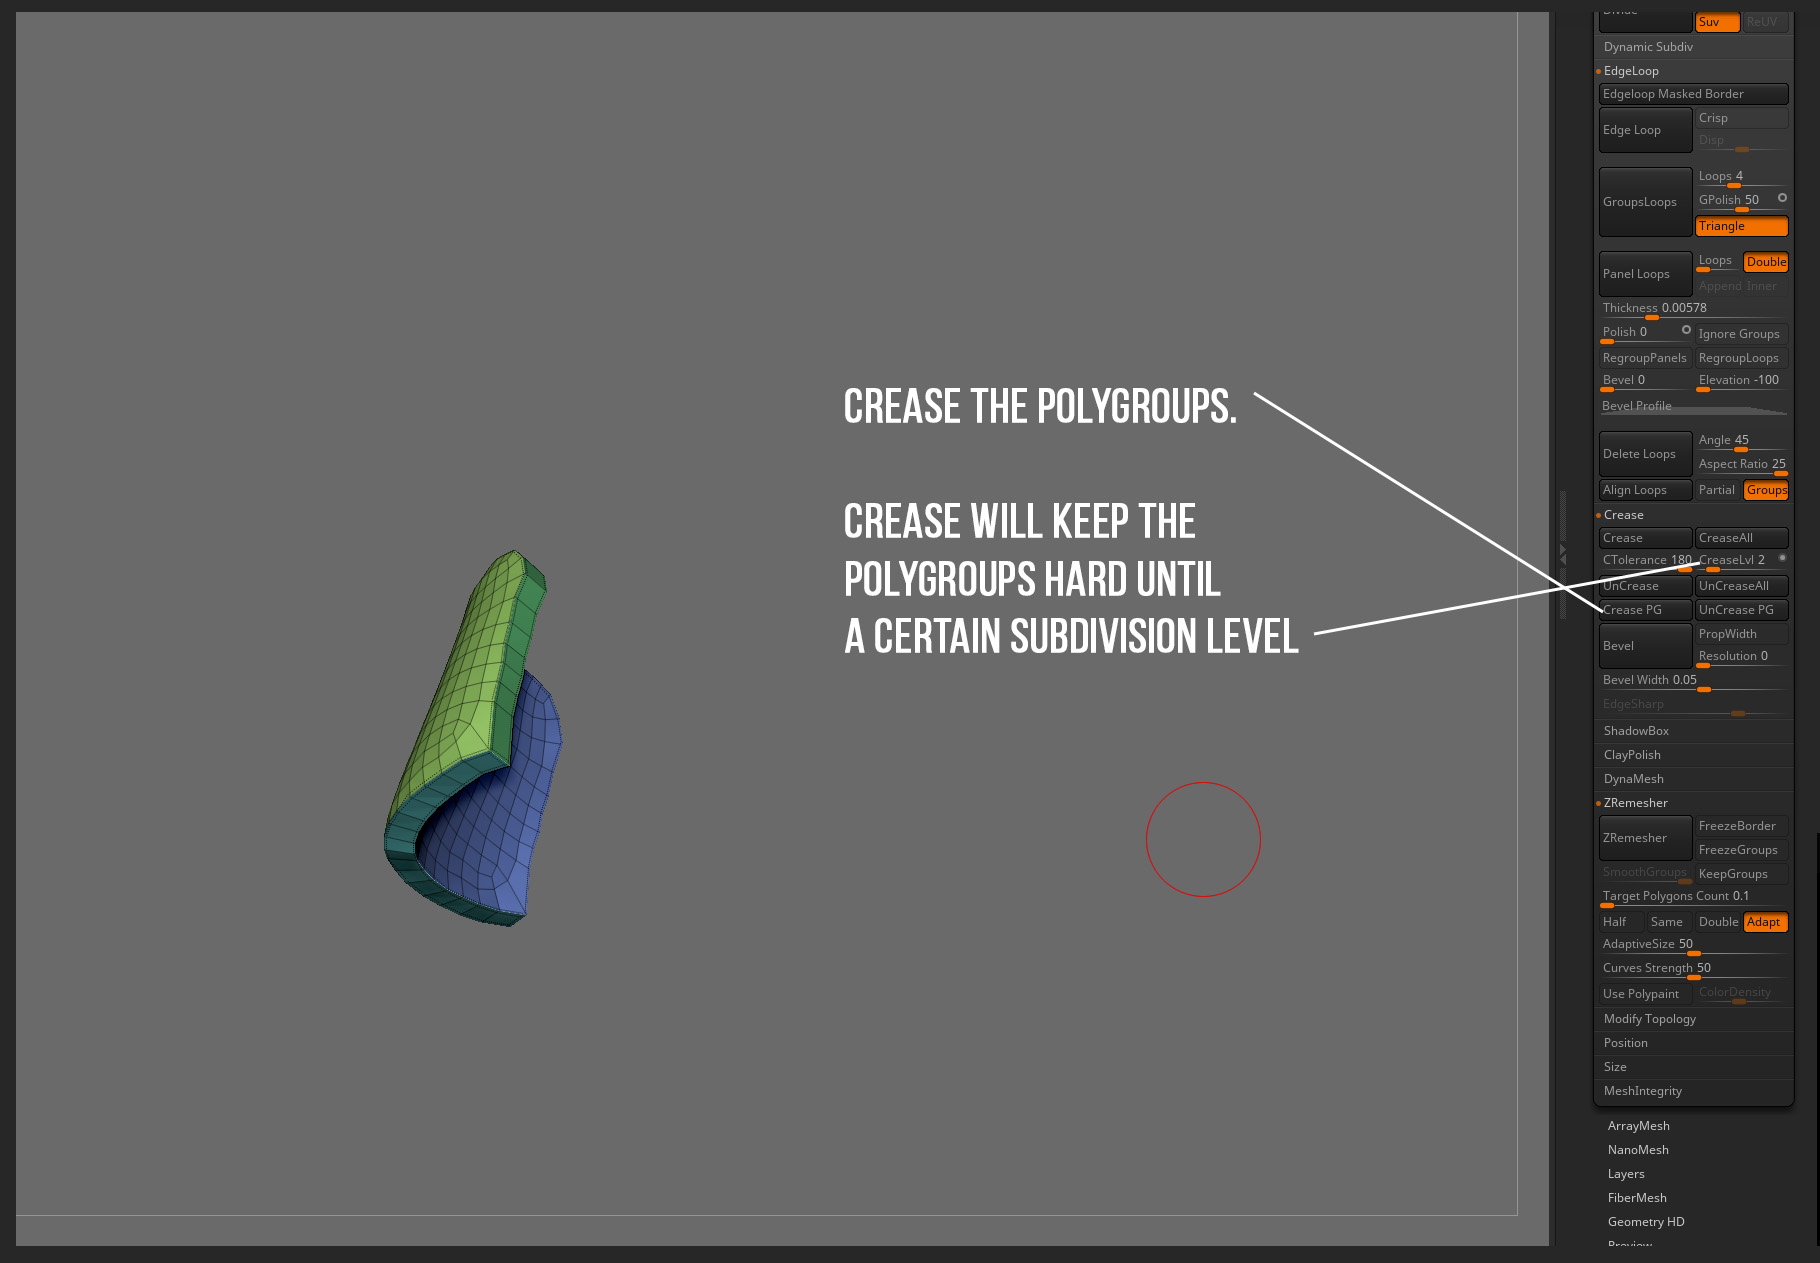
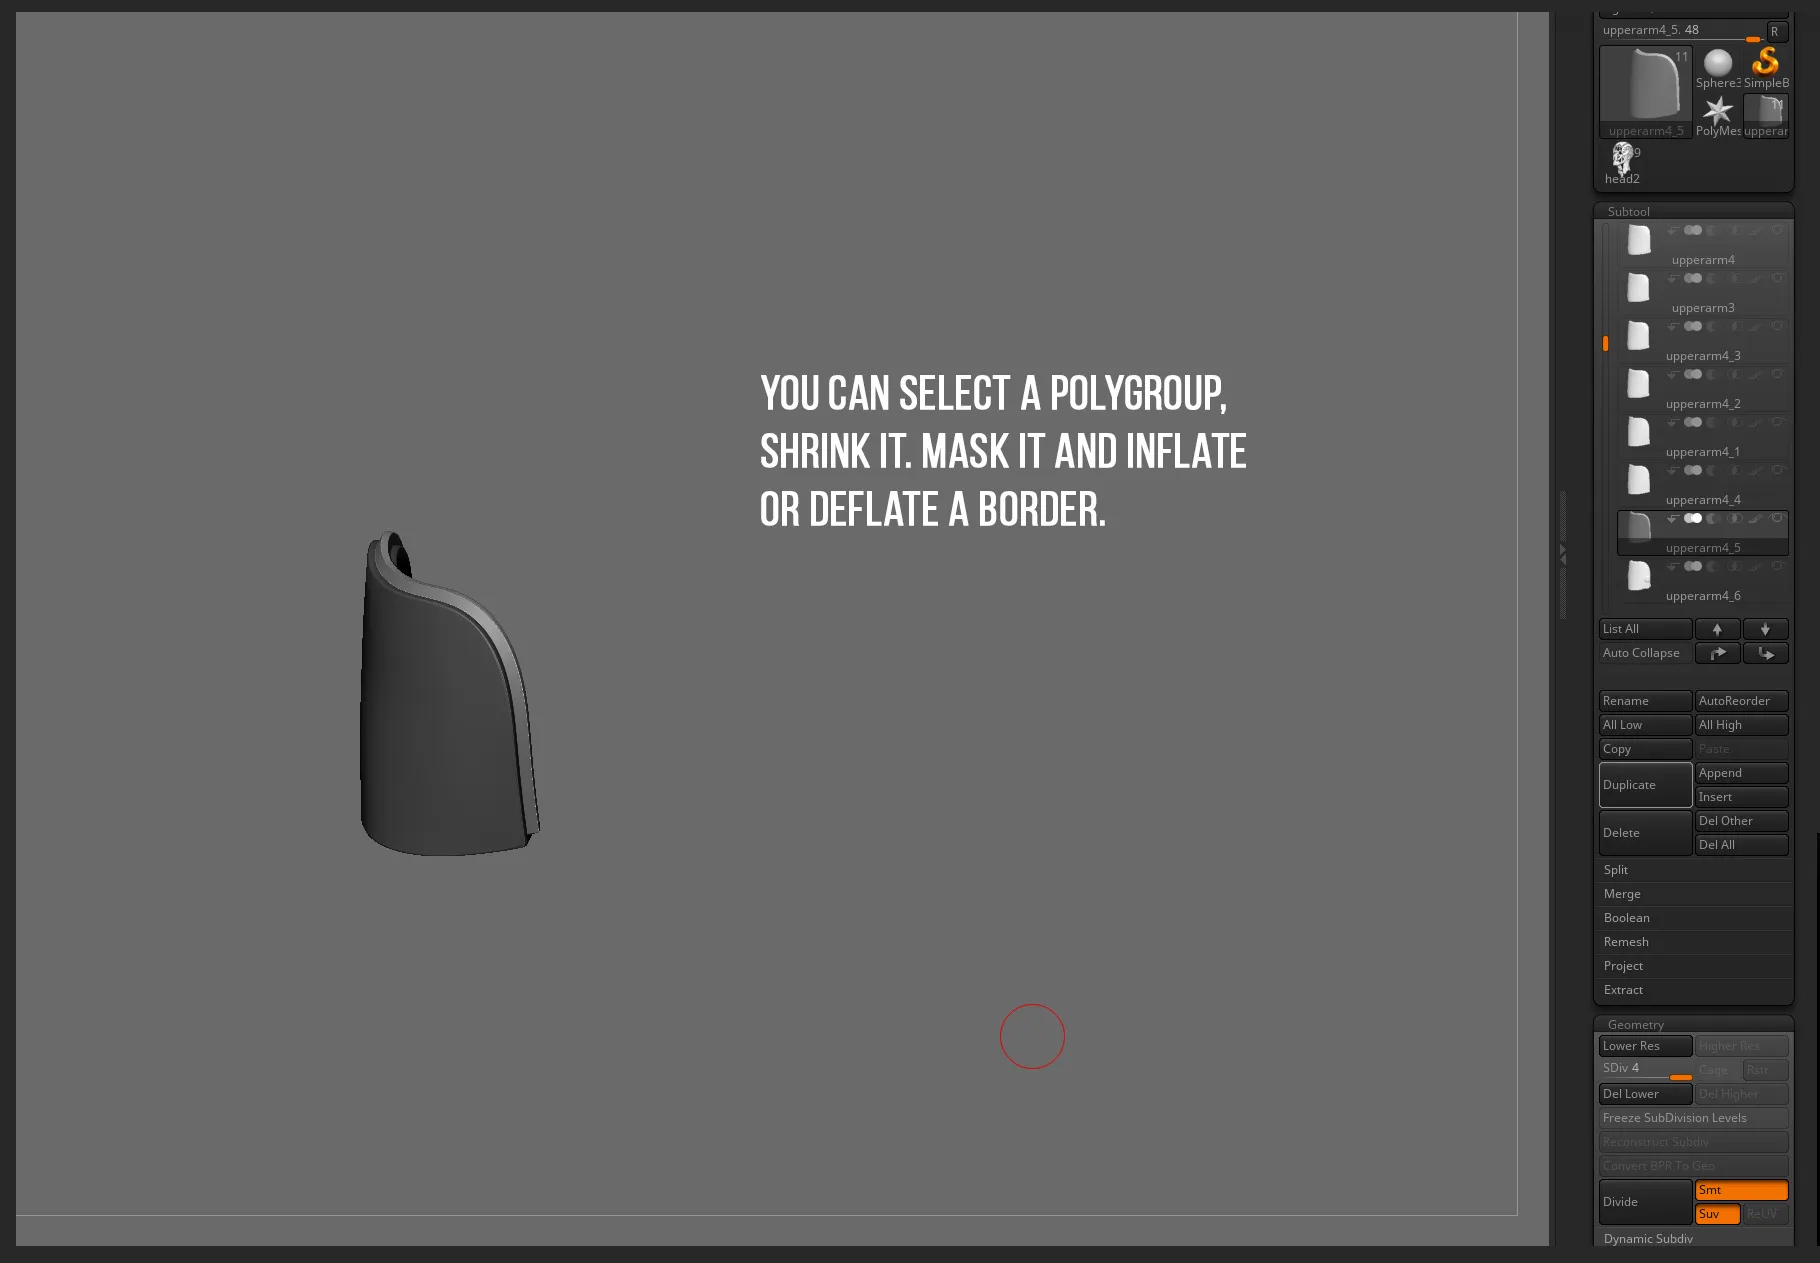
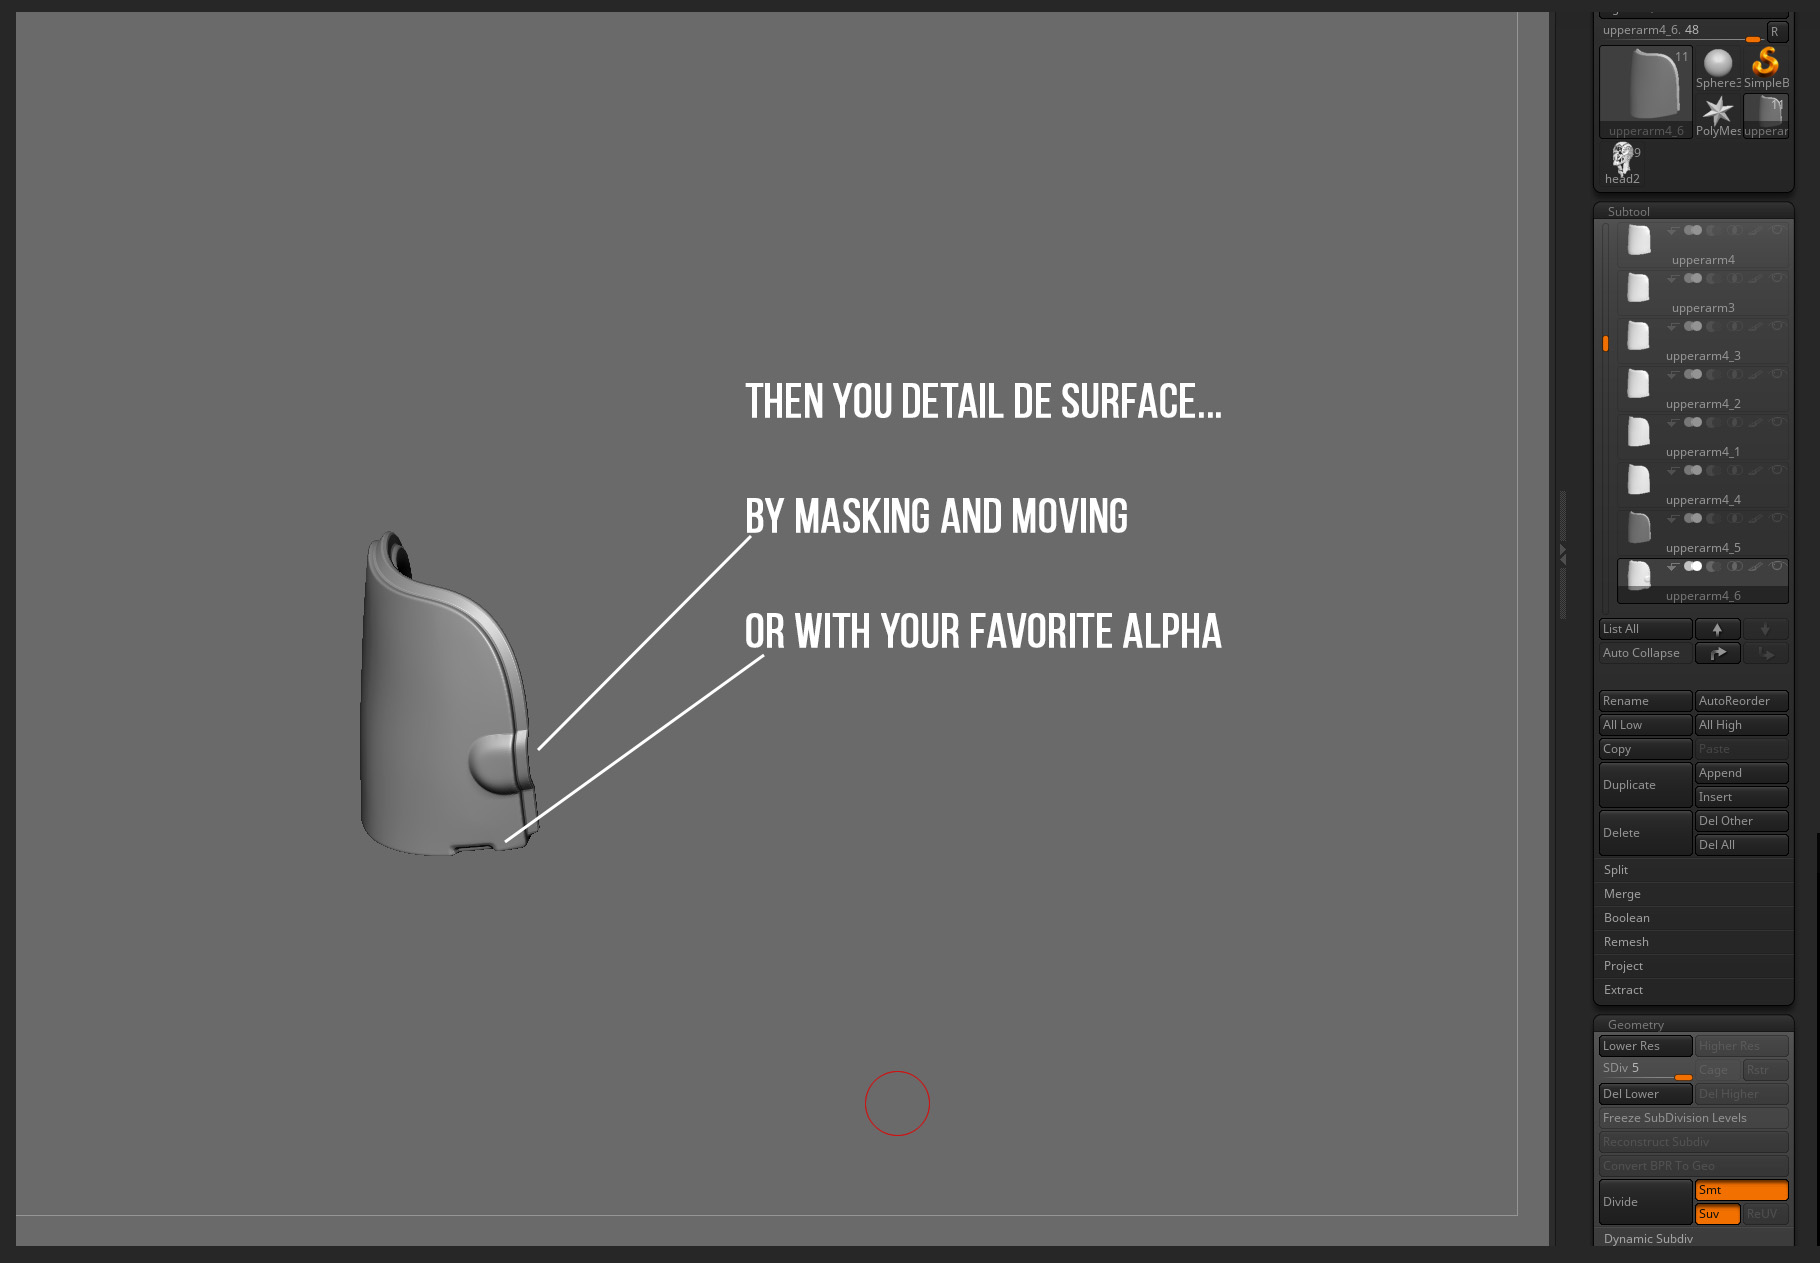
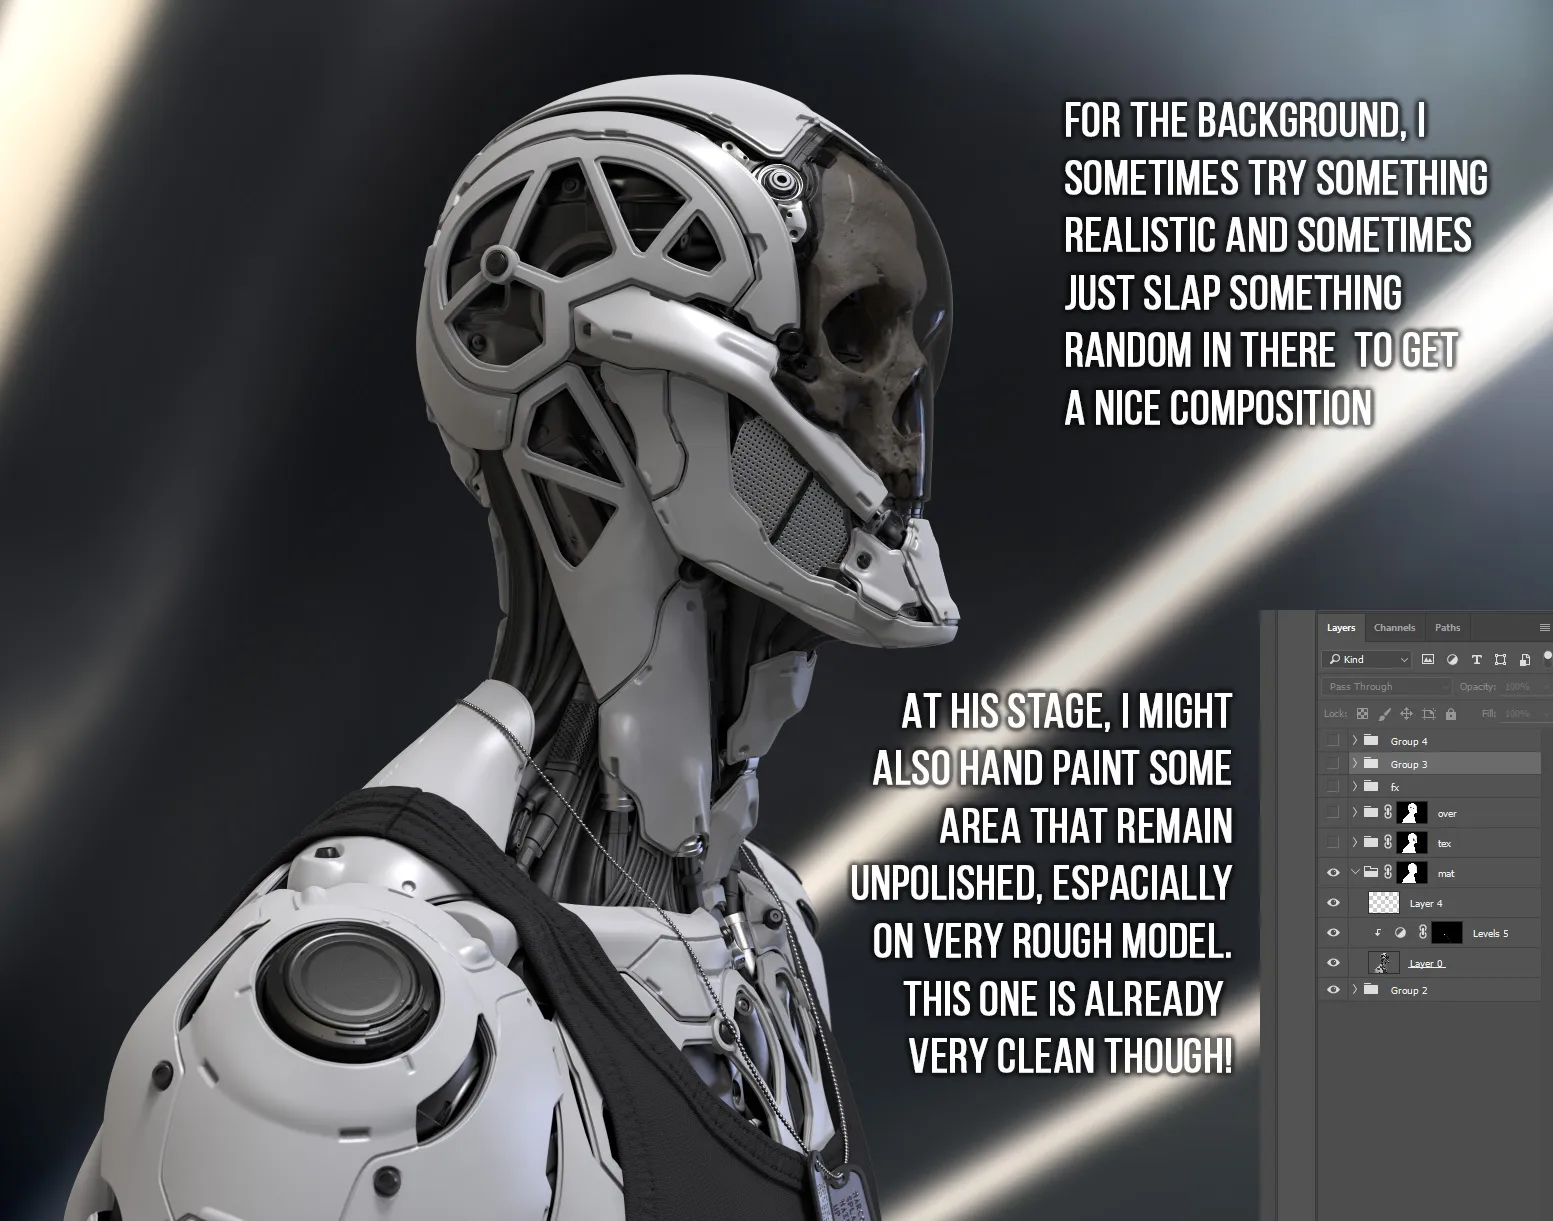
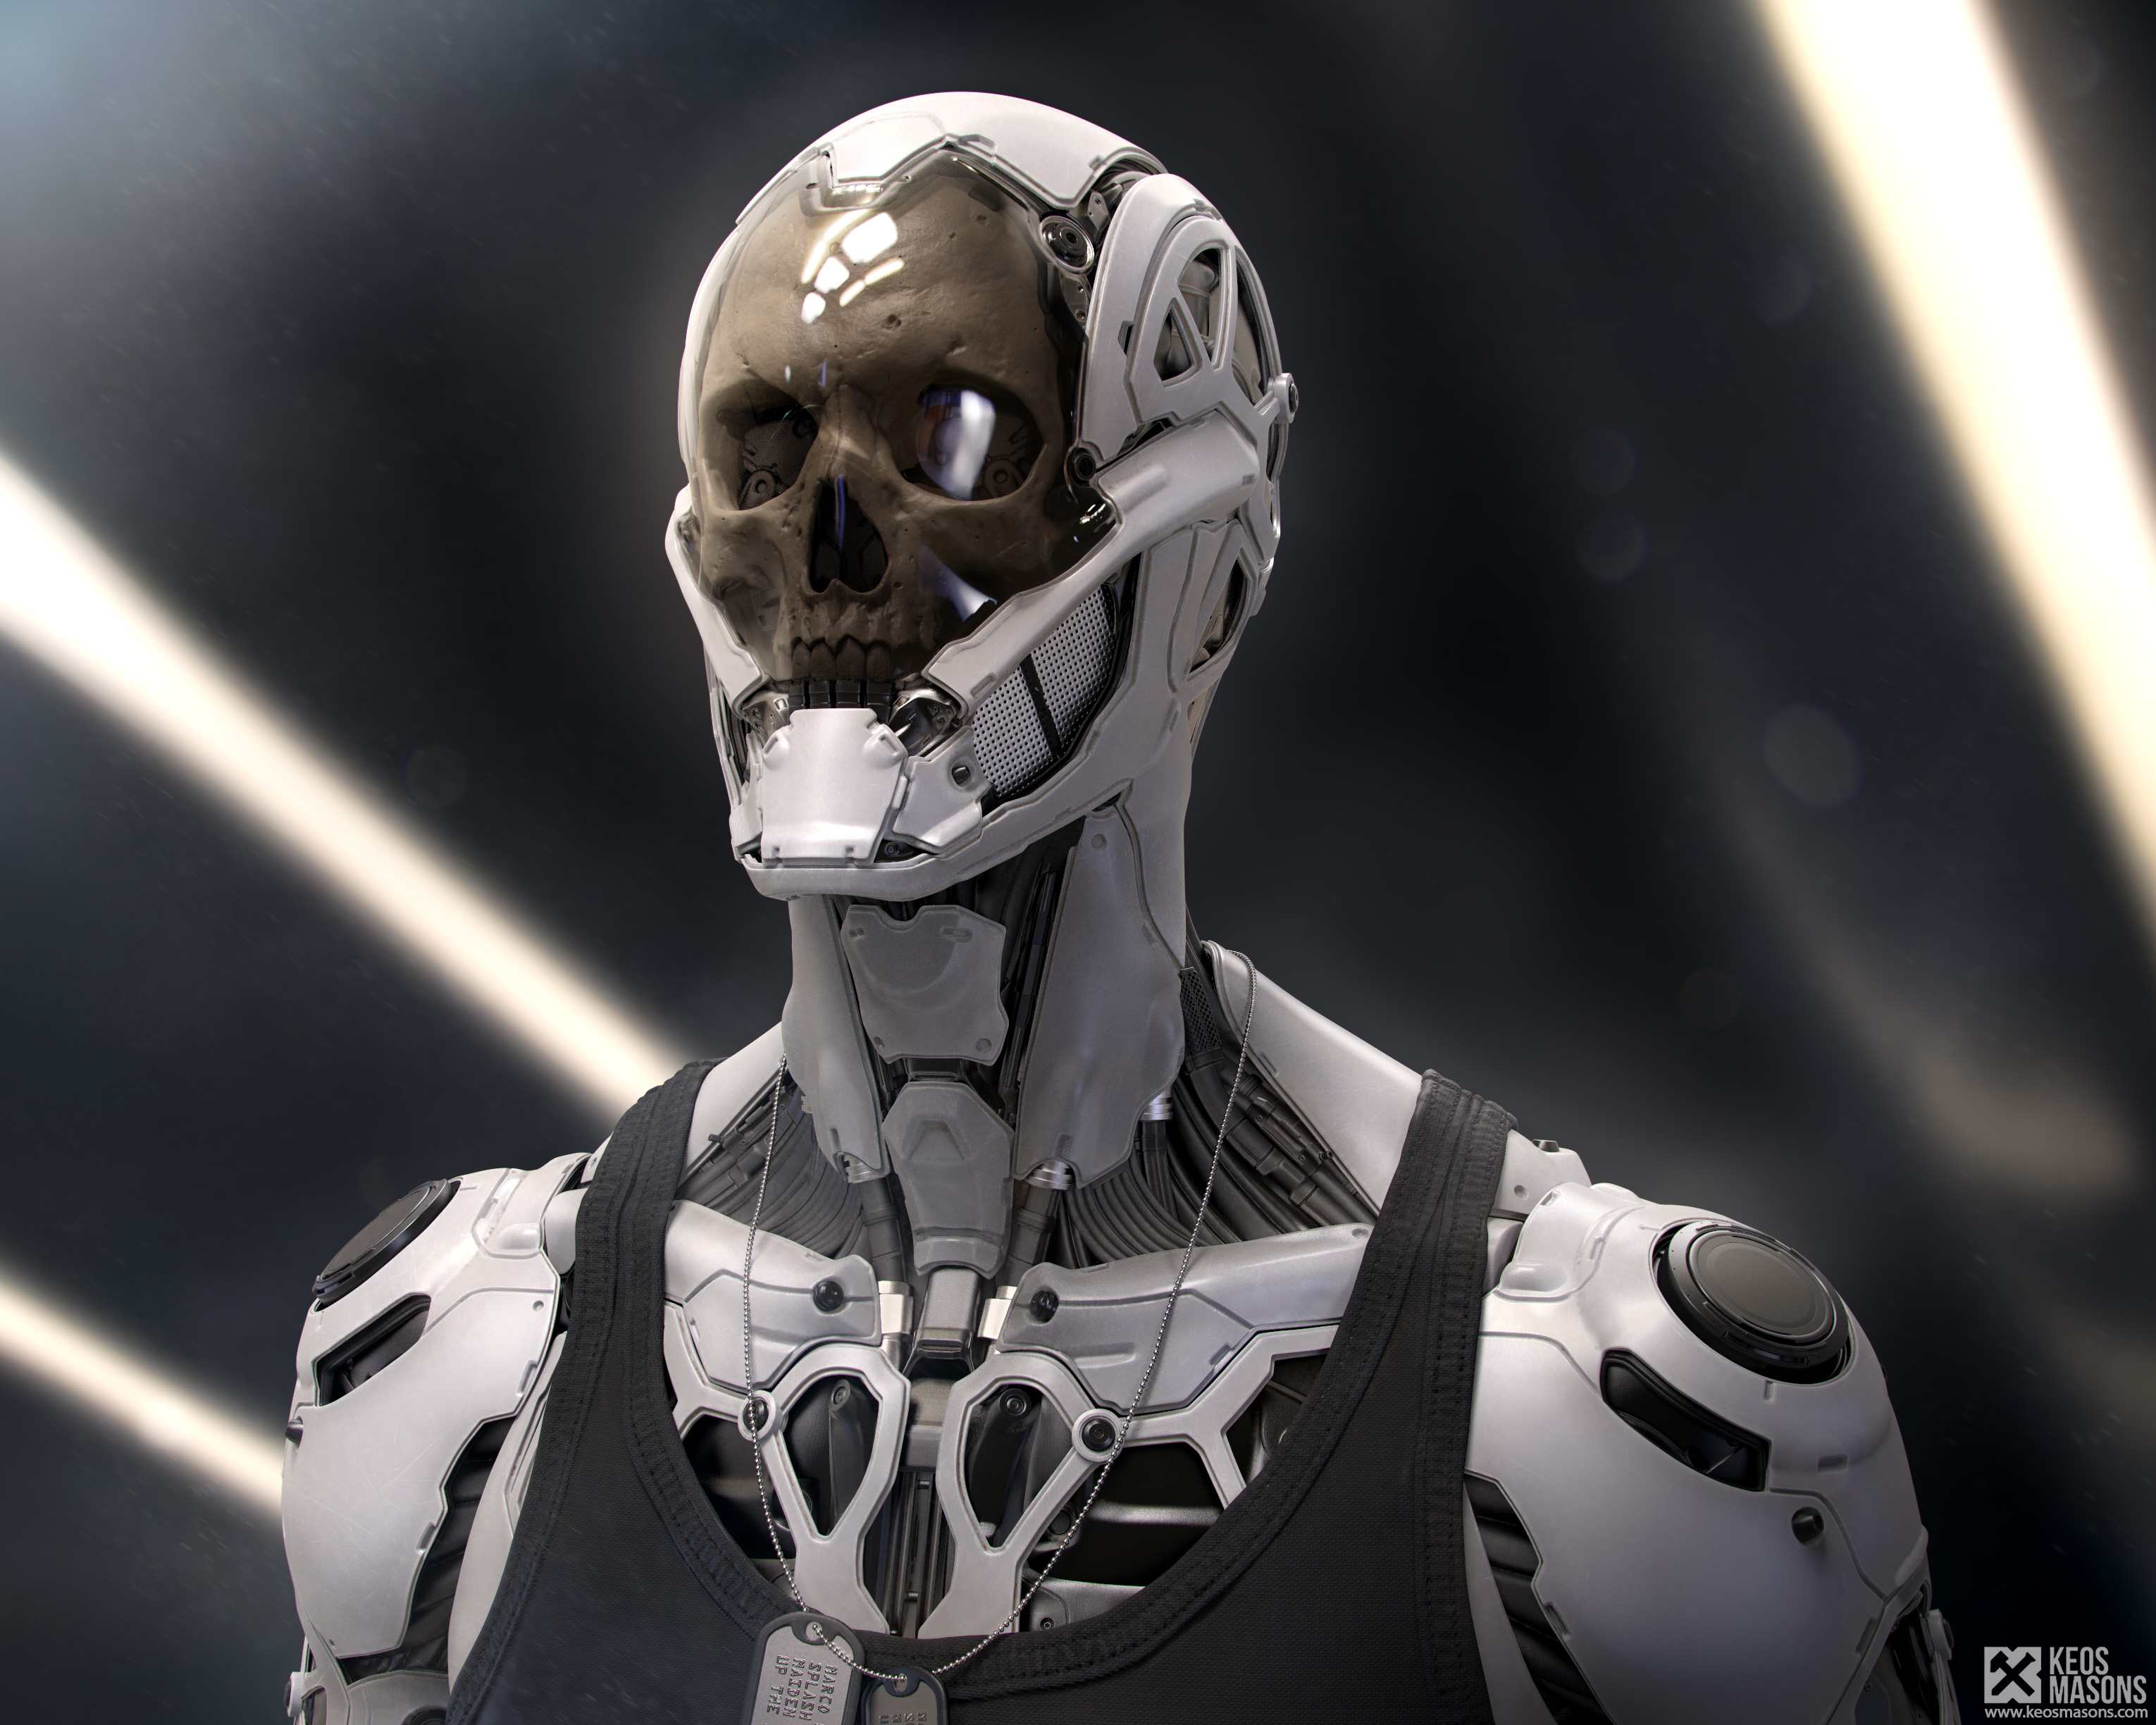
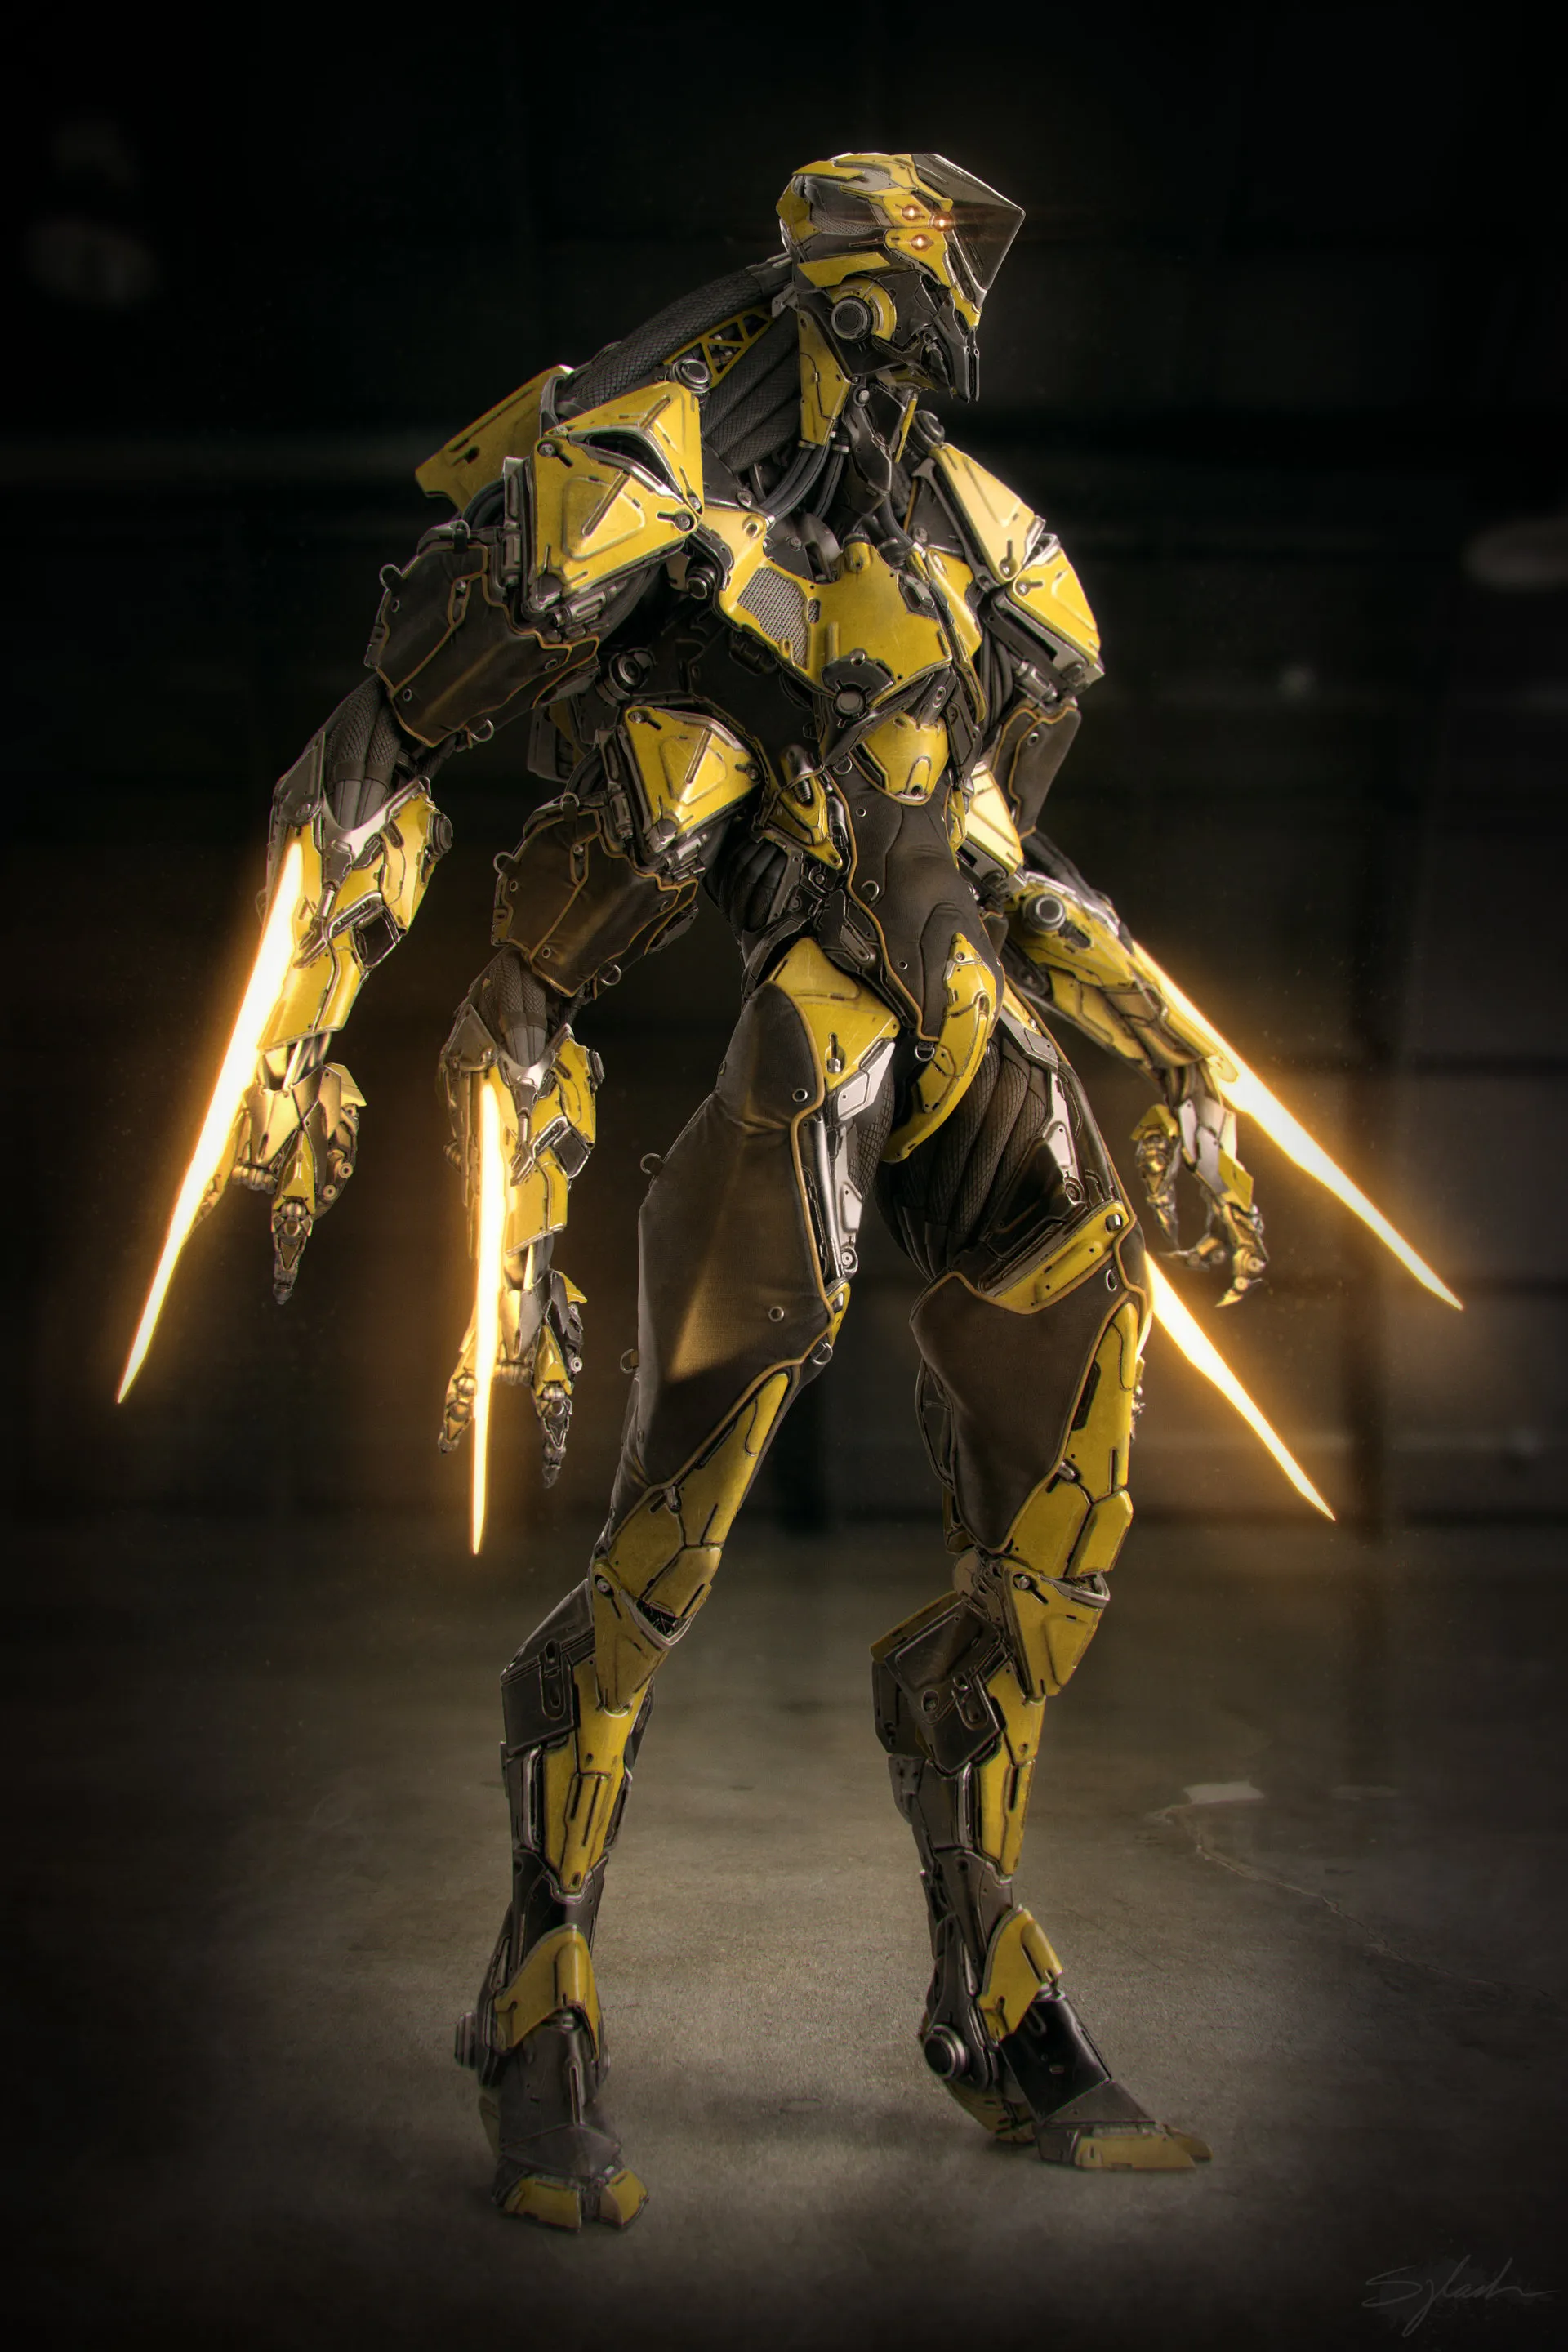
In the following images, I show a technique that represents the biggest part of my polishing process. I don’t always polish to this level, but it’s good to know the tricks when it’s time for a highly polished model. Otherwise, like Cedric’s mech, sculpting on one piece is another method and skill that is good to know.


 What was the primary inspiration for this piece?
Ced: I usually don’t look for specific inspiration before starting a new set of characters. I love the old blank page method. The reason is that I don’t want to be influenced too much by something on the side. I want to be as creative as possible and try to follow some fresh, new artistic avenues, especially in terms of shapes and silhouettes, which is the most important thing to me.
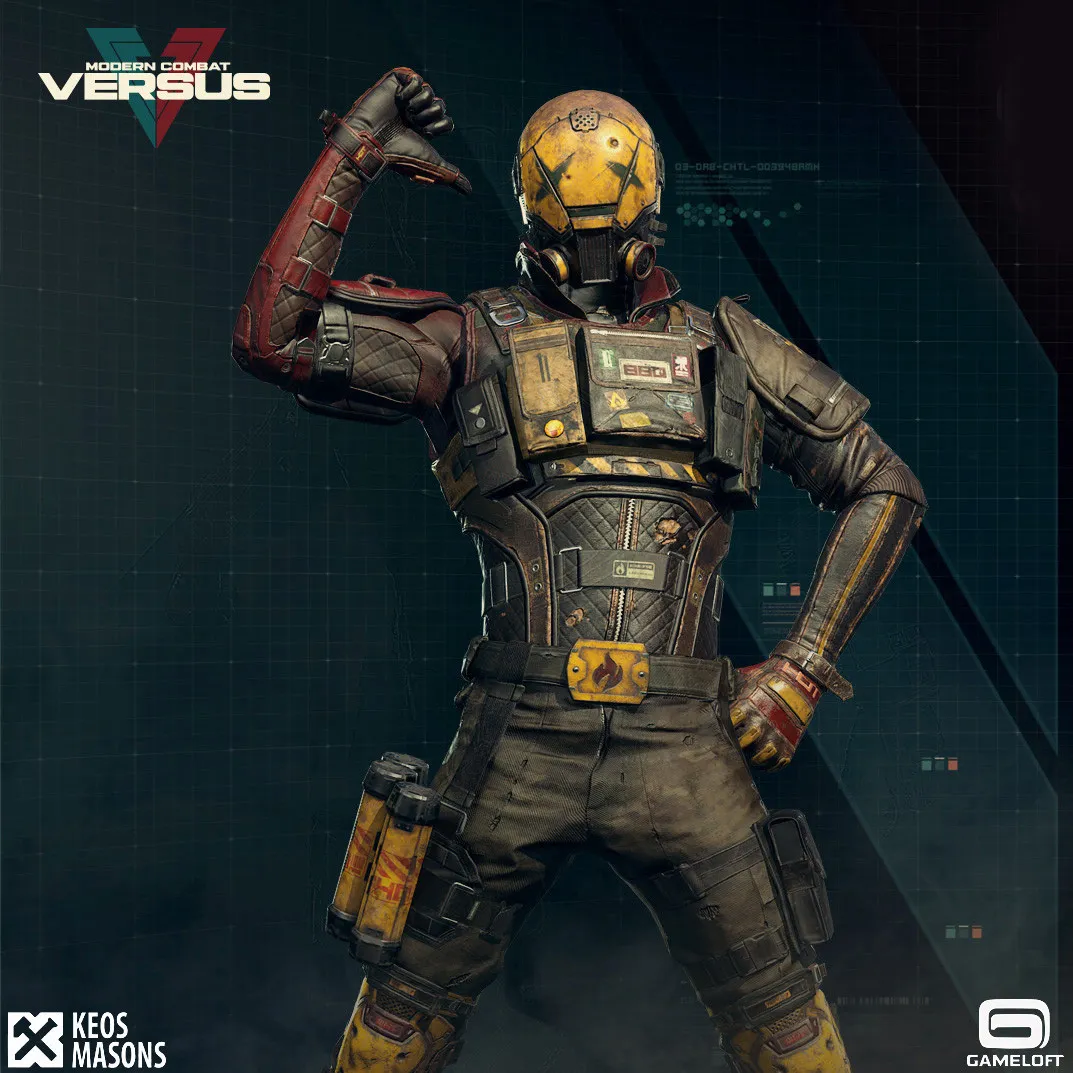
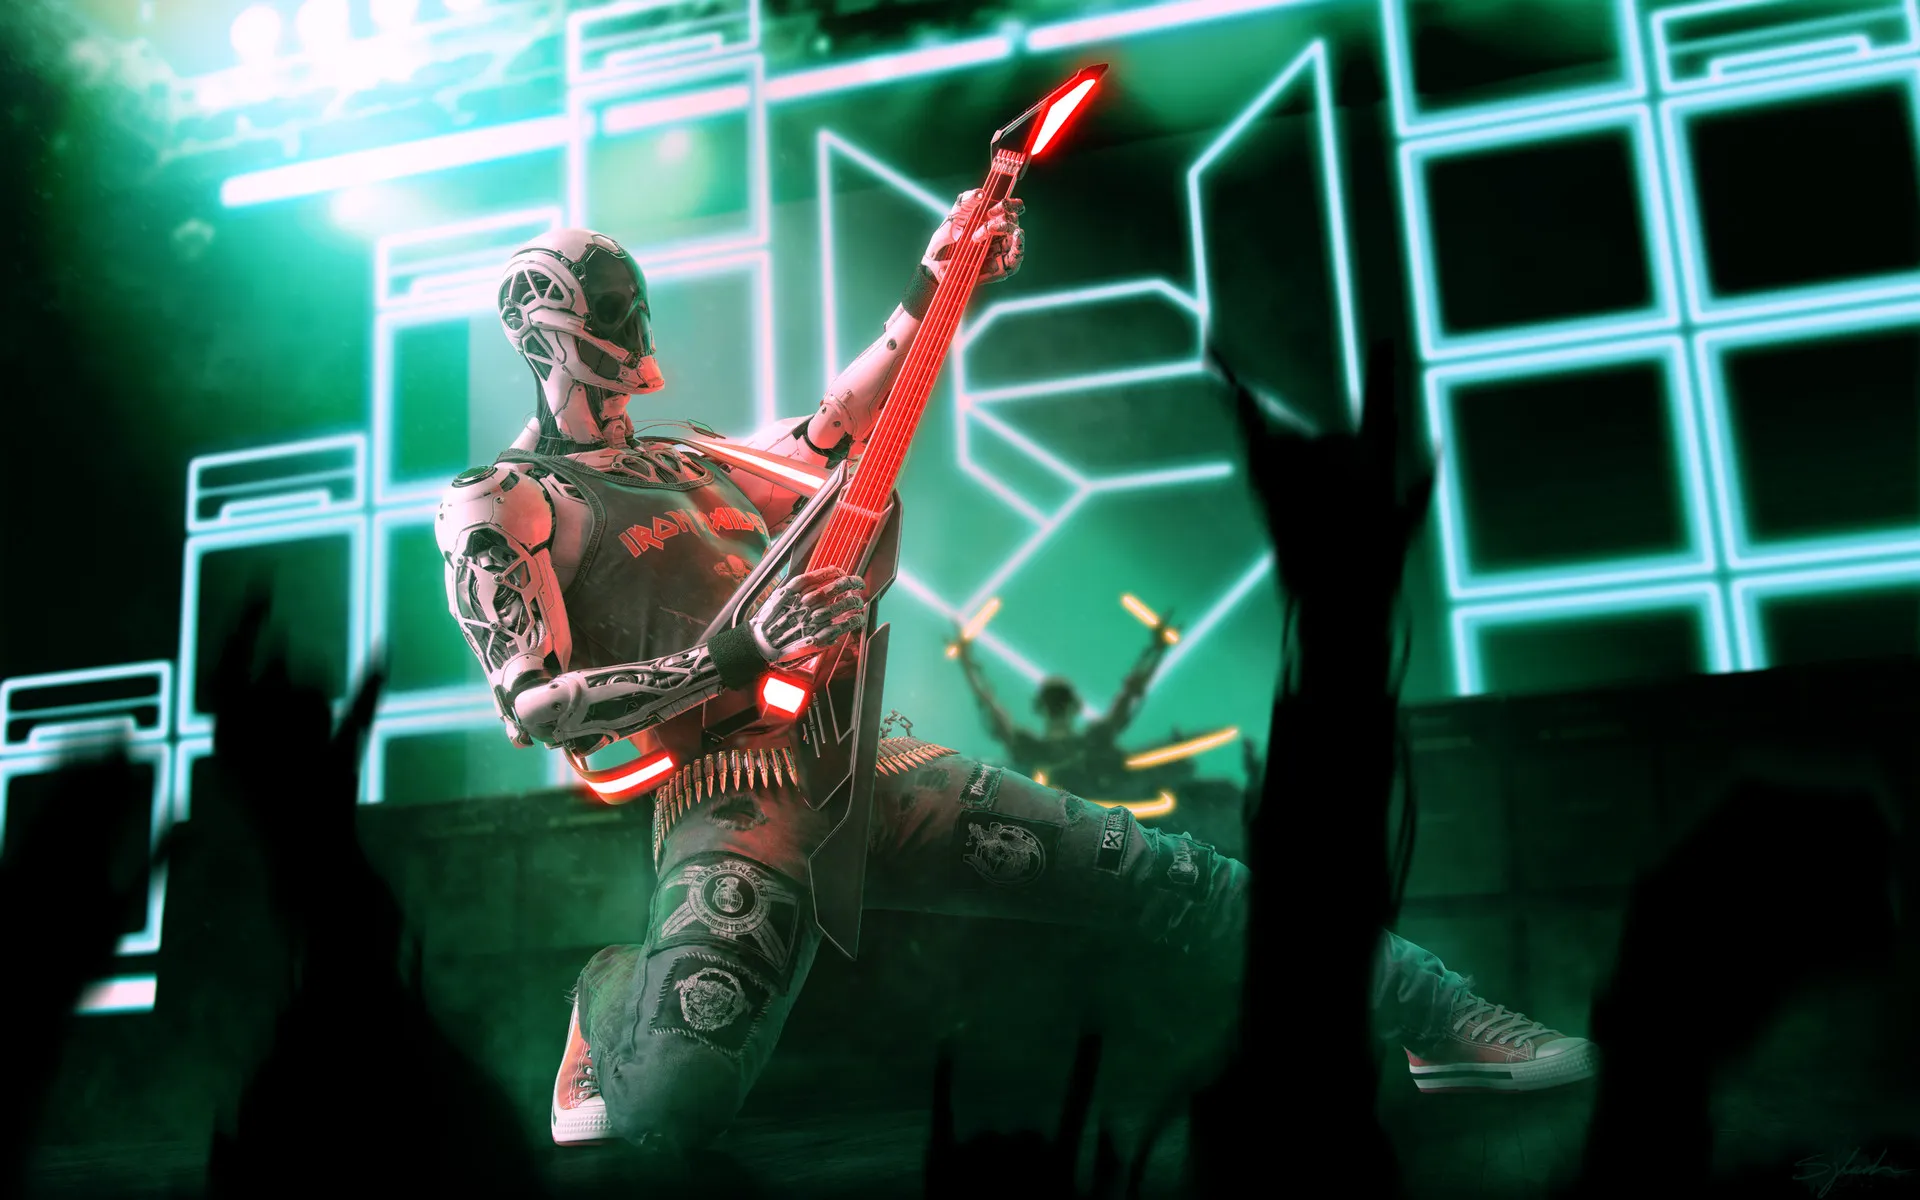
Marco: This piece was not about exploration or reinventing the wheel but just to have fun. I was listening to a ton of Iron Maiden at that time and I felt like doing a tribute to them but during the process I changed it a lot. In the end, it’s mainly a rocker robot from the year 3000 that likes to wear 80’s clothing. I love doing kitsch things like this!
Why do you use Zbrush as your tool of choice for sci-fi instead of Maya or 3DS Max?
Ced: ZBrush changed my life forever once I had it in my hand. It brought a totally new angle for concepting and assets production. It’s like playing with mud without any technical restraints. It became much more natural to play with curves and volumes, and the newly added “mechanical” features help to polish more quickly and with a high production quality.
For fine detail, “visual noise” and to speed up the workflow, we often use Vitaly Bulgarov IMM brushes, which are perfect!
Marco: As mentioned before, ZBrush and I have a love story. The first day I tried it, it responded perfectly to my sensibility as an artist who likes to draw. Basically, you have a shape, you put your pen on it and BOOM! it adds or removes volume. The thing that I love most about ZBrush is the speed in which you can create a shape and add details to it without much preparation needed. And if you are not convinced of your shape, you can easily change it or experiment quickly with it.
Being able to go left or right at any time gives me a sense of freedom that I have not found in other software. Tools like Dynamesh were a total game changer for me. With tools such as ZRemesh, PanelLoop and the IMMs, I’ve been able to stay in ZBrush and do my high poly meshes with ease. I almost never go out of ZBrush now, but I make sure to know all other software for when they come in handy!

For final texturing, did you use custom substance painter materials or were they from an external source/library?
Ced: I usually do my own. I plug some of the existing materials in a brand new custom smart material but I mix them all and change the values to get something unique and closer to the feeling that I wanted for the set of characters. The possibilities are so infinite in Substance Painter and at the same time it’s really easy, intuitive and quick to use.
Marco: Some clients have their own Smart Material which come in very handy for calibrating their reflection and albedo vis-a-vis their engine. If not, I make my own based on pre-existing Smart Materials. If you want to use Painter for concepts there are some good native Smart Materials you can slap on your model.
For a full production character in a video game, I recommend studying references of materials well and then taking some time to refine your textures. A bad texture job can destroy the work under it. I recommend looking for external libraries to help you, as long as you know how to make your own. Otherwise, you won’t master this art correctly. It’s actually the same as cloth or anatomy sculpting, make sure not to use Marvelous or 3D scans as a crutch. Make sure you know how to sculpt it from scratch. Otherwise, you are shooting yourself in the foot.
Was the high poly count a challenge to manage towards the end?
Ced: Not really, it almost became an invisible constraint. ZBrush is able to handle a huge amount of polys, same for most of the 3D packages like Max/Maya, Marmoset Toolbag and Substance Painter.
Marco: I never count it, but I always make sure to not exaggerate on the polycount if it is not necessary. Worst case scenario, just break up the models in different ZTLs and decimate each parts to be present in each ZTLs for visibility.
What kind of system/video card are you working with that may have made this easier?
Ced: Compared to what I use to deal with 20 years ago, it’s just completely different. Most of the time you don’t really need to worry about that. Machines now are much more powerful: last intel CPU, a very good Geforce Graphic Card, a lot of RAM and a pretty big Hard Disk, and you are good to go for a while.
Marco: I just got a new PC because I wanted to game with the graphics cranked up, but my 3 year old PC worked pretty well too and it wasn’t even considered all that good at the time. For ZBrush you only need CPU and some RAM and you can help yourself by breaking the model to make ZTLs. A good PC can help with Painter for sure, but even now I usually work in 2K maps and only go up to 4K when it’s time to play with fabric, details and etc.
What was the final render time?
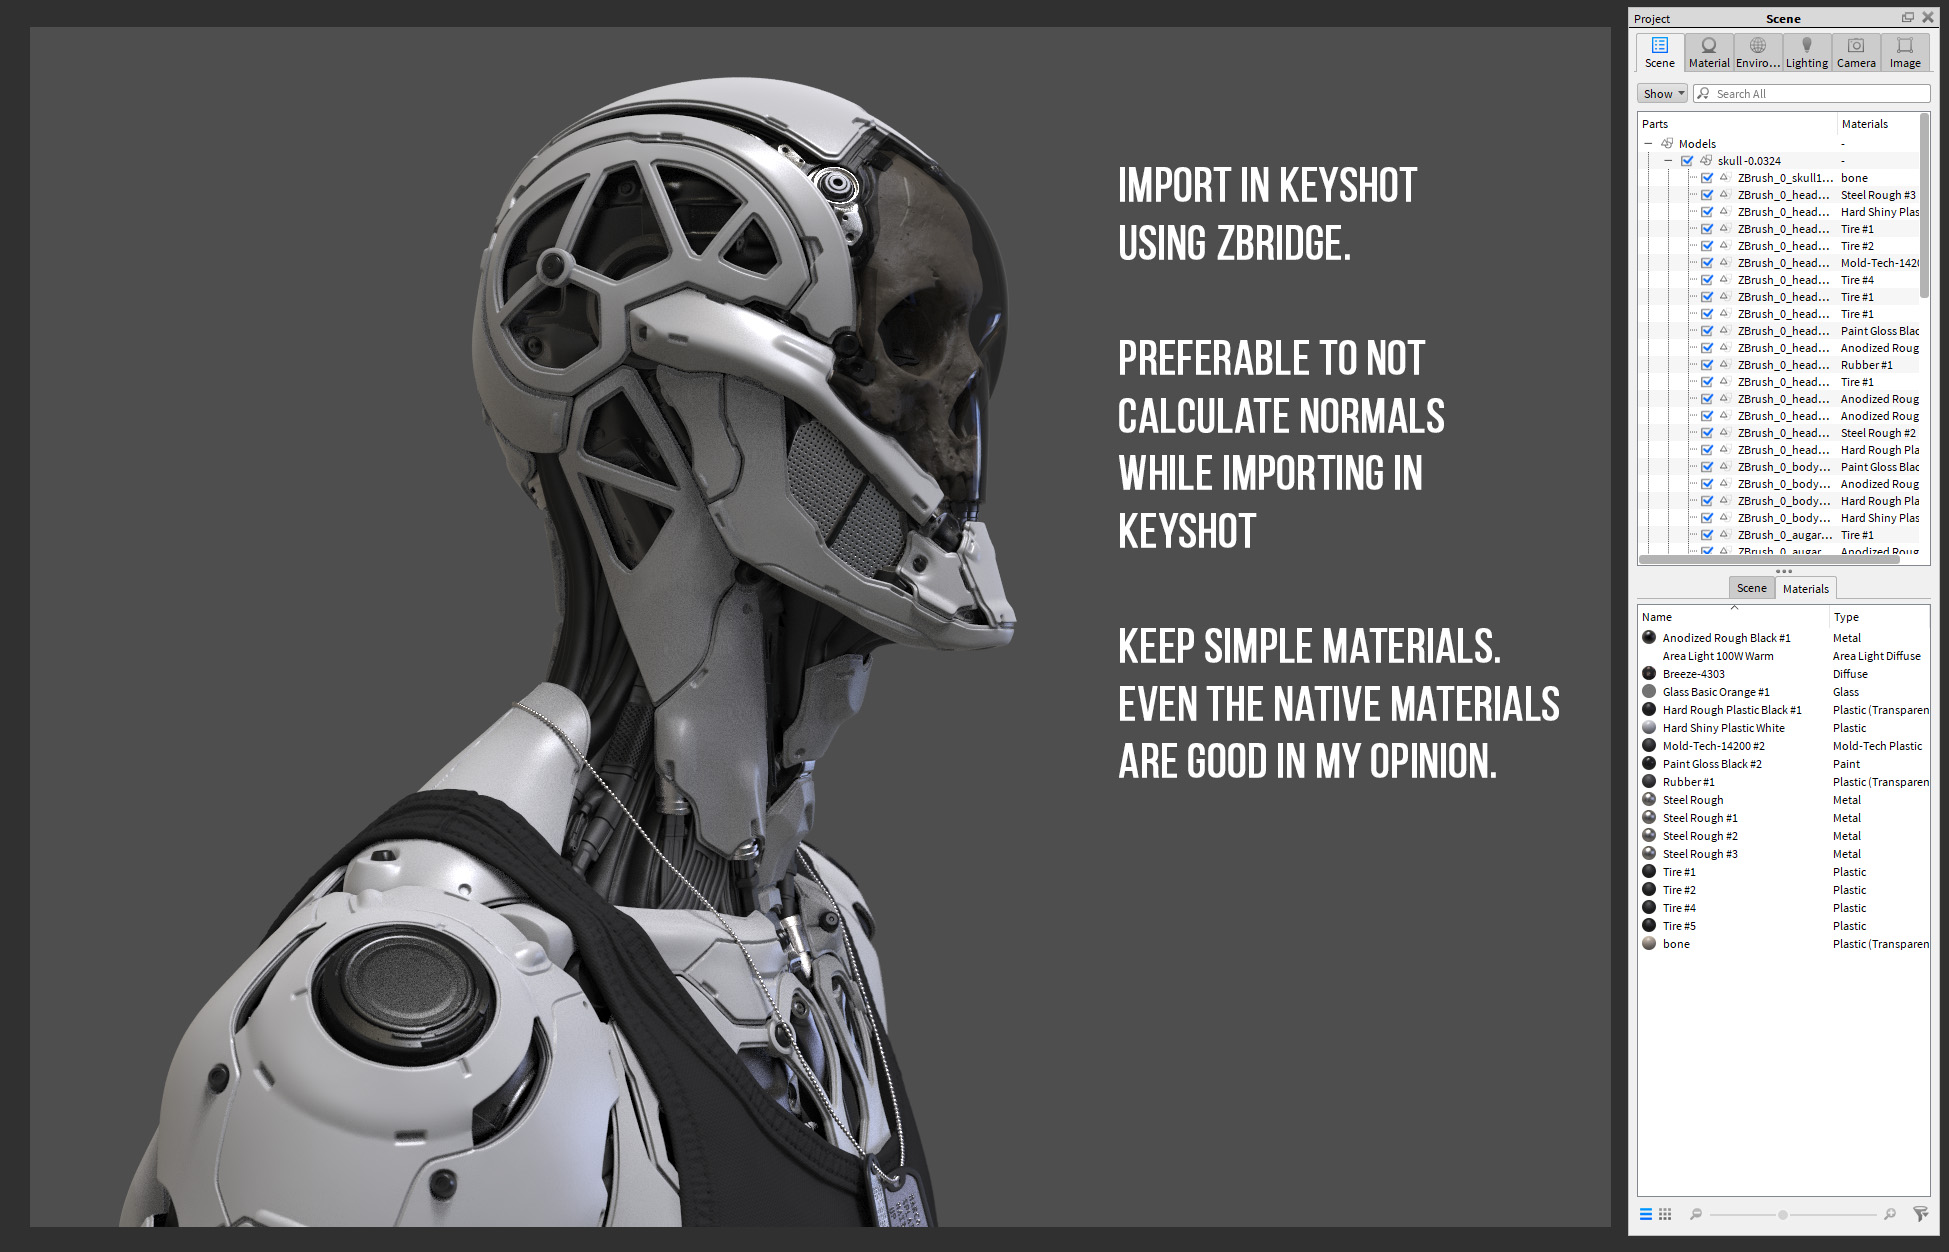
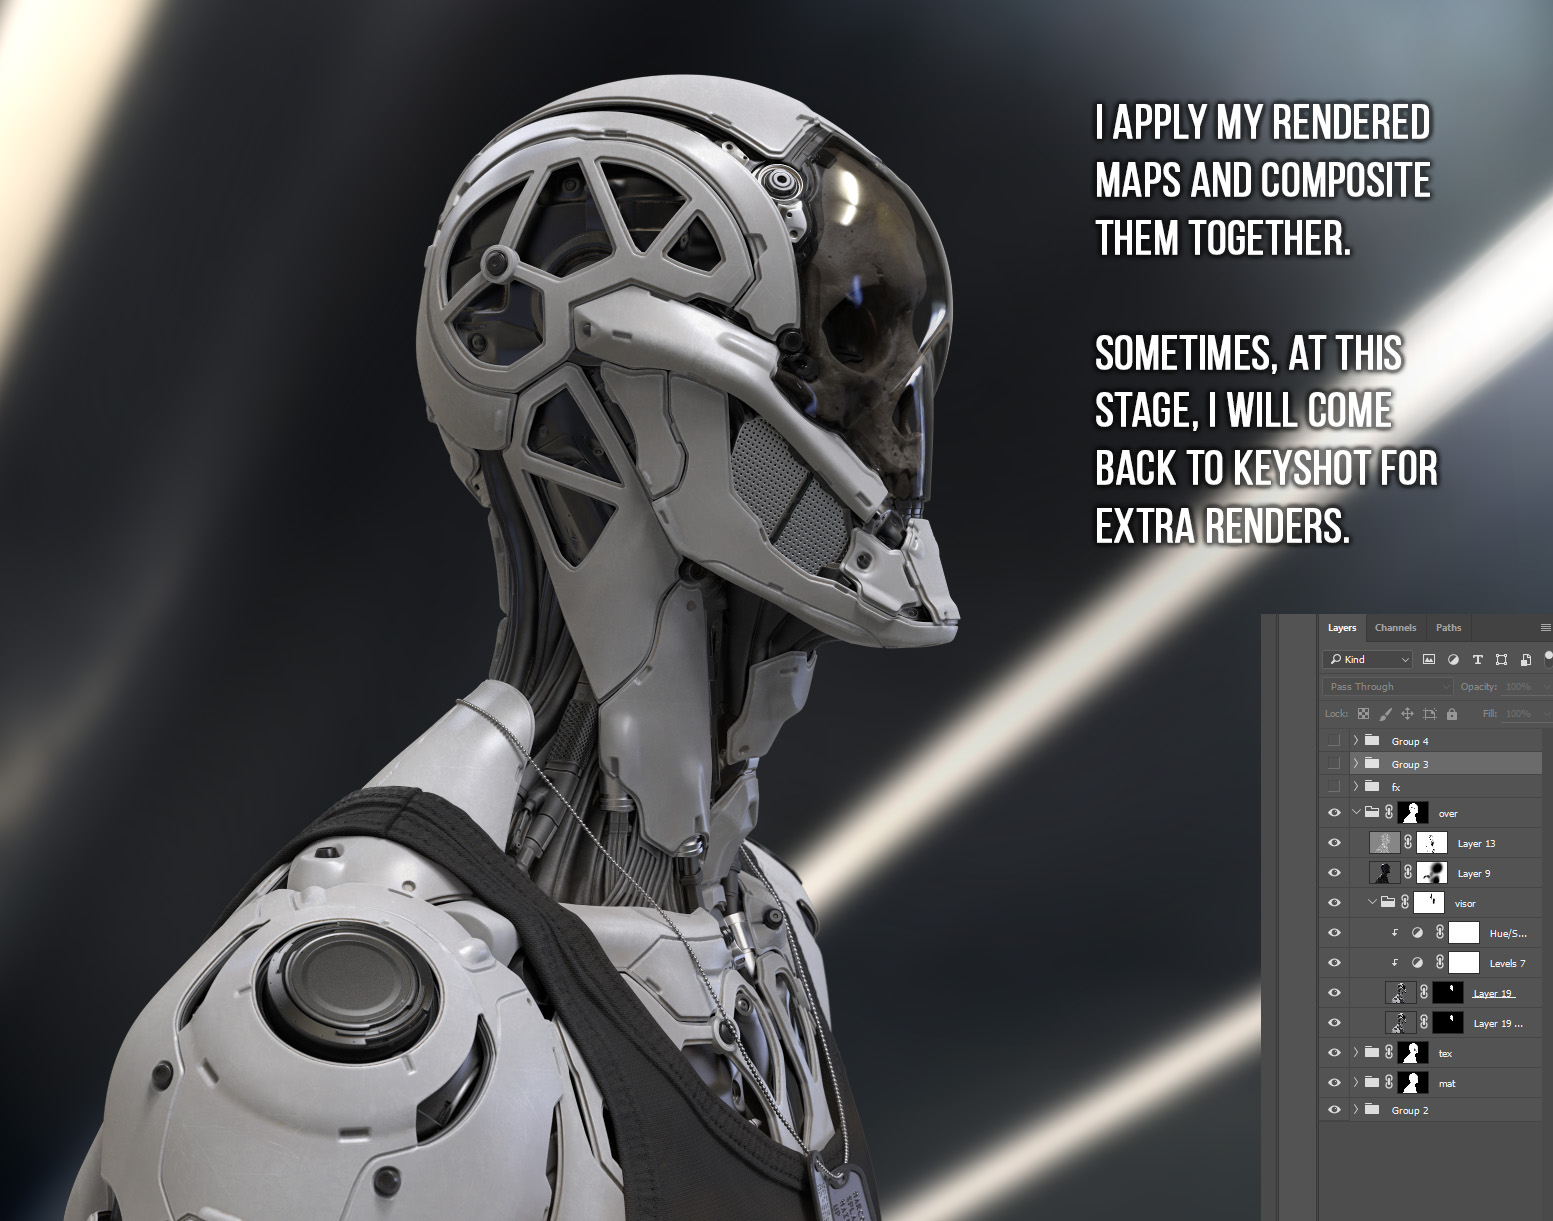
Ced: It’s pretty fast and it gets better and better. We usually use two different softwares to render our work: Keyshot and Marmoset Toolbag. We mostly use Keyshot when we want to provide something fast and efficient for concepting contracts. Keyshot is able to handle a huge amount of polygons and has a very intuitive and quick way to set up materials, environments, backgrounds and camera effects. It makes the process customizable, fun and is excellent for feedback and communication with clients.
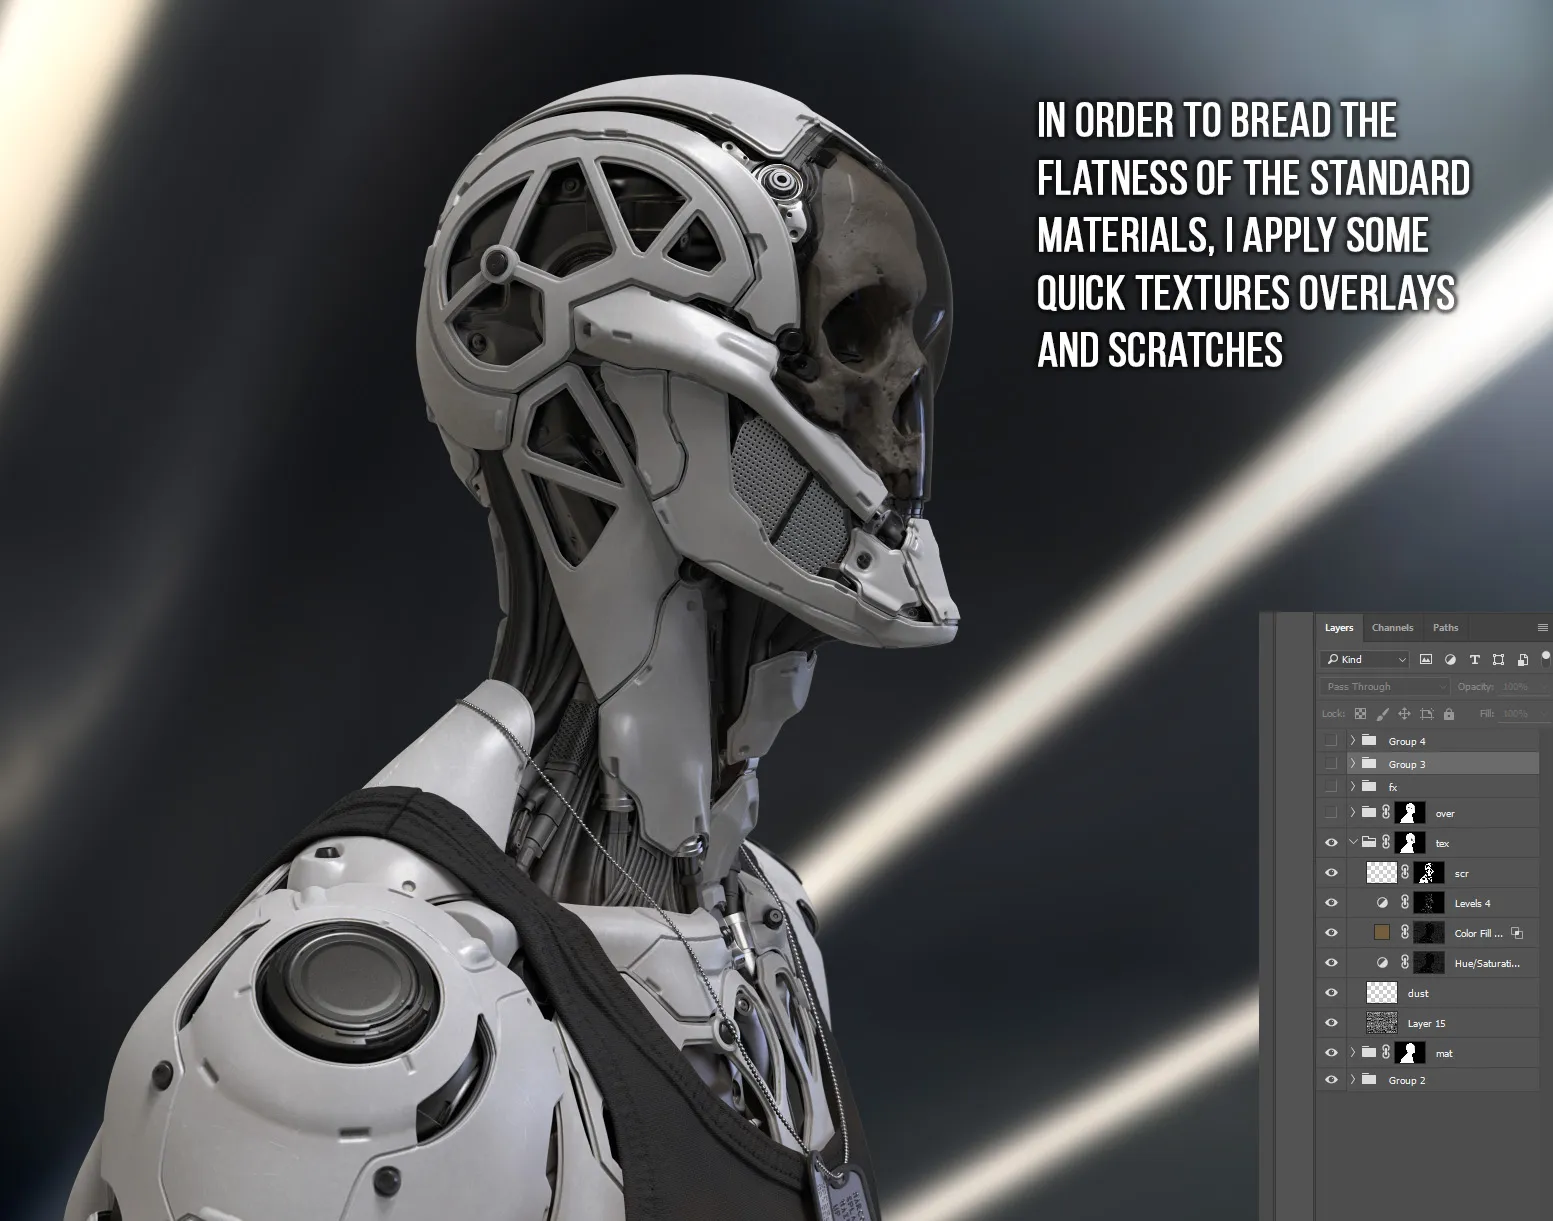
It’s approximately the same as with Marmoset Toolbag except that this one needs a little big longer to prepare the mesh, scene and texture, however you have the wonderful opportunity to show some good turnarounds and interactive modifications. Both techniques need a final tweaking in Photoshop for the last magical touches.
Marco: On my side, I mostly use Keyshot. For concept and sketches I render around 7 to 10 minutes each map, which represents from 2 to 4 extra maps usually, and I render them while I work in Photoshop, starting on post production and composition. For high resolution illustrations, I render at around 30 minutes and 1600 pixels. You’ll need to triple the render time if you want to render in 300 DPI though.
 References
Ced: I spend most of my time looking at artists and their artworks on Artstation. There is some great talent over there! I pick and keep tons of them every days to enrich my library and then I cry… Too much good artists in this world! I also enjoy Pinterest in terms of looking for some very interesting content, whatever the subject matter or style. Before working on an asset or contracted characters, I find it useful to gather all the similar references on a huge board that I keep on my second screen, this helps a lot to boost up production.
Marco: Like Cedric, I look at Artstation for motivation and Pinterest for concepts, or just Google for out-of-the-box inspiration. I try to not look at only one particular thing because, otherwise you might end up making it too similar. Variety is key! I usually try to have some references for the style, some for the shape, some for the materials, some for the props, some for the render. I think something really worth mentioning is to stay observant even if you are not sculpting. This curiosity makes everything around you a reference that you store in your mind for later.
Your detailed, hard surface tutorials have already become legendary within the sci-fi art community. What can you tell us about the new one you are working on that will include detailed audio instructions for newcomers to the subject matter?
Ced: It’s coming and it’s going to be pretty cool!
Marco: It’s important to note that since everyone learns differently, and in order to reach out to more people, we are preparing a different method for the next one. Our last one was a silent full-length tutorial whereas now it will be a shorter one and with audio.
![]()